/admin` to complete configurations.
### [#](https://devdocs.bagisto.com/2.3/performance/loadbalancing.html#create-ami-for-bagisto-application) Create AMI for Bagisto Application
#### [#](https://devdocs.bagisto.com/2.3/performance/loadbalancing.html#create-ami-from-bagisto-ec2-instance) Create AMI from Bagisto EC2 Instance
- Go to **Instances > Actions > Image and templates > Create Image**.
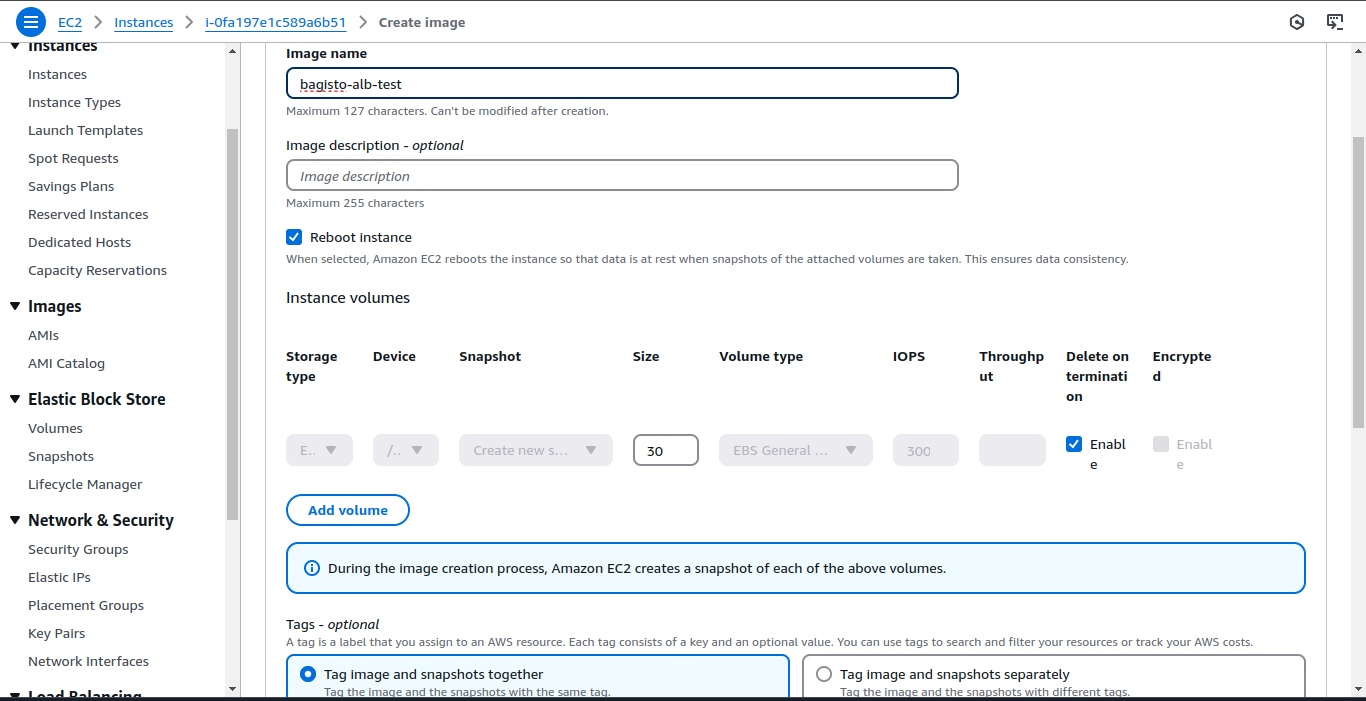
- Enter the image name and click **Create Image**.
#### [#](https://devdocs.bagisto.com/2.3/performance/loadbalancing.html#wait-for-ami-to-be-available) Wait for AMI to Be Available
- Monitor the status of the AMI in the AMI section.
#### [#](https://devdocs.bagisto.com/2.3/performance/loadbalancing.html#launch-instances-from-ami) Launch Instances from AMI
- Once the AMI is available, go to AMIs and launch as many instances as required in the target group.
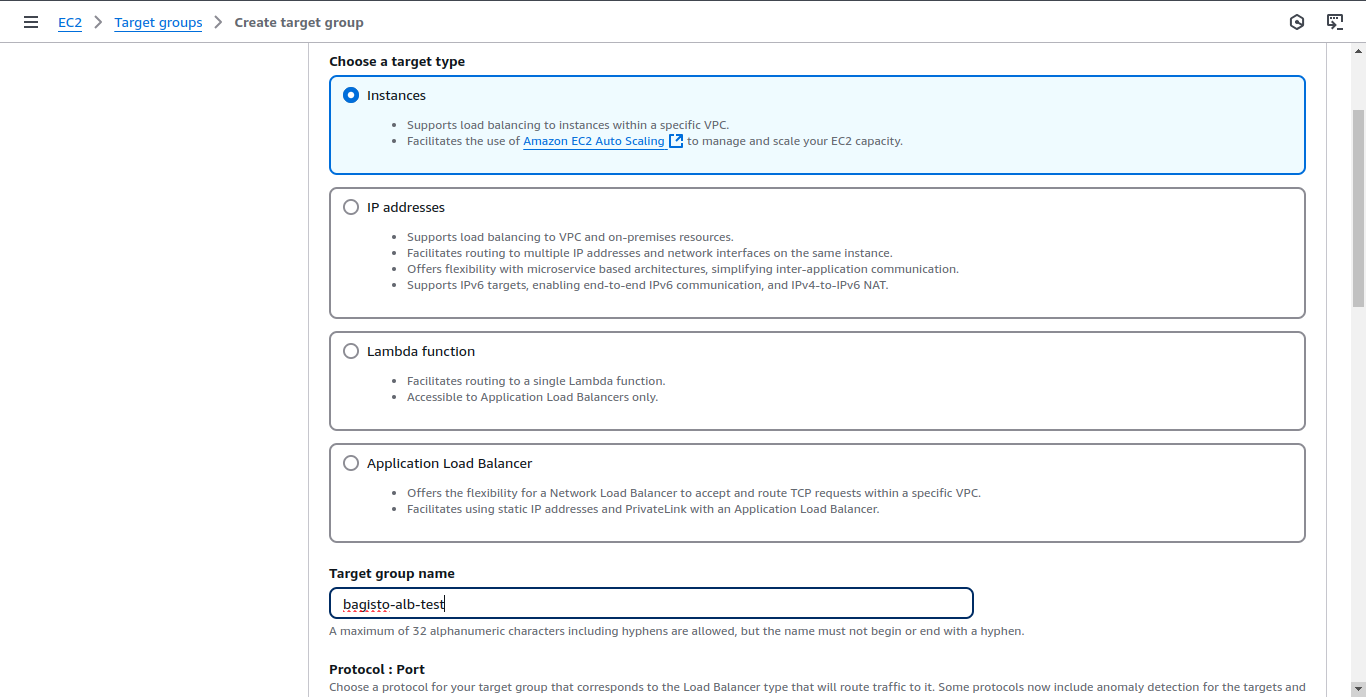
### [#](https://devdocs.bagisto.com/2.3/performance/loadbalancing.html#configure-target-group) Configure Target Group
#### [#](https://devdocs.bagisto.com/2.3/performance/loadbalancing.html#create-target-group) Create Target Group
- Go to Target Groups and click Create Target Group.
- Choose Instances as the target type and give it a name.
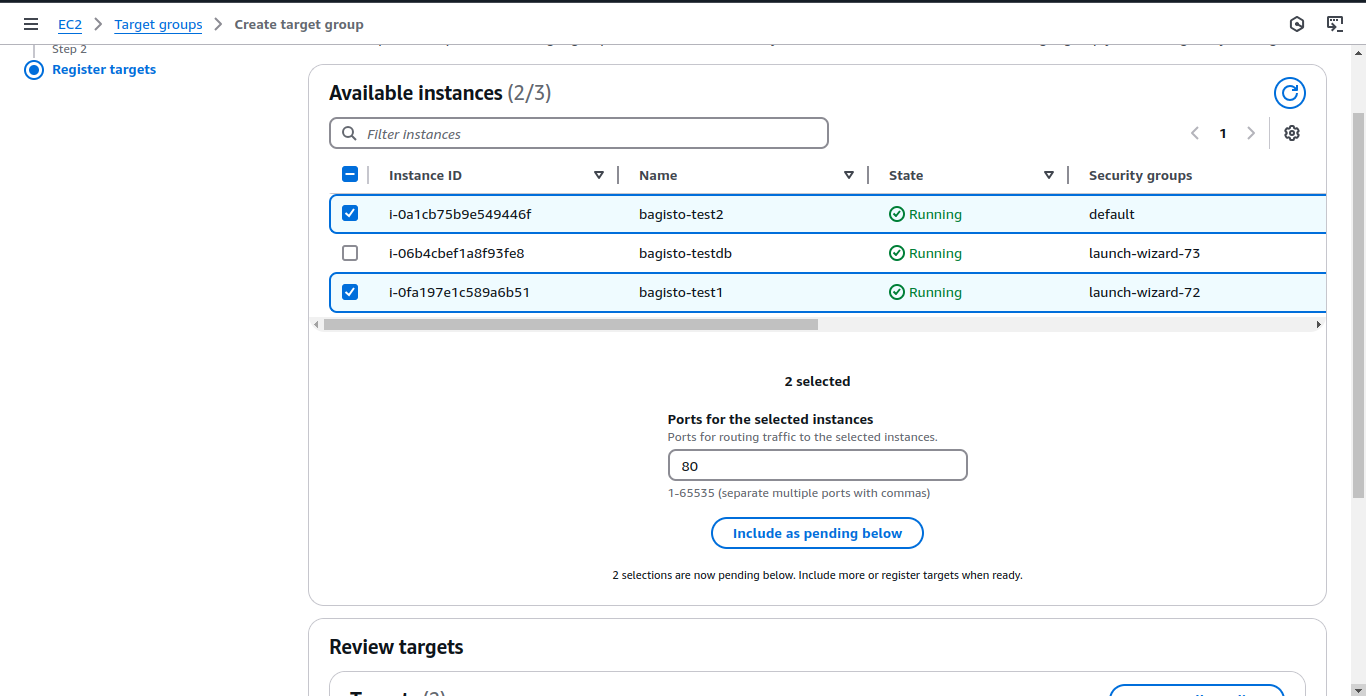
#### [#](https://devdocs.bagisto.com/2.3/performance/loadbalancing.html#register-instances-in-the-target-group) Register Instances in the Target Group
- Choose the instances to be added to the target group
#### [#](https://devdocs.bagisto.com/2.3/performance/loadbalancing.html#configure-load-balancing-algorithm) Configure Load Balancing Algorithm
- After creating the target group, go to Attributes and choose the desired load-balancing algorithm (default: round-robin). Enable stickiness.
### [#](https://devdocs.bagisto.com/2.3/performance/loadbalancing.html#create-and-configure-application-load-balancer-alb) Create and Configure Application Load Balancer (ALB)
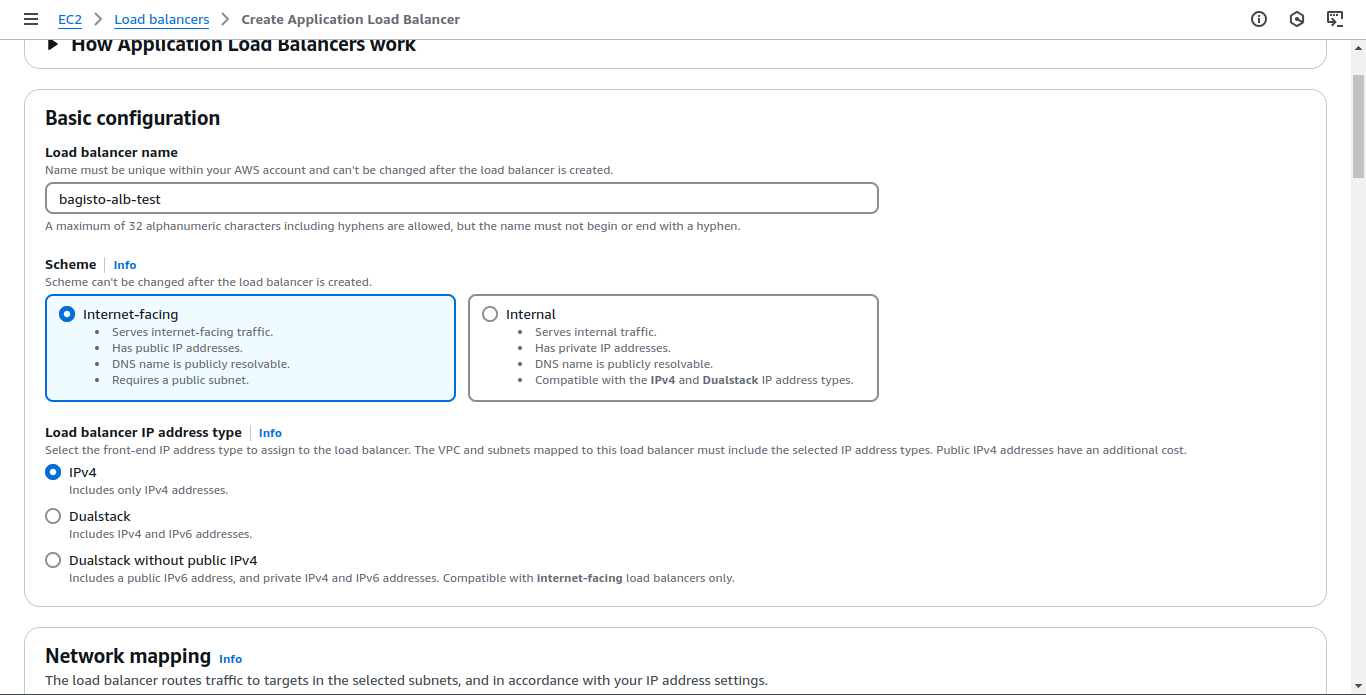
#### [#](https://devdocs.bagisto.com/2.3/performance/loadbalancing.html#create-alb) Create ALB
- Go to **Load Balancers** and click **Create Load Balancer**.
- Choose **Application Load Balancer** and provide the following configurations:
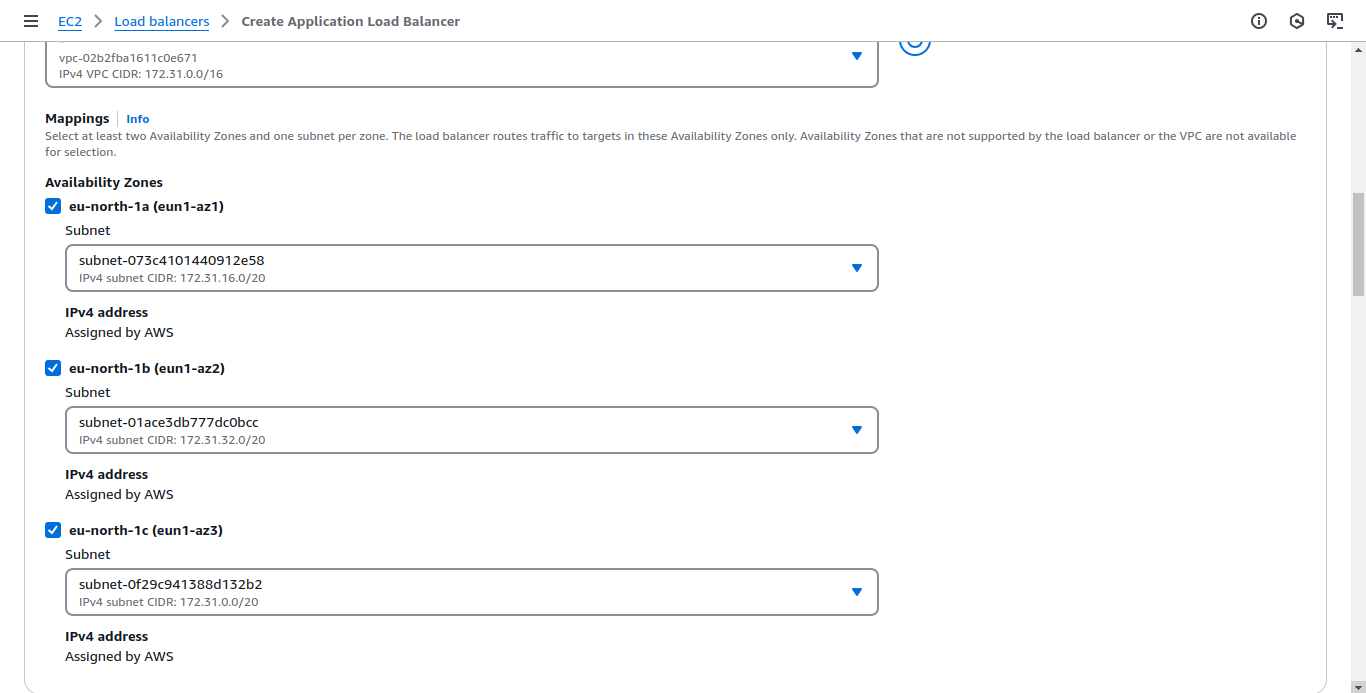
- **Internet-facing**.
- Select all **Availability Zones**.
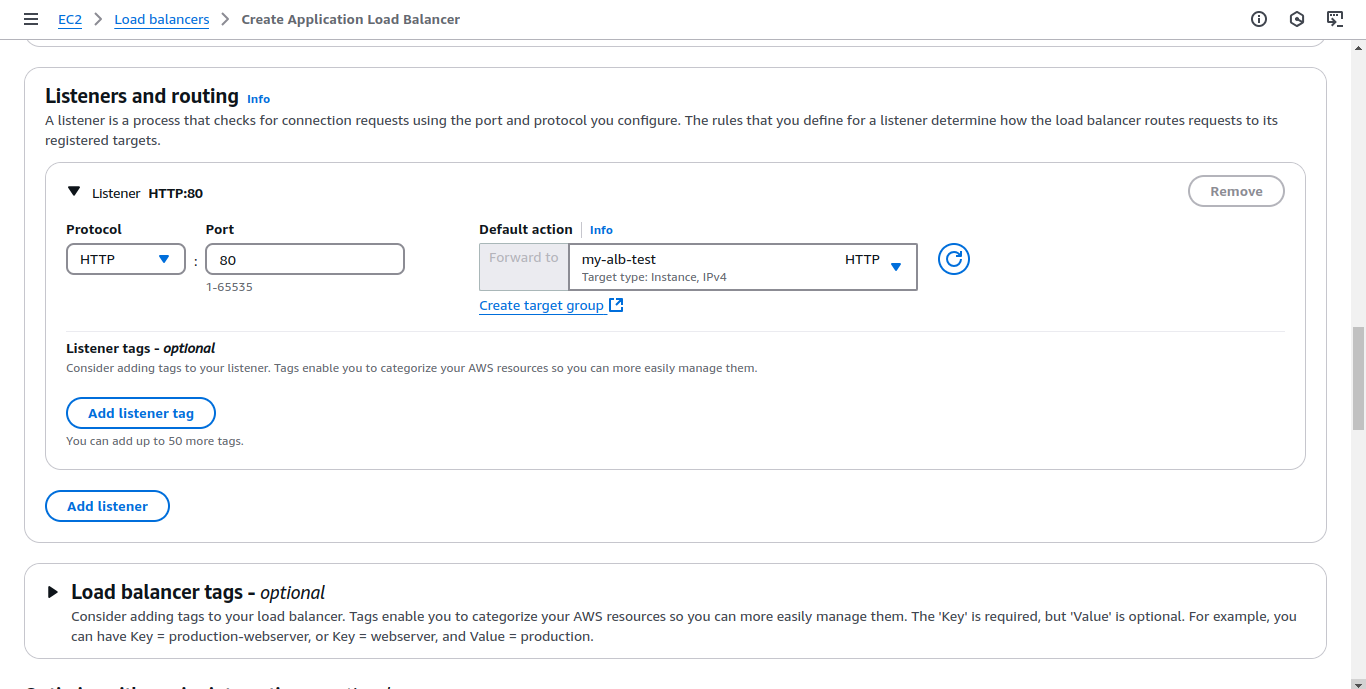
- Choose the target group created earlier and configure the listener on **port 80 (HTTP)**.
#### [#](https://devdocs.bagisto.com/2.3/performance/loadbalancing.html#adjust-security-groups) Adjust Security Groups
- Modify the security groups to allow necessary traffic (e.g., HTTP/HTTPS).
#### [#](https://devdocs.bagisto.com/2.3/performance/loadbalancing.html#verify-load-balancer-configuration) Verify Load Balancer Configuration
- Copy the **DNS name** of the load balancer and verify it.
- Configure the **domain name** (CNAME) to point to this load balancer DNS for production use.
#### [#](https://devdocs.bagisto.com/2.3/performance/loadbalancing.html#set-up-ssl-on-load-balancer) Set Up SSL on Load Balancer
- Configure the ALB listener to use HTTPS (port 443), ensuring that an SSL certificate is installed.
### [#](https://devdocs.bagisto.com/2.3/performance/loadbalancing.html#verify-and-test-the-entire-setup) Verify and Test the Entire Setup
#### [#](https://devdocs.bagisto.com/2.3/performance/loadbalancing.html#test-load-balancer) Test Load Balancer
- Confirm that the load balancer is distributing traffic across the registered instances.
#### [#](https://devdocs.bagisto.com/2.3/performance/loadbalancing.html#verify-domain-configuration) Verify Domain Configuration
- Ensure the domain is resolving correctly to the load balancer.
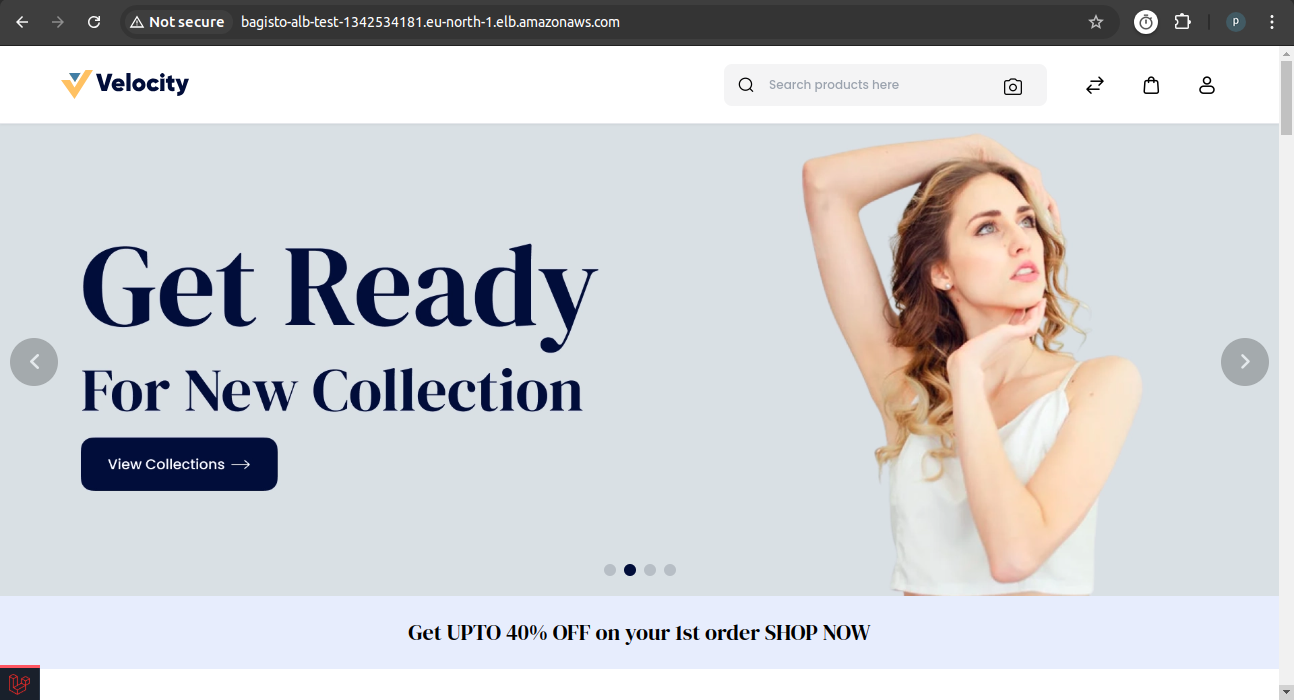
#### [#](https://devdocs.bagisto.com/2.3/performance/loadbalancing.html#test-bagisto-functionality) Test Bagisto Functionality
- Access the Bagisto application and verify that the S3 integration is working, the application can connect to the MySQL database, and all features are functional.
**Bagisto with ALB Setup on AWS is Successfully Configured!**
The Bagisto application is now running behind an Application Load Balancer (ALB) with a dedicated MySQL database and S3 integration for storage. The load balancer is efficiently distributing traffic across multiple instances, ensuring high availability and scalability.
[Laravel Octane](https://devdocs.bagisto.com/2.3/performance/octane.html)[Bagisto APIs](https://devdocs.bagisto.com/2.3/api)
## Bagisto v2.3 Requirements
This is the documentation for the current version (v2.3) of Bagisto. Stay informed and make the most of Bagisto's capabilities.
# [#](https://devdocs.bagisto.com/2.3/introduction/requirements.html#requirements) Requirements
- [Server Configuration](https://devdocs.bagisto.com/2.3/introduction/requirements.html#server-configuration)
- [PHP Extensions](https://devdocs.bagisto.com/2.3/introduction/requirements.html#php-extensions)
- [PHP Configuration](https://devdocs.bagisto.com/2.3/introduction/requirements.html#php-configuration)
- [Apache Configuration](https://devdocs.bagisto.com/2.3/introduction/requirements.html#apache-configuration)
- [Nginx Configuration](https://devdocs.bagisto.com/2.3/introduction/requirements.html#nginx-configuration)
- [Supported Database Servers](https://devdocs.bagisto.com/2.3/introduction/requirements.html#supported-database-servers)
## [#](https://devdocs.bagisto.com/2.3/introduction/requirements.html#server-configuration) Server Configuration
- **Server**: Apache 2 or NGINX
- **RAM**: 4GB or higher
- **Node**: 23.10.0 LTS or higher
- **PHP**: 8.2 or higher
- **Composer**: 2.5 or higher
## [#](https://devdocs.bagisto.com/2.3/introduction/requirements.html#php-extensions) PHP Extensions
Ensure the following extensions are installed and enabled. You can check using the **`phpinfo()`** page or the **`php -m`** command.
- **php-intl extension**: This extension is required for internationalization support in Bagisto.
- **php-gd extension**: The **`php-gd`** extension must be properly installed to ensure correct image functionality in the project. If not installed correctly, image-related features may not work as expected.
Note
It is important to ensure proper installation of the **`php-gd`** extension to avoid any issues with image manipulation in Bagisto.
## [#](https://devdocs.bagisto.com/2.3/introduction/requirements.html#php-configuration) PHP Configuration
Open your **`php.ini`** file and modify the following settings.
- **memory_limit**: Set the **`memory_limit`** directive to **`4G`** or higher to ensure sufficient memory allocation for the application.
- **max_execution_time**: Adjust the **`max_execution_time`** directive to **`360`** or higher. This value determines the maximum time (in seconds) a script is allowed to run. Increasing this value ensures that longer operations, such as import/export processes, can be completed successfully.
- **date.timezone**: Set the **`date.timezone`** directive to your specific timezone. For example, **`Asia/Kolkata`**. This ensures that date and time-related functions work accurately based on the specified timezone.
```
memory_limit = 4G
max_execution_time = 360
date.timezone = Asia/Kolkata <- Change this to your own timezone.
```
Remember to restart your web server
Whenever you make changes to the PHP configuration file, be sure to restart Apache or NGINX to apply the modifications.
## [#](https://devdocs.bagisto.com/2.3/introduction/requirements.html#apache-configuration) Apache Configuration
To serve Bagisto using Apache, make sure your virtual host is properly configured. Below is a basic `VirtualHost` example suitable for local development:
```
ServerAdmin webmaster@localhost
DocumentRoot /var/www/html/bagisto/public
Options Indexes FollowSymLinks
AllowOverride All
Require all granted
```
Note
Ensure `DocumentRoot` points to the `public` directory of your Bagisto installation.
`AllowOverride All` is essential for Laravel’s `.htaccess` to function correctly.
## [#](https://devdocs.bagisto.com/2.3/introduction/requirements.html#nginx-configuration) Nginx Configuration
If you are deploying your Bagisto application to a server that is running Nginx, you may use the following configuration file as a starting point for configuring your web server. Most likely, this file will need to be customized depending on your server's configuration.
Please ensure, like the configuration below, your web server directs all requests to your application's `public/index.php` file. You should never attempt to move the `index.php` file to your project's root, as serving the application from the project root will expose many sensitive configuration files to the public Internet:
```
server {
listen 80;
listen [::]:80;
server_name example.com;
root /srv/example.com/public;
add_header X-Frame-Options "SAMEORIGIN";
add_header X-Content-Type-Options "nosniff";
index index.php;
charset utf-8;
location / {
try_files $uri $uri/ /index.php?$query_string;
}
location ~* ^\/(?!cache).*\.(?:jpg|jpeg|gif|png|ico|cur|gz|svg|svgz|mp4|ogg|ogv|webm|htc|webp|woff|woff2)$ {
expires max;
access_log off;
add_header Cache-Control "public";
}
location = /favicon.ico { access_log off; log_not_found off; }
location = /robots.txt { access_log off; log_not_found off; }
error_page 404 /index.php;
location ~ ^/index\.php(/|$) {
fastcgi_pass unix:/var/run/php/php8.2-fpm.sock;
fastcgi_param SCRIPT_FILENAME $realpath_root$fastcgi_script_name;
include fastcgi_params;
fastcgi_hide_header X-Powered-By;
}
location ~ /\.(?!well-known).* {
deny all;
}
}
```
## [#](https://devdocs.bagisto.com/2.3/introduction/requirements.html#supported-database-servers) Supported Database Servers
Bagisto supports the following database servers:
- **MySQL**: Version 8.0.32 or higher is recommended for optimal performance and compatibility.
- **Database Collation**: The recommended collation for the database is **`utf8mb4_unicode_ci`**, which ensures proper handling of Unicode characters and multilingual support.
[Introduction](https://devdocs.bagisto.com/2.3/introduction)[Installation](https://devdocs.bagisto.com/2.3/introduction/installation.html)
## DataGrid Implementation Guide
Heads up: You are viewing outdated documentation for Bagisto. Please consider upgrading to [v2.3](https://devdocs.bagisto.com/2.3/prologue) for the latest information.
# [#](https://devdocs.bagisto.com/1.x/advanced/datagrid.html#datagrid) DataGrid
DataGrid is just a concept of displaying your database records in tabular format. We have implemented this in Bagisto either you can use it to display data in tabular format or write code from scratch to display data in tabular format. In addition to DataGrid, we have implemented additional features such as sorting, filtering, mass action. You may refer to the table below for detailed information about the features.
Let us take a sample of one DataGrid,
```
select('id')
->addSelect('id', 'code', 'admin_name', 'type', 'is_required', 'is_unique', 'value_per_locale', 'value_per_channel');
$this->setQueryBuilder($queryBuilder);
}
/**
* Add columns.
*/
public function addColumns()
{
$this->addColumn([\
'index' => 'id',\
'label' => trans('admin::app.datagrid.id'),\
'type' => 'number',\
'searchable' => false,\
'sortable' => true,\
'filterable' => true\
]);
$this->addColumn([\
'index' => 'code',\
'label' => trans('admin::app.datagrid.code'),\
'type' => 'string',\
'searchable' => true,\
'sortable' => true,\
'filterable' => true\
]);
$this->addColumn([\
'index' => 'admin_name',\
'label' => trans('admin::app.datagrid.admin-name'),\
'type' => 'string',\
'searchable' => true,\
'sortable' => true,\
'filterable' => true\
]);
$this->addColumn([\
'index' => 'type',\
'label' => trans('admin::app.datagrid.type'),\
'type' => 'string',\
'sortable' => true,\
'searchable' => true,\
'filterable' => true\
]);
$this->addColumn([\
'index' => 'is_required',\
'label' => trans('admin::app.datagrid.required'),\
'type' => 'boolean',\
'sortable' => true,\
'searchable' => false,\
'wrapper' => function ($value) {\
if ($value->is_required == 1)\
return 'True';\
else\
return 'False';\
}\
]);
$this->addColumn([\
'index' => 'is_unique',\
'label' => trans('admin::app.datagrid.unique'),\
'type' => 'boolean',\
'sortable' => true,\
'searchable' => false,\
'filterable' => true,\
'wrapper' => function ($value) {\
if ($value->is_unique == 1)\
return 'True';\
else\
return 'False';\
}\
]);
$this->addColumn([\
'index' => 'value_per_locale',\
'label' => trans('admin::app.datagrid.per-locale'),\
'type' => 'boolean',\
'sortable' => true,\
'searchable' => false,\
'filterable' => true,\
'wrapper' => function ($value) {\
if ($value->value_per_locale == 1)\
return 'True';\
else\
return 'False';\
}\
]);
$this->addColumn([\
'index' => 'value_per_channel',\
'label' => trans('admin::app.datagrid.per-channel'),\
'type' => 'boolean',\
'sortable' => true,\
'searchable' => false,\
'filterable' => true,\
'wrapper' => function ($value) {\
if ($value->value_per_channel == 1)\
return 'True';\
else\
return 'False';\
}\
]);
}
/**
* Prepare actions.
*/
public function prepareActions()
{
$this->addAction([\
'title' => trans('admin::app.datagrid.edit'),\
'method' => 'GET',\
'route' => 'admin.catalog.attributes.edit',\
'icon' => 'icon pencil-lg-icon'\
]);
$this->addAction([\
'title' => trans('admin::app.datagrid.delete'),\
'method' => 'POST',\
'route' => 'admin.catalog.attributes.delete',\
'icon' => 'icon trash-icon'\
]);
}
/**
* Prepare mass actions.
*/
public function prepareMassActions()
{
$this->addMassAction([\
'type' => 'delete',\
'action' => route('admin.catalog.attributes.massdelete'),\
'label' => 'Delete',\
'method' => 'DELETE'\
]);
}
}
```
## [#](https://devdocs.bagisto.com/1.x/advanced/datagrid.html#global-properties-of-datagrid) Global properties of DataGrid
As you see the above sample Datagrid, now let us discuss some properties,
| Name | Functionality |
| ---------------- | ------------------------------------------------------------------------------------------------------------------------------------------------------------------------------------------------------------ |
| index | This property is defined in the grid, and the value assigned to this property must be unique i.e. `id`, so that data will be uniquely identified and operations performed will be based on your index value. |
| sortOrder | The `sortOrder` key is used to arrange the results in ascending or descending order, we have to set the sort order variable to `asc` or `desc`. |
| queryBuilder | It is used to perform database operations in your application. |
| enableMassAction | This accepts boolean values `true` or `false` to enable or disable the mass action in Datagrid. |
| enableAction | This accepts boolean values `true` or `false` to enable or disable the action column of Datagrid. |
| paginate | While creating your grid file you have to declare paginate property and set it to `true` to allow pagination on your page. |
| itemsPerPage | The `itemsPerPage` key is used to display the number of items per page. |
| enableFilterMap | This accepts boolean values `true` or `false` to enable or disable the filter on the basis of columns. |
## [#](https://devdocs.bagisto.com/1.x/advanced/datagrid.html#steps-to-create-datagrid) Steps to create DataGrid
You can create a DataGrid in two ways.
1. By using Bagisto Package Generator ( **Recommended**)
2. By manually setting up all files ( **Expert Level**)
### [#](https://devdocs.bagisto.com/1.x/advanced/datagrid.html#_1-by-using-bagisto-package-generator) 1\. By using Bagisto Package Generator
This command will create a new data grid class in `packages/ACME/TestPackage/src/Datagrids` directory.,
```
php artisan package:make-datagrid TestDataGrid ACME/TestPackage
```
If data grid class already present then you can use force command for overwriting.
```
php artisan package:make-datagrid TestDataGrid ACME/TestPackage --force
```
This will generate whole directory structures. You don't need to do manually.
### [#](https://devdocs.bagisto.com/1.x/advanced/datagrid.html#_2-by-manually-setting-up-all-files) 2\. By manually setting up all files
1. We assume that you have created package let's say `ACME\TestPackage` with the below directory structure.
```
- ACME/TestPackage/
- publishable/assets
- css/
- images/
- js/
- src/
- Config/
- acl.php
- admin-menu.php
- Console/
- Commands/
- Contracts/
- Database/
- Migrations/
- Seeders/
- Events/
- Http/
- Controllers/
- Admin/
- TestPackageController.php
- Shop/
- TestPackageController.php
- Middleware/
- Requests/
- admin-routes.php
- shop-routes.php
- Listeners/
- Mail/
- Models/
- Providers/
- TestPackageServiceProvider.php
- TestPackageProvider.php
- Repositories/
- Resources/
- assets/
- images/
- js/
- app.js
- sass/
- admin.scss
- default.scss
- velocity.scss
- lang/
- views/
- admin/
- layouts/
- style.blade.php
- index.blade.php
- shop/
- default/
- index.blade.php
- velocity/
- index.blade.php
- package.json
- webpack.mix.js
```
2. Create a folder **Datagrids** in your package inside `src` folder, inside **Datagrids** folder, create a class let's say `TestDataGrid.php` that extends DataGrid class from Webkul `Ui` package.
3. We have created `DataGrid` abstract class in Webkul `Ui` package. In the DataGrid abstract class, a list of properties and methods are declared. So, while creating your own DataGrid you need to only extends the `Webkul\Ui\DataGrid\DataGrid` abstract class inside your `TestDataGrid.php` class.
4. In `Webkul\Ui\DataGrid\DataGrid.php` abstract class, two abstract methods are declared `prepareQueryBuilder()` and `addColumns()`. We can prepare grid by defining these two methods
- `prepareQueryBuilder()`: In this method, records are retrieved through queries that is applicable on database and stored in a collection. When records are retrieved, `$this->setQueryBuilder($queryBuilder)` setQueryBuilder method is called.
- `setQueryBuilder()`: This method is written in DataGrid abstract class of Webkul `Ui` package. This is used for setting the `$queryBuilder`.
```
public function prepareQueryBuilder()
{
$queryBuilder = DB::table('attributes')
->select('id')
->addSelect('id', 'code', 'admin_name', 'type', 'is_required', 'is_unique', 'value_per_locale', 'value_per_channel');
$this->setQueryBuilder($queryBuilder);
}
```
- `addColumns()`: In this method, the columns are created which are displayed in the grid. In this method, the parameter accepts the array in key-value pairs. Some of the essential keys are described below,
| Name | functionality |
| ---------- | ---------------------------------------------------------------------------------------------------------------------------------------------------------------------------------------- |
| index | This key is defined in the grid, and the value assigned to this key must be unique, so that data will be uniquely identified and operations performed will be based on your index value. |
| label | In this key, the name of the column is defined. |
| type | This key accepts the type of data in column. |
| searchable | This accepts boolean values `true` or `false` to make the column searchable. |
| sortable | This accepts boolean values `true` or `false` to make the column sortable. |
| filterable | This accepts boolean values `true` or `false` to make the column filterable. |
| wrapper | Perform actions based on condition satisfied or some customization to value. |
```
public function addColumns()
{
$this->addColumn([\
'index' => 'id',\
'label' => trans('admin::app.datagrid.id'),\
'type' => 'number',\
'searchable' => false,\
'sortable' => true,\
'filterable' => true\
]);
$this->addColumn([\
'index' => 'code',\
'label' => trans('admin::app.datagrid.code'),\
'type' => 'string',\
'searchable' => true,\
'sortable' => true,\
'filterable' => true\
]);
}
```
- `prepareActions()`: Additionally, this method is defined when there is a need to perform any action such as edit or delete on the grid. In this method, `addAction()` is called to define particular action.
- `addAction()`: It is used for adding actions (like `edit`, `delete`, etc) to each row generated by Datagrid.
| Name | Functionality |
| ------ | ------------------------------------------------------------------------ |
| title | The text to be displayed in written here. |
| method | HTTP methods are declared. |
| route | This key accepts the route of icon. |
| icon | Class of icon to be displayed in action column you may prefer text also. |
```
public function prepareActions()
{
$this->addAction([\
'title' => trans('admin::app.datagrid.edit'),\
'method' => 'GET',\
'route' => 'admin.catalog.attributes.edit',\
'icon' => 'icon pencil-lg-icon'\
]);
$this->addAction([\
'title' => trans('admin::app.datagrid.delete'),\
'method' => 'POST',\
'route' => 'admin.catalog.attributes.delete',\
'icon' => 'icon trash-icon'\
]);
}
```
WARNING
- Use JavaScript with wrapper property set to true when needed.
- Return static blade files loaded with scripts in it with caution.
## [#](https://devdocs.bagisto.com/1.x/advanced/datagrid.html#multiple-datagrids) Multiple DataGrids
As the default Datagrid will handle only a single request at a time which means filtration, sorting and many other operations will get conflicted when you try to implement the multiple DataGrids. To overcome this we have provided a trait `ProvideDataGridPlus` in the namespace `Webkul\Ui\DataGrid\Traits`.
- Just take any of the Datagrid, let say `ProductDataGrid` in the namespace `Webkul\Admin\DataGrids`,
```
namespace Webkul\Admin\DataGrids;
class ProductDataGrid extends DataGrid
{
...
}
```
- Import the `ProvideDataGridPlus` trait in the mentioned class,
```
namespace Webkul\Admin\DataGrids;
use Webkul\Ui\DataGrid\Traits\ProvideDataGridPlus;
class ProductDataGrid extends DataGrid
{
use ProvideDataGridPlus;
...
}
```
- After that `toJson()` method will be available in the Datagrid instance which will provide data to the component.
- Now you need to create one route and method from where the response will come. Let us take an example of the product listing page. Now go to `ProductController` in the namespace `Webkul\Product\Http\Controllers`, there is an index method, just use the `toJson`.
```
use Webkul\Admin\DataGrids\ProductDataGrid;
class ProductController extends Controller
{
/**
* Display a listing of the resource.
*
* @return \Illuminate\View\View
*/
public function index()
{
if (request()->ajax()) {
return app(ProductDataGrid::class)->toJson();
}
return view($this->_config['view']);
}
...
}
```
- Now, in the view portion use this component i.e. `datagrid-plus` and add the url from where it will load the json data,
```
...
...
```
- Done, your datagrid is ready.
[Create your own product type](https://devdocs.bagisto.com/1.x/advanced/create-product-type.html)[Events](https://devdocs.bagisto.com/1.x/advanced/events.html)
## Bagisto Event Handling
Heads up: You are viewing outdated documentation for Bagisto. Please consider upgrading to [v2.3](https://devdocs.bagisto.com/2.3/prologue) for the latest information.
# [#](https://devdocs.bagisto.com/2.x/advanced/events.html#events) Events
- [Introduction](https://devdocs.bagisto.com/2.x/advanced/events.html#introduction)
- [Creating an Event Class](https://devdocs.bagisto.com/2.x/advanced/events.html#creating-an-event-class)
- [Using Package Generator](https://devdocs.bagisto.com/2.x/advanced/events.html#using-package-generator)
- [Manually Registering Events](https://devdocs.bagisto.com/2.x/advanced/events.html#manually-registering-events)
- [Manually Registering Listeners](https://devdocs.bagisto.com/2.x/advanced/events.html#manually-registering-listeners)
- [Specifying Events](https://devdocs.bagisto.com/2.x/advanced/events.html#specifying-events)
- [Events Fired in Bagisto](https://devdocs.bagisto.com/2.x/advanced/events.html#events-fired-in-bagisto)
- [Events Listen in Bagisto](https://devdocs.bagisto.com/2.x/advanced/events.html#events-listen-in-bagisto)
- [Listening to Existing Events](https://devdocs.bagisto.com/2.x/advanced/events.html#listening-to-existing-events)
- [Registering a Listener](https://devdocs.bagisto.com/2.x/advanced/events.html#registering-a-listener)
## [#](https://devdocs.bagisto.com/2.x/advanced/events.html#introduction) Introduction
Event Listeners in Bagisto are a way to implement the observer pattern, where listeners respond to events that occur in the application. Events can be thought of as announcements made by the application, and listeners are the actions taken in response to those announcements. All event classes in Bagisto are stored in the `Providers` folder, and the listeners are stored in the `Listeners` folder.
In Bagisto, events and listeners are organized in a clear and structured manner:
- Events are typically stored in the Events folder.
- Listeners are stored in the Listeners folder.
This organization makes it easy to manage and locate the event-driven components of your application.
To learn in detail about Controllers, you can visit the Laravel documentation [here(opens new window)](https://laravel.com/docs/11.x/events).
## [#](https://devdocs.bagisto.com/2.x/advanced/events.html#creating-an-event-class) Creating an Event Class
### [#](https://devdocs.bagisto.com/2.x/advanced/events.html#using-package-generator) Using Package Generator
If you have the Bagisto Package Generator installed, you can use the following command to create a new event class in the `packages/Webkul/Blog/src/Events` directory:
```
php artisan package:make-event BlogEvent Webkul/Blog
```
If the event class already exists, you can use the --force option to overwrite it:
```
php artisan package:make-event BlogEvent Webkul/Blog --force
```
Alternatively, if you don't have the package generator, you can create the file manually by creating a new class in the `packages/Webkul/Blog/src/Events` directory.
### [#](https://devdocs.bagisto.com/2.x/advanced/events.html#manually-registering-events) Manually Registering Events
In Bagisto, you register events manually in the `boot` method of your `EventServiceProvider.php` file. Here is an example of how to register events:
```
/**
* Register any other events for your application.
*
* @return void
*/
public function boot()
{
//...
Event::listen('event.name', 'path-upto-listener@function');
}
```
In this example, `event.name` is the name of the event, and `path-upto-listener@function` is the listener method that will handle the event.
### [#](https://devdocs.bagisto.com/2.x/advanced/events.html#manually-registering-listeners) Manually Registering Listeners
When registering events, you specify the listener function to be executed when an event is triggered. Here is an example of how to register a listener:
```
class EventServiceProvider extends ServiceProvider
{
/**
* Bootstrap services.
*
* @return void
*/
public function boot()
{
//...
Event::listen('checkout.order.save.after', 'Webkul\Admin\Listeners\Order@sendNewOrderMail');
}
}
```
In this example, the `checkout.order.save.after` event will trigger the `sendNewOrderMail` method of the `Order` listener in the `Webkul\Admin\Listeners` namespace.
## [#](https://devdocs.bagisto.com/2.x/advanced/events.html#specifying-events) Specifying Events
In Bagisto, events are typically fired before and after the execution of CRUD operations. This allows listeners to perform additional actions, such as logging, notifications, or data manipulation, at specific points in the lifecycle of an operation.
For example, you might have events fired during product creation, updating, or deletion. Here’s an example of firing events before and after saving an order:
```
namespace Webkul\Sales\Repositories;
use Webkul\Sales\Contracts\Order;
class OrderRepository extends Repository
{
public function create(array $data)
{
Event::dispatch('sales.order.create.before', $data);
$order = parent::create($data);
Event::dispatch('sales.order.create.after', $order);
return $order;
}
}
```
## [#](https://devdocs.bagisto.com/2.x/advanced/events.html#events-fired-in-bagisto) Events Fired in Bagisto
In Bagisto, there are several events fired throughout its operations, allowing developers to hook into specific points in the application's lifecycle to customize behavior or add functionality. Here's a list of events that are fired in Bagisto, which you can listen to and handle as needed by creating event listeners:
| Events name | Functionality |
| ---------------------------------------- | ----------------------------------------------------------------- |
| catalog.attribute.create.before | This event will be fired before attribute gets created. |
| catalog.attribute.create.after | This event will be fired after attribute gets created. |
| catalog.attribute.update.before | This event will be fired before attribute gets updated. |
| catalog.attribute.update.after | This event will be fired after attribute gets updated. |
| catalog.attribute.delete.before | This event will be fired before attribute gets deleted. |
| catalog.attribute.delete.after | This event will be fired after attribute gets deleted. |
| catalog.attribute_family.create.before | This event will be fired before attribute family gets created. |
| catalog.attribute_family.create.after | This event will be fired after attribute family gets created. |
| catalog.attribute_family.update.before | This event will be fired before updating attribute family. |
| catalog.attribute_family.update.after | This event will be fired after updating attribute family. |
| catalog.attribute_family.delete.before | This event will be fired before deleting attribute family. |
| catalog.attribute_family.delete.after | This event will be fired after deleting attribute family. |
| catalog.category.create.before | This event will be fired before creating category. |
| catalog.category.create.after | This event will be fired after creating category. |
| catalog.category.update.before | This event will be fired before updating category. |
| catalog.category.update.after | This event will be fired after updating category. |
| catalog.category.delete.before | This event will be fired before deleting category. |
| catalog.category.delete.after | This event will be fired after deleting category. |
| catalog.categories.mass-update.before | This event will be fired before bulk category update. |
| catalog.categories.mass-update.after | This event will be fired after bulk category update. |
| catalog.product.create.before | This event will be fired before product gets created. |
| catalog.product.create.after | This event will be fired after product gets created. |
| catalog.product.update.before | This event will be fired before product gets updated. |
| catalog.product.update.after | This event will be fired after product gets updated. |
| catalog.product.delete.before | This event will be fired before product gets deleted. |
| catalog.product.delete.after | This event will be fired after product gets deleted. |
| products.datagrid.sync | This event will be fired to synicing datagrid product. |
| cms.pages.create.before | This event will be fired before cms page gets created. |
| cms.pages.create.after | This event will be fired after cms page gets created. |
| cms.pages.update.before | This event will be fired before cms page gets updated. |
| cms.pages.update.after | This event will be fired after cms page gets updated. |
| cms.pages.delete.before | This event will be fired before cms page gets deleted. |
| cms.pages.delete.after | This event will be fired after cms page gets deleted. |
| customer.addresses.create.before | This event will be fired before customer address gets created. |
| customer.addresses.create.after | This event will be fired after customer address gets created. |
| customer.addresses.update.before | This event will be fired before customer address gets updated. |
| customer.addresses.update.after | This event will be fired after customer address gets updated. |
| customer.addresses.delete.before | This event will be fired before customer address gets deleted. |
| customer.addresses.delete.after | This event will be fired after customer address gets deleted. |
| customer.registration.before | This event will be fired before customer gets created. |
| customer.registration.after | This event will be fired after customer gets created. |
| customer.login.after | This event will be fired after customer gets login. |
| customer.logout.after | This event will be fired after customer gets logout. |
| customer.update.before | This event will be fired before customer gets updated. |
| customer.update.after | This event will be fired after customer gets updated. |
| customer.password.update.after | This event will be fired after customer password gets updated. |
| customer.note-created.after | This event will be fired after customer note gets created. |
| customer.subscription.before | This event will be fired before customer gets subscription. |
| customer.subscription.after | This event will be fired after customer gets subscription. |
| customer.delete.before | This event will be fired before customer gets deleted. |
| customer.delete.after | This event will be fired after customer gets deleted. |
| customer.customer_group.create.before | This event will be fired before customer group gets created. |
| customer.customer_group.create.after | This event will be fired after customer group gets created. |
| customer.customer_group.update.before | This event will be fired before customer group gets updated. |
| customer.customer_group.update.after | This event will be fired after customer group gets updated. |
| customer.customer_group.delete.before | This event will be fired before customer group gets deleted. |
| customer.customer_group.delete.after | This event will be fired after customer group gets deleted. |
| customer.review.update.before | This event will be fired before customer review gets updated. |
| customer.review.update.after | This event will be fired after customer review gets updated. |
| customer.review.delete.before | This event will be fired before customer review gets deleted. |
| customer.review.delete.after | This event will be fired after customer review gets deleted. |
| marketing.sitemaps.create.before | This event will be fired before sitemaps gets created. |
| marketing.sitemaps.create.after | This event will be fired after sitemaps gets created. |
| marketing.sitemaps.update.before | This event will be fired before sitemaps gets updated. |
| marketing.sitemaps.update.after | This event will be fired after sitemaps gets updated. |
| marketing.sitemaps.delete.before | This event will be fired before sitemaps gets deleted. |
| marketing.sitemaps.delete.after | This event will be fired after sitemaps gets deleted. |
| marketing.campaigns.create.before | This event will be fired before campaigns gets created. |
| marketing.campaigns.create.after | This event will be fired after campaigns gets created. |
| marketing.campaigns.update.before | This event will be fired before campaigns gets updated. |
| marketing.campaigns.update.after | This event will be fired after campaigns gets updated. |
| marketing.campaigns.delete.before | This event will be fired before campaigns gets deleted. |
| marketing.campaigns.delete.after | This event will be fired after campaigns gets deleted. |
| marketing.events.create.before | This event will be fired before marketing event gets created. |
| marketing.events.create.after | This event will be fired after marketing event gets created. |
| marketing.events.update.before | This event will be fired before marketing event gets updated. |
| marketing.events.update.after | This event will be fired after marketing event gets updated. |
| marketing.events.delete.before | This event will be fired before marketing event gets deleted. |
| marketing.events.delete.after | This event will be fired after marketing event gets deleted. |
| marketing.templates.create.before | This event will be fired before templates gets created. |
| marketing.templates.create.after | This event will be fired after templates gets created. |
| marketing.templates.update.before | This event will be fired before templates gets updated. |
| marketing.templates.update.after | This event will be fired after templates gets updated. |
| marketing.templates.delete.before | This event will be fired before templates gets deleted. |
| marketing.templates.delete.after | This event will be fired after templates gets deleted. |
| promotions.cart_rule.create.before | This event will be fired before cart rule gets created. |
| promotions.cart_rule.create.after | This event will be fired after cart rule gets created. |
| promotions.cart_rule.update.before | This event will be fired before cart rule gets updated. |
| promotions.cart_rule.update.after | This event will be fired after cart rule gets updated. |
| promotions.cart_rule.delete.before | This event will be fired before cart rule gets deleted. |
| promotions.cart_rule.delete.after | This event will be fired after cart rule gets deleted. |
| promotions.catalog_rule.create.before | This event will be fired before catalog rule gets created. |
| promotions.catalog_rule.create.after | This event will be fired after catalog rule gets created. |
| promotions.catalog_rule.update.before | This event will be fired before catalog rule gets updated. |
| promotions.catalog_rule.update.after | This event will be fired after catalog rule gets updated. |
| promotions.catalog_rule.delete.before | This event will be fired before catalog rule gets deleted. |
| promotions.catalog_rule.delete.after | This event will be fired after catalog rule gets deleted. |
| sales.order.comment.create.before | This event will be fired before order comment gets created. |
| sales.order.comment.create.after | This event will be fired after order comment gets created. |
| core.channel.create.before | This event will be fired before channel gets created. |
| core.channel.create.after | This event will be fired after channel gets created. |
| core.channel.update.before | This event will be fired before channel gets updated. |
| core.channel.update.after | This event will be fired after channel gets updated. |
| core.channel.delete.before | This event will be fired before channel gets deleted. |
| core.channel.delete.after | This event will be fired after channel gets deleted. |
| core.exchange_rate.create.before | This event will be fired before exchange rate gets created. |
| core.exchange_rate.create.after | This event will be fired after exchange rate gets created. |
| core.exchange_rate.update.before | This event will be fired before exchange rate gets updated. |
| core.exchange_rate.update.after | This event will be fired after exchange rate gets updated. |
| core.exchange_rate.delete.before | This event will be fired before exchange rate gets deleted. |
| core.exchange_rate.delete.after | This event will be fired after exchange rate gets deleted. |
| inventory.inventory_source.create.before | This event will be fired before inventory source gets created. |
| inventory.inventory_source.create.after | This event will be fired after inventory source gets created. |
| inventory.inventory_source.update.before | This event will be fired before inventory source gets updated. |
| inventory.inventory_source.update.after | This event will be fired after inventory source gets updated. |
| inventory.inventory_source.delete.before | This event will be fired before inventory source gets deleted. |
| inventory.inventory_source.delete.after | This event will be fired after inventory source gets deleted. |
| user.role.create.before | This event will be fired before role gets created. |
| user.role.create.after | This event will be fired after role gets created. |
| user.role.update.before | This event will be fired before role gets updated. |
| user.role.update.after | This event will be fired after role gets updated. |
| user.role.delete.before | This event will be fired before role gets deleted. |
| user.role.delete.after | This event will be fired after role gets deleted. |
| theme_customization.create.before | This event will be fired before theme customization gets created. |
| theme_customization.create.after | This event will be fired after theme customization gets created. |
| theme_customization.update.before | This event will be fired before theme customization gets updated. |
| theme_customization.update.after | This event will be fired after theme customization gets updated. |
| theme_customization.delete.before | This event will be fired before theme customization gets deleted. |
| theme_customization.delete.after | This event will be fired after theme customization gets deleted. |
| user.admin.create.before | This event will be fired before admin gets created. |
| user.admin.create.after | This event will be fired after admin gets created. |
| user.admin.update.before | This event will be fired before admin gets updated. |
| user.admin.update.after | This event will be fired after admin gets updated. |
| admin.password.update.after | This event will be fired after admin password gets updated. |
| user.admin.delete.before | This event will be fired before admin gets deleted. |
| user.admin.delete.after | This event will be fired after admin gets deleted. |
| tax.category.create.before | This event will be fired before tax category gets created. |
| tax.category.create.after | This event will be fired after tax category gets created. |
| tax.category.update.before | This event will be fired before tax category gets updated. |
| tax.category.update.after | This event will be fired after tax category gets updated. |
| tax.category.delete.before | This event will be fired before tax category gets deleted. |
| tax.category.delete.after | This event will be fired after tax category gets deleted. |
| tax.rate.create.before | This event will be fired before tax rate gets created. |
| tax.rate.create.after | This event will be fired after tax rate gets created. |
| tax.rate.update.before | This event will be fired before tax rate gets updated. |
| tax.rate.update.after | This event will be fired after tax rate gets updated. |
| tax.rate.delete.before | This event will be fired before tax rate gets deleted. |
| tax.rate.delete.after | This event will be fired after tax rate gets deleted. |
| checkout.cart.delete.before | This event will be fired before cart item gets deleted. |
| checkout.cart.delete.after | This event will be fired after cart item gets deleted. |
| checkout.cart.delete.all.before | This event will be fired before all cart items gets deleted. |
| checkout.cart.delete.all.after | This event will be fired after all cart item gets deleted. |
| checkout.cart.add.before | This event will be fired before cart item gets created. |
| checkout.cart.add.after | This event will be fired after cart item gets created. |
| checkout.cart.update.before | This event will be fired before cart item gets updated. |
| checkout.cart.update.after | This event will be fired after cart item gets updated. |
| checkout.cart.collect.totals.before | This event will be fired before collecting cart totals. |
| checkout.cart.collect.totals.after | This event will be fired after collecting cart totals. |
| checkout.cart.calculate.items.tax.before | This event will be fired before calculating cart items tax. |
| checkout.cart.calculate.items.tax.after | This event will be fired after calculating cart items tax. |
| core.configuration.save.before | This event will be fired before core configuration gets saved. |
| core.configuration.save.after | This event will be fired after core configuration gets saved. |
| core.currency.create.before | This event will be fired before currency gets created. |
| core.currency.create.after | This event will be fired after currency gets created. |
| core.currency.update.before | This event will be fired before currency gets updated. |
| core.currency.update.after | This event will be fired after currency gets updated. |
| core.currency.delete.before | This event will be fired before currency gets deleted. |
| core.currency.delete.after | This event will be fired after currency gets deleted. |
| core.locale.create.before | This event will be fired before locale gets created. |
| core.locale.create.after | This event will be fired after locale gets created. |
| core.locale.update.before | This event will be fired before locale gets updated. |
| core.locale.update.after | This event will be fired after locale gets updated. |
| core.locale.delete.before | This event will be fired before locale gets deleted. |
| core.locale.delete.after | This event will be fired after locale gets deleted. |
| sales.invoice.save.before | This event will be fired before invoice gets saved. |
| sales.invoice.save.after | This event will be fired after invoice gets saved. |
| checkout.order.save.before | This event will be fired before order gets saved. |
| checkout.order.save.after | This event will be fired after order gets saved. |
| checkout.order.orderitem.save.before | This event will be fired before order item gets saved. |
| checkout.order.orderitem.save.after | This event will be fired after order item gets saved. |
| sales.order.cancel.before | This event will be fired before order gets canceled. |
| sales.order.cancel.after | This event will be fired after order gets canceled. |
| sales.order.update-status.before | This event will be fired before order status gets updated. |
| sales.order.update-status.after | This event will be fired after order status gets updated. |
| sales.refund.save.before | This event will be fired before order refund gets saved. |
| sales.refund.save.after | This event will be fired after order refund gets saved. |
| sales.shipment.save.before | This event will be fired before shipment gets saved. |
| sales.shipment.save.after | This event will be fired after shipment gets saved. |
| checkout.load.index | This event will be fired on checkout page load. |
| shop.item.buy-now | This event will be fired directly on the Buy Now product. |
## [#](https://devdocs.bagisto.com/2.x/advanced/events.html#events-listen-in-bagisto) Events Listen in Bagisto
- Event listen in bagisto is given below with their functionality.
| Events name | functionality |
| ------------------------------------------------- | ------------------------------------------------------------------------ |
| bagisto.shop.layout.body.after | Listing this event to load css of shop layout. |
| bagisto.admin.layout.head | Listing this event to load css of admin layout. |
| checkout.order.save.after | Listing this event to send notification of new order. |
| sales.order.update-status.after | Listing this event to send notification of when order status is changed. |
| sales.invoice.save.after | Listing this event to add paypal smart button. |
| bagisto.shop.customers.login_form_controls.before | Listing this event to add social login buttons. |
| bagisto.shop.products.view.compare.after | Listing this event to add social share buttons. |
## [#](https://devdocs.bagisto.com/2.x/advanced/events.html#listening-to-existing-events) Listening to Existing Events
Bagisto uses events and listeners to implement the observer pattern, allowing you to respond to various actions and events within the application. You can listen to specific events and execute custom code when those events are triggered.
### [#](https://devdocs.bagisto.com/2.x/advanced/events.html#registering-a-listener) Registering a Listener
Open the `EventServiceProvider.php` file located in the `Providers` directory of your Bagisto application. This file is where you register event listeners.
Inside the `boot()` method of `EventServiceProvider.php`, use the `Event::listen` method to register your listener. This method takes the event name and a callback function or a class method that will handle the event.
```
Event::listen('checkout.order.save.after', 'Webkul\Notification\Listeners\Order@createOrder');
```
In the example above, we are listening to the `checkout.order.save.after` event and specifying the `createOrder` function from the `Order` listener class in the `Webkul\Notification\Listeners` namespace.
Replace `'checkout.order.save.after'` with the specific event you want to listen to. In this example, it listens to the event triggered after saving an order during checkout.
By registering the listener, you have associated the **`createOrder`** function with the **`checkout.order.save.after`** event. Whenever this event is triggered, the specified function will be executed.
You can modify the listener function according to your requirements to perform the desired operation.
[Product Type](https://devdocs.bagisto.com/2.x/advanced/create-product-type.html)[Helpers](https://devdocs.bagisto.com/2.x/advanced/helpers.html)
## Bagisto DataGrid Guide
This is the documentation for the current version (v2.3) of Bagisto. Stay informed and make the most of Bagisto's capabilities.
# [#](https://devdocs.bagisto.com/2.3/packages/datagrid.html#datagrid) DataGrid
- [Introduction](https://devdocs.bagisto.com/2.3/packages/datagrid.html#introduction)
- [Global Properties of DataGrid](https://devdocs.bagisto.com/2.3/packages/datagrid.html#global-properties-of-datagrid)
- [How DataGrid Works](https://devdocs.bagisto.com/2.3/packages/datagrid.html#how-datagrid-works)
- [Setting Up DataGrid](https://devdocs.bagisto.com/2.3/packages/datagrid.html#setting-up-datagrid)
- [Create the DataGrids Folder](https://devdocs.bagisto.com/2.3/packages/datagrid.html#create-the-datagrids-folder)
- [Define the PostDataGrid Class](https://devdocs.bagisto.com/2.3/packages/datagrid.html#define-the-postdatagrid-class)
- [Displaying DataGrid](https://devdocs.bagisto.com/2.3/packages/datagrid.html#displaying-datagrid)
- [Render DataGrid](https://devdocs.bagisto.com/2.3/packages/datagrid.html#render-datagrid)
- [Sample DataGrid](https://devdocs.bagisto.com/2.3/packages/datagrid.html#sample-datagrid)
- [DataGrid Customization](https://devdocs.bagisto.com/2.3/packages/datagrid.html#datagrid-customization)
- [Available Column Types](https://devdocs.bagisto.com/2.3/packages/datagrid.html#available-column-types)
- [Integer Column Type](https://devdocs.bagisto.com/2.3/packages/datagrid.html#integer-column-type)
- [Decimal Column Type](https://devdocs.bagisto.com/2.3/packages/datagrid.html#decimal-column-type)
- [Supported Input Formats:](https://devdocs.bagisto.com/2.3/packages/datagrid.html#supported-input-formats)
- [String Column Type](https://devdocs.bagisto.com/2.3/packages/datagrid.html#string-column-type)
- [Boolean Column Type](https://devdocs.bagisto.com/2.3/packages/datagrid.html#boolean-column-type)
- [Date Column Type](https://devdocs.bagisto.com/2.3/packages/datagrid.html#date-column-type)
- [DateTime Column Type](https://devdocs.bagisto.com/2.3/packages/datagrid.html#datetime-column-type)
- [Aggregate Type Column](https://devdocs.bagisto.com/2.3/packages/datagrid.html#aggregate-type-column)
## [#](https://devdocs.bagisto.com/2.3/packages/datagrid.html#introduction) Introduction
A DataGrid is a powerful tool for displaying database records in a tabular format, making it easier to present and manage large amounts of data in an organized manner. In Bagisto, the DataGrid feature enables you to display data efficiently, with built-in functionalities like sorting, filtering, and mass actions. These additional features enhance the basic functionality of DataGrid, allowing you to interact with and manage data seamlessly. Whether you use the pre-built DataGrid or write your own custom implementation, Bagisto’s DataGrid provides a robust solution for data presentation and manipulation.
## [#](https://devdocs.bagisto.com/2.3/packages/datagrid.html#global-properties-of-datagrid) Global Properties of DataGrid
The DataGrid in Bagisto has several global properties that enhance its functionality and customization. Below are the key properties and their purposes:
| Property | Functionality |
| -------------------- | ----------------------------------------------------------------------------------------------------------------------------- |
| **`primaryColumn`** | Specifies the primary identifier column for the data grid, typically set to `'id'` for unique identification of data entries. |
| **`queryBuilder`** | Manages the database query operations for fetching data based on configured criteria. |
| **`columns`** | Array defining the columns to be displayed in the data grid. |
| **`sortColumn`** | Optional. Specifies the default column used for sorting data in the grid. |
| **`sortOrder`** | Specifies the default order ('asc' or 'desc') for sorting data in the grid. |
| **`actions`** | Array containing configurations for actions that can be performed on individual data grid entries. |
| **`massActions`** | Array defining actions that can be applied to multiple entries simultaneously in the data grid. |
| **`paginator`** | Stores an instance of `LengthAwarePaginator` for managing pagination of grid data. |
| **`itemsPerPage`** | Specifies the default number of items to display per page in the data grid. |
| **`perPageOptions`** | Array of options allowing users to select different numbers of items per page. |
| **`exportable`** | Boolean indicating whether the data grid can exported. |
| **`exportFile`** | Stores metadata related to exported data if `exportable` is enabled. |
## [#](https://devdocs.bagisto.com/2.3/packages/datagrid.html#how-datagrid-works) How DataGrid Works
The **`DataGrid`** abstract class is created in the **`Webkul\DataGrid`** package. In the abstract class, a list of properties and methods are declared. To create your own DataGrid, you need to extend the **`Webkul\DataGrid\DataGrid`** abstract class.
In **`Webkul\DataGrid\DataGrid\DataGrid.php`** abstract class, two abstract methods are declared **`prepareQueryBuilder()`** and **`prepareColumns()`**. You can prepare your grid by defining these two methods.
- **`prepareQueryBuilder()`**: In this method, records are retrieved through queries applicable to the database and stored in a collection. When records are retrieved, the **`setQueryBuilder()`** method is called.
```
public function prepareQueryBuilder()
{
$queryBuilder = DB::table('posts')
->select('id',
'title',
'status',
'created_at',
'updated_at'
);
return $queryBuilder;
}
```
- **`prepareColumns()`**: In this method, columns are created which are displayed in the grid. The parameter accepts an array in key-value pairs. Some of the essential keys are described below:
| Key | Functionality |
| ------------------------- | --------------------------------------------------------------------------------------------- |
| **`index`** | Specifies the column's index, used to identify the column within the grid. |
| **`label`** | Specifies the label of the column, typically used as the column header in the grid. |
| **`type`** | Specifies the type of data contained in the column. |
| **`searchable`** | Accepts boolean values ( `true` or `false`) to indicate if the column can be searched. |
| **`filterable`** | Accepts boolean values ( `true` or `false`) to indicate if the column can be filtered. |
| **`filterableType`** | Specifies the type of filter that can be applied to the column, if filterable. |
| **`filterableOptions`** | Array of options that can be used to filter the column's data. |
| **`allowMultipleValues`** | Accepts boolean values ( `true` or `false`) to indicate if the column allows multiple values. |
| **`sortable`** | Accepts boolean values ( `true` or `false`) to indicate if the column can be sorted. |
| **`visibility`** | Accepts boolean values ( `true` or `false`) to indicate if the column is visible. |
| **`closure`** | Used to apply custom actions or conditions to the column's value. |
| **`columnName`** | Specifies the fully qualified table column name associated with the grid column. |
```
public function prepareColumns()
{
$this->addColumn([\
'index' => 'status',\
'label' => trans('shop::app.customers.account.orders.status.title'),\
'type' => 'string',\
'searchable' => true,\
'filterable' => true,\
'filterable_type' => 'dropdown',\
'filterable_options' => [\
[\
'label' => trans('shop::app.customers.account.orders.status.options.processing'),\
'value' => Order::STATUS_PROCESSING,\
],\
[\
'label' => trans('shop::app.customers.account.orders.status.options.completed'),\
'value' => Order::STATUS_COMPLETED,\
],\
[\
'label' => trans('shop::app.customers.account.orders.status.options.canceled'),\
'value' => Order::STATUS_CANCELED,\
],\
[\
'label' => trans('shop::app.customers.account.orders.status.options.closed'),\
'value' => Order::STATUS_CLOSED,\
],\
[\
'label' => trans('shop::app.customers.account.orders.status.options.pending'),\
'value' => Order::STATUS_PENDING,\
],\
[\
'label' => trans('shop::app.customers.account.orders.status.options.pending-payment'),\
'value' => Order::STATUS_PENDING_PAYMENT,\
],\
[\
'label' => trans('shop::app.customers.account.orders.status.options.fraud'),\
'value' => Order::STATUS_FRAUD,\
],\
],\
'sortable' => true,\
'closure' => function ($row) {\
switch ($row->status) {\
case Order::STATUS_PROCESSING:\
return ''.trans('shop::app.customers.account.orders.status.options.processing').'
';\
\
case Order::STATUS_COMPLETED:\
return ''.trans('shop::app.customers.account.orders.status.options.completed').'
';\
\
case Order::STATUS_CANCELED:\
return ''.trans('shop::app.customers.account.orders.status.options.canceled').'
';\
\
case Order::STATUS_CLOSED:\
return ''.trans('shop::app.customers.account.orders.status.options.closed').'
';\
\
case Order::STATUS_PENDING:\
return ''.trans('shop::app.customers.account.orders.status.options.pending').'
';\
\
case Order::STATUS_PENDING_PAYMENT:\
return ''.trans('shop::app.customers.account.orders.status.options.pending-payment').'
';\
\
case Order::STATUS_FRAUD:\
return ''.trans('shop::app.customers.account.orders.status.options.fraud').'
';\
}\
},\
]);
}
```
- **`prepareActions()`**: This method is defined when there is a need to perform any action such as edit or delete on the grid. In this method, the **`addAction()`** method is called to define a particular action.
- **`addAction()`**: This method is used for adding actions (like **`edit`**, **`delete`**, etc.) to each row generated by the DataGrid.
| Key | Functionality |
| ------------ | -------------------------------------------------------------------- |
| **`icon`** | This key accept class of your icon. |
| **`title`** | This key accept title of action column. |
| **`method`** | This key accept HTTP methods to perform specific action(GET/DELETE). |
| **`url`** | This key accepts the route of the specific action. |
```
public function prepareActions()
{
$this->addAction([\
'icon' => 'icon-edit'\
'title' => trans('blog::app.admin.datagrid.edit'),\
'method' => 'GET',\
'url' => function ($row) {\
return route('admin.blog.edit', $row->id);\
},\
]);
}
```
## [#](https://devdocs.bagisto.com/2.3/packages/datagrid.html#setting-up-datagrid) Setting Up DataGrid
### [#](https://devdocs.bagisto.com/2.3/packages/datagrid.html#create-the-datagrids-folder) Create the DataGrids Folder
First, navigate to the `src` folder of your package. Within this folder, create a new directory called `DataGrids`. Inside this new directory, create a file named `PostDataGrid.php`.
The folder structure should look like this:
```
└── packages
└── Webkul
└── Blog
└── src
├── ...
└── DataGrids
└── PostDataGrid.php
```
### [#](https://devdocs.bagisto.com/2.3/packages/datagrid.html#define-the-postdatagrid-class) Define the PostDataGrid Class
Open the `PostDataGrid.php` file and add the following code to define the `PostDataGrid` class. This class will extend the base DataGrid class provided by Bagisto and set up the necessary configurations for your data grid.
```
namespace Webkul\Blog\DataGrids;
use Webkul\DataGrid\DataGrid;
use Illuminate\Support\Facades\DB;
class PostDataGrid extends DataGrid
{
// ...
}
```
### [#](https://devdocs.bagisto.com/2.3/packages/datagrid.html#displaying-datagrid) Displaying DataGrid
Open the `Admin/PostController.php` file in your package and locate the index method. In this method, you will use the `toJson()` method from your DataGrid class to return the data grid as JSON when the request is an AJAX call.
```
use Webkul\Blog\DataGrids\PostDataGrid;
class PostController extends Controller
{
/**
* Display a listing of the resource.
*
* @return \Illuminate\View\View
*/
public function index()
{
if (request()->ajax()) {
return datagrid(PostDataGrid::class)->process();
}
return view('blog::admin.index');
}
// ...
}
```
### [#](https://devdocs.bagisto.com/2.3/packages/datagrid.html#render-datagrid) Render DataGrid
Open the view file `views/admin/index.blade.php`. In this view, you will use the `datagrid` Blade component and specify the URL from which it will load the `JSON` data.
Update the index.blade.php file as shown below:
```
```
Make sure the route `admin.blog.index` is defined in your `web.php` file, so that it points to the index method of the PostController:
With these steps, your DataGrid is now ready to be used.
WARNING
Make sure to copy the sample code provided below to your own **`PostDataGrid.php`** file, as we have already included all the necessary methods and functions there. This code can be used later as an example for your implementation.
### [#](https://devdocs.bagisto.com/2.3/packages/datagrid.html#sample-datagrid) Sample DataGrid
Here's an improved version of the provided DataGrid sample:
```
select('id',
'title',
'status',
'created_at',
'updated_at'
);
return $queryBuilder;
}
/**
* Prepare columns.
*
* @return void
*/
public function prepareColumns()
{
$this->addColumn([\
'index' => 'id',\
'label' => trans('blog::app.admin.datagrid.id'),\
'type' => 'string',\
'searchable' => false,\
'filterable' => true,\
'sortable' => true,\
]);
$this->addColumn([\
'index' => 'title',\
'label' => trans('blog::app.admin.datagrid.title'),\
'type' => 'string',\
'searchable' => true,\
'sortable' => true,\
'filterable' => false,\
'closure' => function ($value) {\
return substr($value->title, 0, 20);\
},\
]);
$this->addColumn([\
'index' => 'status',\
'label' => trans('blog::app.admin.datagrid.status'),\
'type' => 'boolean',\
'sortable' => true,\
'searchable' => false,\
'filterable' => true,\
'closure' => function ($value) {\
if ($value->status) {\
return ''.trans('blog::app.admin.datagrid.active').'
';\
}\
\
return ''.trans('blog::app.admin.datagrid.inactive').'
';\
},\
]);
$this->addColumn([\
'index' => 'created_at',\
'label' => trans('blog::app.admin.datagrid.created_at'),\
'type' => 'datetime',\
'filterable' => true,\
'filterable_type' => 'datetime_range',\
'sortable' => true,\
]);
$this->addColumn([\
'index' => 'updated_at',\
'label' => trans('blog::app.admin.datagrid.updated_at'),\
'type' => 'datetime',\
'filterable' => true,\
'filterable_type' => 'datetime_range',\
'sortable' => true,\
]);
}
/**
* Prepare actions.
*
* @return void
*/
public function prepareActions()
{
$this->addAction([\
'icon' => 'icon-edit',\
'title' => trans('blog::app.admin.datagrid.edit'),\
'method' => 'GET',\
'url' => function ($row) {\
return route('admin.blog.edit', $row->id);\
},\
]);
$this->addAction([\
'icon' => 'icon-delete',\
'title' => trans('blog::app.admin.datagrid.delete'),\
'method' => 'DELETE',\
'url' => function ($row) {\
return route('admin.blog.delete', $row->id);\
},\
]);
}
/**
* Prepare mass actions.
*
* @return void
*/
public function prepareMassActions()
{
$this->addMassAction([\
'title' => trans('blog::app.admin.datagrid.mass-update'),\
'url' => route('admin.blog.mass_update'),\
'method' => 'POST',\
'options' => [\
[\
'label' => trans('blog::app.admin.datagrid.active'),\
'value' => 1,\
], [\
'label' => trans('blog::app.admin.datagrid.inactive'),\
'value' => 0,\
],\
],\
]);
$this->addMassAction([\
'title' => trans('blog::app.admin.datagrid.mass-delete'),\
'url' => route('admin.blog.mass_delete'),\
'method' => 'POST'\
]);
}
}
```
## [#](https://devdocs.bagisto.com/2.3/packages/datagrid.html#datagrid-customization) DataGrid Customization
In Bagisto, you can customize the DataGrid to fit your specific needs. This involves extending the DataGrid template and utilizing slots to tailor the layout and functionality. Here’s how to do it:
Use the `DataGrid` component in your Blade view and specify the source URL and other properties like `isMultiRow` if needed. Additionally, use the `#header` and `#body` slots to customize the content.
Here’s an example of how you can extend the DataGrid template:
1. Start by extending the DataGrid template:
```
```
| Key | Functionality |
| ------------------- | ------------------------------------------------------------------------------------------------------------------------------- |
| **`isLoading`** | This key provides information about whether the DataGrid is currently loading. |
| **`available`** | This key contains the available records in the DataGrid. |
| **`applied`** | An object representing the currently applied filters, pagination, sorting, and mass actions. |
| **`selectAll`** | A function that selects or deselects all records in the datagrid. |
| **`sort`** | This is a function used to sort the datagrid based on a specified column. |
| **`performAction`** | This is a function triggered when an action is performed on a record in the datagrid, such as editing, deleting, or processing. |
You can use these props to customize the appearance and behavior of the datagrid header, including handling loading states, applying filters, sorting data, selecting records, and performing actions on the entire dataset.
Once you've completed this step, all the data within the DataGrid becomes accessible inside the template. At this point, you have the freedom to modify the DataGrid's functionality and its user interface to suit your preferences.
TIP
By customizing the DataGrid directly in the Blade file, you won't affect your default DataGrid. This means you can display the same DataGrid with various appearances and customize it by writing simple Vue.js code and using Tailwind CSS (since we use it in Bagisto).
## [#](https://devdocs.bagisto.com/2.3/packages/datagrid.html#available-column-types) Available Column Types
Bagisto’s DataGrid supports various column types that allow you to store, display, and manage diverse kinds of data. This also includes a searchability feature, allowing users to filter data by specific criteria. Below is a breakdown of key column types: decimal, integer, string, boolean, date, datetime, and aggregate types.
### [#](https://devdocs.bagisto.com/2.3/packages/datagrid.html#integer-column-type) Integer Column Type
The integer column type is designed for whole numbers without any fractional or decimal parts. This column type is ideal for counting or identification data. Used for IDs, quantities, and numeric fields that don’t require decimal places.
```
$this->addColumn([\
'index' => 'id',\
'label' => trans('blog::app.admin.datagrid.index.id'),\
'type' => 'integer',\
'searchable' => true,\
'filterable' => true,\
'sortable' => true,\
]);
```
### [#](https://devdocs.bagisto.com/2.3/packages/datagrid.html#decimal-column-type) Decimal Column Type
The decimal column type stores numbers with high precision, allowing fractional parts. It’s ideal for financial or measurement data where exact precision is necessary. Used for columns like product prices, weights, or tax rates that require decimal values.
```
$this->addColumn([\
'index' => 'price',\
'label' => trans('blog::app.admin.datagrid.index.price'),\
'type' => 'decimal',\
'searchable' => true,\
'filterable' => true,\
'sortable' => true,\
]);
```
TIP
Bagisto’s Decimal and Integer column types support a variety of filtering operations to help users refine their searches effectively. Here’s an overview of the available filtering options and their input formats:
### [#](https://devdocs.bagisto.com/2.3/packages/datagrid.html#supported-input-formats) Supported Input Formats:
#### [#](https://devdocs.bagisto.com/2.3/packages/datagrid.html#decimal-columns) Decimal Columns:
```
Exact match: "10.5"
Greater than: ">10.5"
Less than: "<20.75"
Greater than or equal to: ">=15.0"
Less than or equal to: "<25.5"
Range: "10.5-20.75"
```
#### [#](https://devdocs.bagisto.com/2.3/packages/datagrid.html#integer-columns) Integer Columns:
```
Exact match: "10"
Greater than: ">10"
Less than: "<20"
Greater than or equal to: ">=15"
Less than or equal to: "<25"
Range: "10-20"
```
Use these formats to apply precise filters to your Decimal and Integer columns and get the data you need more efficiently!
### [#](https://devdocs.bagisto.com/2.3/packages/datagrid.html#string-column-type) String Column Type
The string column type stores text or alphanumeric data. It’s widely used for columns that contain names, descriptions, or any textual information. Typically used for product names, customer names, categories, and descriptions.
```
$this->addColumn([\
'index' => 'name',\
'label' => trans('blog::app.admin.datagrid.index.name'),\
'type' => 'string',\
'searchable' => true,\
'filterable' => true,\
'sortable' => true,\
]);
```
#### [#](https://devdocs.bagisto.com/2.3/packages/datagrid.html#filterable-options-in-string-column-type) filterable options in string column type
When using the string column type in Bagisto’s DataGrid, the following filterable options are supported to help refine searches based on text data.
```
$this->addColumn([\
'index' => 'type',\
'label' => trans('blog::app.admin.datagrid.index.type'),\
'type' => 'string',\
'filterable' => true,\
'searchable' => true,\
'filterable_type' => 'dropdown',\
'filterable_options' => [\
[\
'label' => trans('blog::app.admin.datagrid.index.type.text'),\
'value' => 'text',\
],\
[\
'label' => trans('blog::app.admin.datagrid.index.type.textarea'),\
'value' => 'textarea',\
],\
[\
'label' => trans('blog::app.admin.datagrid.index.type.price'),\
'value' => 'price',\
],\
[\
'label' => trans('blog::app.admin.datagrid.index.type.boolean'),\
'value' => 'boolean',\
],\
[\
'label' => trans('blog::app.admin.datagrid.index.type.select'),\
'value' => 'select',\
],\
[\
'label' => trans('blog::app.admin.datagrid.index.type.multiselect'),\
'value' => 'multiselect',\
],\
[\
'label' => trans('blog::app.admin.datagrid.index.type.date-time'),\
'value' => 'datetime',\
],\
[\
'label' => trans('blog::app.admin.datagrid.index.type.date'),\
'value' => 'date',\
],\
[\
'label' => trans('blog::app.admin.datagrid.index.type.image'),\
'value' => 'image',\
],\
[\
'label' => trans('blog::app.admin.datagrid.index.type.file'),\
'value' => 'file',\
],\
[\
'label' => trans('blog::app.admin.datagrid.index.type.checkbox'),\
'value' => 'checkbox',\
],\
],\
'sortable' => true,\
]);
```
### [#](https://devdocs.bagisto.com/2.3/packages/datagrid.html#boolean-column-type) Boolean Column Type
The boolean column type stores binary values such as true or false. It’s useful for indicating the state of a specific condition. Used for status flags like “active/inactive,” “available/unavailable,” or "enabled/disabled."
```
$this->addColumn([\
'index' => 'status',\
'label' => trans('blog::app.admin.datagrid.index.status'),\
'type' => 'boolean',\
'searchable' => true,\
'filterable' => true,\
'sortable' => true,\
]);
```
### [#](https://devdocs.bagisto.com/2.3/packages/datagrid.html#date-column-type) Date Column Type
The date column type stores dates, but without time information. It is useful when only the calendar date is important, such as in daily reports or event dates. Often used for birth dates, order dates, or specific event dates.
```
$this->addColumn([\
'index' => 'created_at',\
'label' => trans('blog::app.admin.datagrid.index.date'),\
'type' => 'date',\
'searchable' => true,\
'filterable' => true,\
'sortable' => true,\
]);
```
#### [#](https://devdocs.bagisto.com/2.3/packages/datagrid.html#filterable-type-in-date-column-type) filterable type in Date column type
When using the date column type in Bagisto’s DataGrid, the following filterable type are supported to help refine searches based on text data. The filterable type is typically set to 'date_range', allowing users to search for records based on specific date ranges.
```
$this->addColumn([\
'index' => 'created_at',\
'label' => trans('blog::app.admin.datagrid.index.date'),\
'type' => 'date',\
'searchable' => true,\
'filterable' => true,\
'filterable_type' => 'date_range',\
'sortable' => true\
]);
```
### [#](https://devdocs.bagisto.com/2.3/packages/datagrid.html#datetime-column-type) DateTime Column Type
The datetime column type stores both date and time information. This is important when precise timestamps are needed. Used for tracking exact times for events like order creation, login timestamps, or last updated times.
```
$this->addColumn([\
'index' => 'updated_at',\
'label' => trans('blog::app.admin.datagrid.index.date'),\
'type' => 'datetime',\
'searchable' => true,\
'filterable' => true,\
'sortable' => true,\
]);
```
#### [#](https://devdocs.bagisto.com/2.3/packages/datagrid.html#filterable-type-in-date-time-column-type) filterable type in Date Time column type
When using the date time column type in Bagisto’s DataGrid, the following filterable type are supported to help refine searches based on text data. The filterable type is typically set to 'datetime_range', allowing users to search for records based on specific date time ranges.
```
$this->addColumn([\
'index' => 'updated_at',\
'label' => trans('blog::app.admin.datagrid.index.date'),\
'type' => 'datetime',\
'filterable' => true,\
'searchable' => true,\
'filterable_type' => 'datetime_range',\
'sortable' => true,\
]);
```
### [#](https://devdocs.bagisto.com/2.3/packages/datagrid.html#aggregate-type-column) Aggregate Type Column
The aggregate column type is used for displaying summarized or calculated data, such as totals, averages, or counts derived from other data in the DataGrid. Used to display metrics like total sales, average order value, or product count in categories.
```
$this->addColumn([\
'index' => 'total',\
'label' => trans('blog::app.admin.datagrid.index.total'),\
'type' => 'aggregate',\
'searchable' => true,\
'filterable' => true,\
'sortable' => true,\
]);
```
[Validation](https://devdocs.bagisto.com/2.3/packages/validation.html)[Access Control List](https://devdocs.bagisto.com/2.3/packages/create-acl.html)
## Bagisto GraphQL API
Heads up: You are viewing outdated documentation for Bagisto. Please consider upgrading to [v2.3](https://devdocs.bagisto.com/2.3/prologue) for the latest information.
# [#](https://devdocs.bagisto.com/1.x/graphql-shop-api/#bagisto-graphql-shop-apis) Bagisto GraphQL Shop APIs
Bagisto GraphQL Shop API is a medium to use the features of the core Bagisto Shop System. By using Bagisto GraphQL Shop API, you can integrate your application to serve the default content of Bagisto.
**To download and contribute: [Bagisto GraphQL API GitHub(opens new window)](https://github.com/bagisto/headless-ecommerce/)**
## [#](https://devdocs.bagisto.com/1.x/graphql-shop-api/#key-features) Key Features
- Bagisto GraphQL API provides a complete and understandable description of the data.
- Authentication: Customer Authentication with Login Details.
- Authentication: Admin Authentication with Login Details.
- Provide access to performed CRUD operations.
- Provide the option to filter the responses based on attribute fields.
- The Framework supports the pagination which helps to increase the performance of application.
- Get many resources in a single request.
## [#](https://devdocs.bagisto.com/1.x/graphql-shop-api/#request) Request
- `http(s)://example.com/graphql`
## [#](https://devdocs.bagisto.com/1.x/graphql-shop-api/#where-can-i-use-bagisto-graphql-apis) Where can I use Bagisto GraphQL APIs?
We can use the Bagisto GraphQL APIs in different areas. Some of them are:
- To build a PWA (Progressive Web Application) application, which uses modern web capabilities to deliver an application like experience to the users and provide more user friendly experience than a web application.
- Use to integrate an Online-Shopping Mobile Application with the Bagisto Store to help the customers make purchase.
- Use to integrate with CRM (Customer Relationship Management) systems Like: HubSpot, Salesforce etc. which allows you to manage the business relationships with your customers to help you grow your business.
- To provide exactly what you need and nothing more.
- To get Predictable result.
- Applications using GraphQL can be quick even on slow mobile network connections.
- Applications for devices where bandwidth usage matters.
## Bagisto Reviews API
Heads up: You are viewing outdated documentation for Bagisto. Please consider upgrading to [v2.3](https://devdocs.bagisto.com/2.3/prologue) for the latest information.
# [#](https://devdocs.bagisto.com/1.x/api/reviews.html#reviews) Reviews
In this section, we will check all the reviews' API based on customers as well as products. Also we will see how to create a review.
## [#](https://devdocs.bagisto.com/1.x/api/reviews.html#get-all-reviews) Get all reviews
You can get all the reviews of the Bagisto store. You can achieve this job by using `reviews` API call resource. There is no need of customer authentication.
- Headers
| Key | Value |
| ------ | ---------------- |
| Accept | application/json |
- Request
`GET /api/reviews(?page,limit,pagination)`
- Params
| Name | Info | Type |
| ---------- | -------------------------------------------- | ------ |
| limit | Maximum number of records in each request | Number |
| page | Records for specific page based on the limit | Number |
| pagination | Will display all the records if set to `0` | Number |
TIP
If you are using pagination and want to know more info about responses then check the [explanation](https://devdocs.bagisto.com/1.x/api/explanation) portion.
### [#](https://devdocs.bagisto.com/1.x/api/reviews.html#examples) Examples
#### [#](https://devdocs.bagisto.com/1.x/api/reviews.html#_1-get-reviews-for-specific-page) 1\. Get reviews for specific page
- Headers
| Key | Value |
| ------ | ---------------- |
| Accept | application/json |
- Request
`GET https://example.com/api/reviews?page=1`
Response
```
{
"data": [\
{\
"id": 10,\
"title": "Awesome Product & Service ",\
"rating": "3.0",\
"comment": "Awesome Product & Service ",\
"name": "John Doe",\
"status": "approved",\
},\
{\
"id": 9,\
"title": "Awesome Product Quality",\
"rating": "4.0",\
"comment": "Awesome Product Quality",\
"name": "John Doe",\
"status": "approved",\
},\
{...},\
{...},\
],
"links": {
"first": "https://example.com/api/reviews?page=1",
"last": "https://example.com/api/reviews?page=2",
"prev": null,
"next": null
},
"meta": {...}
}
```
#### [#](https://devdocs.bagisto.com/1.x/api/reviews.html#_2-get-all-reviews-without-pagination) 2\. Get all reviews without pagination
- Headers
| Key | Value |
| ------ | ---------------- |
| Accept | application/json |
- Request
`GET https://example.com/api/reviews?pagination=0`
Response
```
{
"data": [\
{\
"id": 6,\
"title": "Great product & Service!!!",\
"rating": "4.0",\
"comment": "Beautiful bangles. Better than I expected.",\
"name": "John Doe",\
"status": "approved",\
},\
{\
"id": 5,\
"title": "Very good product.. Recommend to all",\
"rating": "5.0",\
"comment": "I have ordered 2 sets. The product i received was good, i loved it.",\
"name": "Peter Doe",\
"status": "approved",\
},\
{\
"id": 4,\
"title": "Awesome Product & Service ",\
"rating": "3.0",\
"comment": "Awesome Product & Service ",\
"name": "John Doe",\
"status": "approved",\
},\
{...},\
{...},\
{...}\
]
}
```
## [#](https://devdocs.bagisto.com/1.x/api/reviews.html#get-review-by-id) Get review by id
To get the specific review detail, you have to pass a review id i.e. `id` as a request payload like `reviews/{id}` in API URL.
- Headers
| Key | Value |
| ------ | ---------------- |
| Accept | application/json |
- Request
`GET /api/reviews/{id}`
- Params
| Name | Info | Type |
| ---- | ------------ | ------ |
| id | Review's ID. | Number |
### [#](https://devdocs.bagisto.com/1.x/api/reviews.html#examples-2) Examples
#### [#](https://devdocs.bagisto.com/1.x/api/reviews.html#_1-get-specific-review-by-id) 1\. Get specific review by id
- Headers
| Key | Value |
| ------ | ---------------- |
| Accept | application/json |
- Request
`GET https://example.com/api/reviews/2`
- Response
```
{
"data": {
"id": 2,
"title": "Awesome Product & Service ",
"rating": "3.0",
"comment": "Awesome Product & Service ",
"name": "John Doe",
"status": "approved",
"product": {...},
"customer": {...}
}
}
```
## [#](https://devdocs.bagisto.com/1.x/api/reviews.html#get-reviews-by-customer-s-id) Get reviews by customer's id
This request will fetch all the reviews by customer's id.
- Headers
| Key | Value |
| ------ | ---------------- |
| Accept | application/json |
- Request
`GET /api/reviews(?customer_id,limit,page,pagination)`
- Params
| Name | Info | Type |
| ----------- | -------------------------------------------- | ------ |
| customer_id | Customer's ID. | Number |
| limit | Maximum number of records in each request | Number |
| page | Records for specific page based on the limit | Number |
| pagination | Will display all the records if set to `0` | Number |
### [#](https://devdocs.bagisto.com/1.x/api/reviews.html#examples-3) Examples
#### [#](https://devdocs.bagisto.com/1.x/api/reviews.html#_1-get-data-of-the-specific-page) 1\. Get data of the specific page
- Headers
| Key | Value |
| ------ | ---------------- |
| Accept | application/json |
- Request
`GET https://example.com/api/reviews?customer_id=1&page=1`
TIP
If you didn't use the page (?page=x) filter, then it returns the data of the first page by default.
`GET https://example.com/api/reviews?customer_id=1`
Response
```
{
{
"data": [\
{\
"id": 4,\
"title": "Good Product",\
"rating": "5.0",\
"comment": "Nice...",\
"name": "John Doe",\
"status": "approved",\
"product": {...},\
"customer": {...},\
},\
{\
"id": 3,\
"title": "Value For Money",\
"rating": "5.0",\
"comment": "Very nice product. Made with good quality.",\
"name": "John Doe",\
"status": "approved",\
"product": {...},\
"customer": {...},\
}\
{\
"id": 2,\
"title": "Great product & Service!!!",\
"rating": "4.0",\
"comment": "Beautiful bangles. Better than I expected.",\
"name": "John Doe",\
"status": "approved",\
"product": {...},\
"customer": {...}\
},\
{\
"id": 1,\
"title": "Awesome Product & Service ",\
"rating": "3.0",\
"comment": "Awesome Product & Service ",\
"name": "John Doe",\
"status": "approved",\
"product": {...},\
"customer": {...}\
},\
],
"links": {
"first": "https://example.com/api/reviews?customer_id=1&page=1",
"last": "https://example.com/api/reviews?customer_id=1&page=1",
"prev": null,
"next": null
},
"meta": {...}
}
}
```
#### [#](https://devdocs.bagisto.com/1.x/api/reviews.html#_2-get-all-customer-s-reviews-without-pagination) 2\. Get all customer's reviews without pagination
You can also get all customer's reviews of Bagisto Store in a single API call without using pagination. For this you have to pass `pagination=0` in the query parameter with the `reviews?customer_id={id}` resource in the API URL.
- Headers
| Key | Value |
| ------ | ---------------- |
| Accept | application/json |
- Request
`GET https://example.com/api/reviews?customer_id=1&pagination=0`
Response
```
{
"data": [\
{\
"id": 4,\
"title": "Good Product",\
"rating": "5.0",\
"comment": "Nice...",\
"name": "John Doe",\
"status": "approved",\
"product": {...},\
"customer": {...},\
},\
{\
"id": 3,\
"title": "Value For Money",\
"rating": "5.0",\
"comment": "Very nice product. Made with good quality.",\
"name": "John Doe",\
"status": "approved",\
"product": {...},\
"customer": {...},\
}\
{\
"id": 2,\
"title": "Great product & Service!!!",\
"rating": "4.0",\
"comment": "Beautiful bangles. Better than I expected.",\
"name": "John Doe",\
"status": "approved",\
"product": {...},\
"customer": {...}\
},\
{\
"id": 1,\
"title": "Awesome Product & Service ",\
"rating": "3.0",\
"comment": "Awesome Product & Service ",\
"name": "John Doe",\
"status": "approved",\
"product": {...},\
"customer": {...}\
}\
]
}
```
## [#](https://devdocs.bagisto.com/1.x/api/reviews.html#get-review-by-product-s-id) Get review by product's id
To get all the reviews of a specific product, you have to pass a `product_id` as a query parameter like `reviews?product_id={id}` in API URL. To use this API call customer authentication is not required.
- Headers
| Key | Value |
| ------ | ---------------- |
| Accept | application/json |
- Request
`GET /api/reviews(?product_id,limit,page,pagination)`
- Params
| Name | Info | Type |
| ---------- | -------------------------------------------- | ------ |
| product_id | Product's ID. | Number |
| limit | Maximum number of records in each request | Number |
| page | Records for specific page based on the limit | Number |
| pagination | Will display all the records if set to `0` | Number |
### [#](https://devdocs.bagisto.com/1.x/api/reviews.html#examples-4) Examples
#### [#](https://devdocs.bagisto.com/1.x/api/reviews.html#_1-get-data-of-the-specific-page-2) 1\. Get data of the specific page
- Headers
| Key | Value |
| ------ | ---------------- |
| Accept | application/json |
- Request
`GET https://example.com/api/reviews?product_id=1&page=1`
TIP
If you didn't use the page (?page=x) filter, then it returns the data of the first page by default.
`GET https://example.com/api/reviews?product_id=1`
Response
```
{
"data": [\
{\
"id": 4,\
"title": "Great product & Service!!!",\
"rating": "4.0",\
"comment": "Beautiful bangles. Better than I expected.",\
"name": "John Doe",\
"status": "approved",\
"product": {...},\
},\
{\
"id": 3,\
"title": "Very good product.. Recommend to all",\
"rating": "5.0",\
"comment": "I have ordered 2 sets. The product i received was good, i loved it..",\
"name": "Peter Doe",\
"status": "approved",\
"product": {...},\
}\
],
"links": {...},
"meta": {...}
}
```
## [#](https://devdocs.bagisto.com/1.x/api/reviews.html#create-products-s-review) Create products's review
To post a review of a specific product, you have to login as a customer.
- Headers
| Key | Value |
| ------ | ---------------- |
| Accept | application/json |
- Request
`POST /api/reviews/{product_id}/create`
- Params
| Name | Info | Type |
| ---------- | ------------------------------ | ------ |
| product_id | Product's ID. | Number |
| rating | Specify rating of the product. | Number |
| title | Title for review. | String |
| comment | Comments for review. | String |
### [#](https://devdocs.bagisto.com/1.x/api/reviews.html#examples-5) Examples
#### [#](https://devdocs.bagisto.com/1.x/api/reviews.html#_1-creating-review-for-the-product) 1\. Creating review for the product
- Headers
| Key | Value |
| ------ | ---------------- |
| Accept | application/json |
- Request
`POST https://example.com/api/reviews/1/create`
- Params
| Name | Value |
| ------- | --------------------- |
| rating | 5 |
| title | Awesome Product |
| comment | Good quality product. |
Response
```
{
"message": "Your review submitted successfully.",
"data": {
"id": 6,
"title": "Awesome Product",
"rating": "5.0",
"comment": "Good quality product.",
"name": "John Doe",
"status": "pending",
"product": {...},
"customer": {...},
"created_at": "2020-09-28T14:27:27.000000Z",
"updated_at": "2020-09-28T14:27:27.000000Z"
}
}
```
[Transactions](https://devdocs.bagisto.com/1.x/api/transactions.html)[Wishlists](https://devdocs.bagisto.com/1.x/api/wishlists.html)
## Bagisto Installation Guide
Heads up: You are viewing outdated documentation for Bagisto. Please consider upgrading to [v2.3](https://devdocs.bagisto.com/2.3/prologue) for the latest information.
# [#](https://devdocs.bagisto.com/2.1/introduction/installation.html#installation) Installation
- [Install Using GUI Installer](https://devdocs.bagisto.com/2.1/introduction/installation.html#install-using-gui-installer)
- [Install Using Composer](https://devdocs.bagisto.com/2.1/introduction/installation.html#install-using-composer)
- [Start Using Bagisto](https://devdocs.bagisto.com/2.1/introduction/installation.html#start-using-bagisto)
- [On a Production Server](https://devdocs.bagisto.com/2.1/introduction/installation.html#on-a-production-server)
- [On Your Local Server](https://devdocs.bagisto.com/2.1/introduction/installation.html#on-your-local-server)
- [Login as an Admin](https://devdocs.bagisto.com/2.1/introduction/installation.html#login-as-an-admin)
- [Login as a Customer](https://devdocs.bagisto.com/2.1/introduction/installation.html#login-as-a-customer)
- [Installation of Mobile App](https://devdocs.bagisto.com/2.1/introduction/installation.html#installation-of-mobile-app)
- [Clone the repository](https://devdocs.bagisto.com/2.1/introduction/installation.html#clone-the-repository)
- [Install dependencies](https://devdocs.bagisto.com/2.1/introduction/installation.html#install-dependencies)
- [Generate Required files](https://devdocs.bagisto.com/2.1/introduction/installation.html#generate-required-files)
- [Connect a device or emulator](https://devdocs.bagisto.com/2.1/introduction/installation.html#connect-a-device-or-emulator)
- [Run the Project](https://devdocs.bagisto.com/2.1/introduction/installation.html#run-the-project)
- [Minimum Versions](https://devdocs.bagisto.com/2.1/introduction/installation.html#minimum-versions)
- [Configurations Steps](https://devdocs.bagisto.com/2.1/introduction/installation.html#configurations-steps)
- [For Setup](https://devdocs.bagisto.com/2.1/introduction/installation.html#for-setup)
- [For Theme](https://devdocs.bagisto.com/2.1/introduction/installation.html#for-theme)
- [For Push Notification Service](https://devdocs.bagisto.com/2.1/introduction/installation.html#for-push-notification-service)
- [For Application Title](https://devdocs.bagisto.com/2.1/introduction/installation.html#for-application-title)
- [For Splash Screen](https://devdocs.bagisto.com/2.1/introduction/installation.html#for-splash-screen)
- [For App Icon](https://devdocs.bagisto.com/2.1/introduction/installation.html#for-app-icon)
- [API Documentation](https://devdocs.bagisto.com/2.1/introduction/installation.html#api-documentation)
- [Contributing](https://devdocs.bagisto.com/2.1/introduction/installation.html#contributing)
- [License](https://devdocs.bagisto.com/2.1/introduction/installation.html#license)
## [#](https://devdocs.bagisto.com/2.1/introduction/installation.html#install-using-gui-installer) Install Using GUI Installer
To install Bagisto using our GUI installer, you can follow any of the following methods:
#### [#](https://devdocs.bagisto.com/2.1/introduction/installation.html#method-1) Method 1:
- Choose the directory where you want to install Bagisto. Open your terminal and navigate to this directory.
- Once you are in the desired directory, run the following command in your terminal to install Bagisto:
```
composer create-project bagisto/bagisto
```
- Configure your HTTP server to point to the **`public/`** directory of the project.
- Open your browser and access the following URL:
```
http://localhost/bagisto/public/
```
This will launch the Bagisto installer.
#### [#](https://devdocs.bagisto.com/2.1/introduction/installation.html#method-2) Method 2:
Otherwise you can download the zip file and install it using the following steps:
- [Download Bagisto(opens new window)](https://bagisto.com/en/download/) from our website.
- Extract the contents of the downloaded
- Navigate to the project root directory.
- Run the following command:
```
composer create
```
- Configure your HTTP server to point to the **`public/`** directory of the project.
- Open your browser and access the following URL:
```
http://localhost/bagisto/public/
```
This will launch the Bagisto installer.
WARNING
Ensure that Composer is installed on your system
## [#](https://devdocs.bagisto.com/2.1/introduction/installation.html#install-using-composer) Install Using Composer
To install Bagisto using Composer, use the following steps:
- Choose the directory where you want to install Bagisto. Open your terminal and navigate to this directory.
- Once you are in the desired directory, run the following command in your terminal to install Bagisto:
- Run the following command:
```
composer create-project bagisto/bagisto
```
- Run the following command:
```
php artisan bagisto:install
```
WARNING
During the installation process, if the **`.env`** file doesn't exist, the installer will prompt you to provide the necessary information.
- Follow the prompts during the installation process to provide the following details:
```
- Please Enter the APP URL :
- Please Enter the Application Name :
- Please select the default locale :
- Please enter the default currency :
- Please choose the Allowed Locales for your channels :
- Please choose the Allowed Currencies for your channels :
- Please select the Database Connection :
- Please enter the Database Host :
- Please enter the Database Port Number :
- Please enter the Database Name :
- Please enter the Database Prefix :
- Please enter the Database Username :
- Please enter the Database Password :
```
- For Create your admin credentials
```
- Enter the Name of Admin User :
- Enter the Email address of the Admin User :
- Configure the Password for admin user :
```
## [#](https://devdocs.bagisto.com/2.1/introduction/installation.html#start-using-bagisto) Start Using Bagisto
### [#](https://devdocs.bagisto.com/2.1/introduction/installation.html#on-a-production-server) On a Production Server
To access Bagisto on a production server, open your domain in a web browser. For example:
```
https://example.com/
```
### [#](https://devdocs.bagisto.com/2.1/introduction/installation.html#on-your-local-server) On Your Local Server
To access Bagisto on your local server, follow these steps:
1. Configure your HTTP server to point to the **`public/`** directory of the project.
2. Run the following command:
```
php artisan serve
```
3. Open your browser and access the provided local server URL.
### [#](https://devdocs.bagisto.com/2.1/introduction/installation.html#login-as-an-admin) Login as an Admin
To log in as an admin, visit **`https://example.com/admin/`**. If you used the **`php artisan bagisto:install`** command, use the following credentials:
```
Email: admin@example.com
Password: admin123
```
### [#](https://devdocs.bagisto.com/2.1/introduction/installation.html#login-as-a-customer) Login as a Customer
To log in as a customer, you can directly register on **`https://example.com/customer/register`**. After registration, you can log in using your credentials on the domain.
## [#](https://devdocs.bagisto.com/2.1/introduction/installation.html#installation-of-mobile-app) Installation of Mobile App
Before beginning with the installation, you will need the following with the mentioned versions
- Bagisto Version - v2.0.0
- Android Studio Version - Flamingo \| 2022.2.1
- Flutter Version - 3.10.1
- Dart - 3.0.1
- Xcode - 14.3
- Swift - 5
Make sure you have installed the API module and set this up properly on your bagisto.
> NOTE: It is recommended that you run a simple Hello World program in Flutter first before proceeding further so that you are sure that the environment is properly set up.
### [#](https://devdocs.bagisto.com/2.1/introduction/installation.html#clone-the-repository) Clone the repository
- Open your terminal or command prompt
- Navigate to the directory where you want to save the project
- Use the git clone command followed by the repository URL
```
git clone https://github.com/bagisto/opensource-ecommerce-mobile-app.git
```
### [#](https://devdocs.bagisto.com/2.1/introduction/installation.html#install-dependencies) Install dependencies
- Navigate to the project's directory
```
cd
```
- Run the following command to install the required packages
```
flutter pub get
```
### [#](https://devdocs.bagisto.com/2.1/introduction/installation.html#generate-required-files) Generate Required files
- Navigate to the project's directory
```
cd
```
- Run the following command to generate the required files
```
flutter pub run build_runner build --delete-conflicting-outputs
```
### [#](https://devdocs.bagisto.com/2.1/introduction/installation.html#connect-a-device-or-emulator) Connect a device or emulator
- Physical Device
1. Enable USB debugging on your device
2. Connect it to your computer using a USB cable.
- Emulator
1. Start an Android or iOS emulator using your preferred IDE or tools.
### [#](https://devdocs.bagisto.com/2.1/introduction/installation.html#run-the-project) Run the Project
- Use the following command to build and run the project
```
flutter run
```
### [#](https://devdocs.bagisto.com/2.1/introduction/installation.html#minimum-versions) Minimum Versions
- Android: 21
- iOS: 12
### [#](https://devdocs.bagisto.com/2.1/introduction/installation.html#configurations-steps) Configurations Steps
### [#](https://devdocs.bagisto.com/2.1/introduction/installation.html#for-setup) For Setup
Change the baseUrl as per your store
**Path:** lib/utils/server_configuration.dart
```
static const String baseUrl = ‘....’;
```
> Note: Add the value of the complete URL ending with the GraphQL API endpoint. E.g - https://example.com/graphql
### [#](https://devdocs.bagisto.com/2.1/introduction/installation.html#for-theme) For Theme
Change the Theme for your app
**Path:** lib/utils/mobikul_theme.dart
```
static const Color primaryColor = Color(***********);
static const Color accentColor = Color(***********);
```
### [#](https://devdocs.bagisto.com/2.1/introduction/installation.html#for-push-notification-service) For Push Notification Service
- Android
Replace "google-services.json".
- iOS
Replace "GoogleService-Info.plist".
> Helpful Articles
> Android https://mobikul.com/knowledgebase/generating-google-service-file-enable-fcm-firebase-cloud-messaging-android-application/
> iOS https://mobikul.com/knowledgebase/generating-new-googleservice-info-plist-file-fcm-based-project-ios-app/
### [#](https://devdocs.bagisto.com/2.1/introduction/installation.html#for-application-title) For Application Title
- Android
1. **Path:** android/app/src/main/AndroidManifest.xml
2. **Change app name:** android:label="\*\*\*\*\*\*\*\*\*\*\*"
- iOS
1. Go to the general tab and identity change the display name to your app name
> For Homepage Header Title - Go to ‘assets/language/en.json’
> (Note: Here, “en” in en.json refers to the languages that would be supported within the application)
### [#](https://devdocs.bagisto.com/2.1/introduction/installation.html#for-splash-screen) For Splash Screen
- For adding Lottie as Splash Screen
1. **Path:** assets/lottie/splash_screen.json
2. After updating the Lottie file, update the ‘splashLottie’ in lib/utils/assets_constants.
```
static const String splashLottie = "assets/lottie/splash_screen.json";
```
- For adding an Image as a Splash Screen
1. **Path:** assets/images/splash.png
2. After updating the Image file, update the ‘splashImage’ in lib/utils/assets_constants.
```
static const String splashImage = "assets/images/splash.png";
```
### [#](https://devdocs.bagisto.com/2.1/introduction/installation.html#for-app-icon) For App Icon
- **Android:** Open the android folder in Android Studio and then right click app > new > Image Asset set Image.
- **iOS:** Replace the icons over the path > ios/Runner/Assets.xcassets/AppIcon.appiconset
### [#](https://devdocs.bagisto.com/2.1/introduction/installation.html#api-documentation) API Documentation
For the API Documentation, please go through - https://github.com/bagisto/headless-ecommerce/
### [#](https://devdocs.bagisto.com/2.1/introduction/installation.html#contributing) Contributing
Contributions are welcome! Follow the contribution guidelines to get started.
### [#](https://devdocs.bagisto.com/2.1/introduction/installation.html#license) License
Bagisto is open-sourced software licensed under the MIT license.
[Requirements](https://devdocs.bagisto.com/2.1/introduction/requirements.html)[Docker](https://devdocs.bagisto.com/2.1/introduction/docker.html)
## Bagisto Installation Guide
Heads up: You are viewing outdated documentation for Bagisto. Please consider upgrading to [v2.3](https://devdocs.bagisto.com/2.3/prologue) for the latest information.
# [#](https://devdocs.bagisto.com/2.x/introduction/installation.html#installation) Installation
- [Install Using GUI Installer](https://devdocs.bagisto.com/2.x/introduction/installation.html#install-using-gui-installer)
- [Install Using Composer](https://devdocs.bagisto.com/2.x/introduction/installation.html#install-using-composer)
- [Start Using Bagisto](https://devdocs.bagisto.com/2.x/introduction/installation.html#start-using-bagisto)
- [On a Production Server](https://devdocs.bagisto.com/2.x/introduction/installation.html#on-a-production-server)
- [On Your Local Server](https://devdocs.bagisto.com/2.x/introduction/installation.html#on-your-local-server)
- [Login as an Admin](https://devdocs.bagisto.com/2.x/introduction/installation.html#login-as-an-admin)
- [Login as a Customer](https://devdocs.bagisto.com/2.x/introduction/installation.html#login-as-a-customer)
- [Installation of Mobile App](https://devdocs.bagisto.com/2.x/introduction/installation.html#installation-of-mobile-app)
- [Clone the repository](https://devdocs.bagisto.com/2.x/introduction/installation.html#clone-the-repository)
- [Install dependencies](https://devdocs.bagisto.com/2.x/introduction/installation.html#install-dependencies)
- [Generate Required files](https://devdocs.bagisto.com/2.x/introduction/installation.html#generate-required-files)
- [Connect a device or emulator](https://devdocs.bagisto.com/2.x/introduction/installation.html#connect-a-device-or-emulator)
- [Run the Project](https://devdocs.bagisto.com/2.x/introduction/installation.html#run-the-project)
- [Minimum Versions](https://devdocs.bagisto.com/2.x/introduction/installation.html#minimum-versions)
- [Configurations Steps](https://devdocs.bagisto.com/2.x/introduction/installation.html#configurations-steps)
- [For Setup](https://devdocs.bagisto.com/2.x/introduction/installation.html#for-setup)
- [For Theme](https://devdocs.bagisto.com/2.x/introduction/installation.html#for-theme)
- [For Push Notification Service](https://devdocs.bagisto.com/2.x/introduction/installation.html#for-push-notification-service)
- [For Application Title](https://devdocs.bagisto.com/2.x/introduction/installation.html#for-application-title)
- [For Splash Screen](https://devdocs.bagisto.com/2.x/introduction/installation.html#for-splash-screen)
- [For App Icon](https://devdocs.bagisto.com/2.x/introduction/installation.html#for-app-icon)
- [API Documentation](https://devdocs.bagisto.com/2.x/introduction/installation.html#api-documentation)
- [Contributing](https://devdocs.bagisto.com/2.x/introduction/installation.html#contributing)
- [License](https://devdocs.bagisto.com/2.x/introduction/installation.html#license)
## [#](https://devdocs.bagisto.com/2.x/introduction/installation.html#install-using-gui-installer) Install Using GUI Installer
To install Bagisto using our GUI installer, you can follow any of the following methods:
#### [#](https://devdocs.bagisto.com/2.x/introduction/installation.html#method-1) Method 1:
- Choose the directory where you want to install Bagisto. Open your terminal and navigate to this directory.
- Once you are in the desired directory, run the following command in your terminal to install Bagisto:
```
composer create-project bagisto/bagisto
```
- Configure your HTTP server to point to the **`public/`** directory of the project.
- Open your browser and access the following URL:
```
http://localhost/bagisto/public/
```
This will launch the Bagisto installer.
#### [#](https://devdocs.bagisto.com/2.x/introduction/installation.html#method-2) Method 2:
Otherwise you can download the zip file and install it using the following steps:
- [Download Bagisto(opens new window)](https://bagisto.com/en/download/) from our website.
- Extract the contents of the downloaded
- Navigate to the project root directory.
- Run the following command:
```
composer create
```
- Configure your HTTP server to point to the **`public/`** directory of the project.
- Open your browser and access the following URL:
```
http://localhost/bagisto/public/
```
This will launch the Bagisto installer.
WARNING
Ensure that Composer is installed on your system
## [#](https://devdocs.bagisto.com/2.x/introduction/installation.html#install-using-composer) Install Using Composer
To install Bagisto using Composer, use the following steps:
- Choose the directory where you want to install Bagisto. Open your terminal and navigate to this directory.
- Once you are in the desired directory, run the following command in your terminal to install Bagisto:
- Run the following command:
```
composer create-project bagisto/bagisto
```
- Run the following command:
```
php artisan bagisto:install
```
WARNING
During the installation process, if the **`.env`** file doesn't exist, the installer will prompt you to provide the necessary information.
- Follow the prompts during the installation process to provide the following details:
```
- Please Enter the APP URL :
- Please Enter the Application Name :
- Please select the default locale :
- Please enter the default currency :
- Please choose the Allowed Locales for your channels :
- Please choose the Allowed Currencies for your channels :
- Please select the Database Connection :
- Please enter the Database Host :
- Please enter the Database Port Number :
- Please enter the Database Name :
- Please enter the Database Prefix :
- Please enter the Database Username :
- Please enter the Database Password :
```
- For Create your admin credentials
```
- Enter the Name of Admin User :
- Enter the Email address of the Admin User :
- Configure the Password for admin user :
```
## [#](https://devdocs.bagisto.com/2.x/introduction/installation.html#start-using-bagisto) Start Using Bagisto
### [#](https://devdocs.bagisto.com/2.x/introduction/installation.html#on-a-production-server) On a Production Server
To access Bagisto on a production server, open your domain in a web browser. For example:
```
https://example.com/
```
### [#](https://devdocs.bagisto.com/2.x/introduction/installation.html#on-your-local-server) On Your Local Server
To access Bagisto on your local server, follow these steps:
1. Configure your HTTP server to point to the **`public/`** directory of the project.
2. Run the following command:
```
php artisan serve
```
3. Open your browser and access the provided local server URL.
### [#](https://devdocs.bagisto.com/2.x/introduction/installation.html#login-as-an-admin) Login as an Admin
To log in as an admin, visit **`https://example.com/admin/`**. If you used the **`php artisan bagisto:install`** command, use the following credentials:
```
Email: admin@example.com
Password: admin123
```
### [#](https://devdocs.bagisto.com/2.x/introduction/installation.html#login-as-a-customer) Login as a Customer
To log in as a customer, you can directly register on **`https://example.com/customer/register`**. After registration, you can log in using your credentials on the domain.
## [#](https://devdocs.bagisto.com/2.x/introduction/installation.html#installation-of-mobile-app) Installation of Mobile App
Before beginning with the installation, you will need the following with the mentioned versions
- Bagisto Version - v2.0.0
- Android Studio Version - Flamingo \| 2022.2.1
- Flutter Version - 3.10.1
- Dart - 3.0.1
- Xcode - 14.3
- Swift - 5
Make sure you have installed the API module and set this up properly on your bagisto.
> NOTE: It is recommended that you run a simple Hello World program in Flutter first before proceeding further so that you are sure that the environment is properly set up.
### [#](https://devdocs.bagisto.com/2.x/introduction/installation.html#clone-the-repository) Clone the repository
- Open your terminal or command prompt
- Navigate to the directory where you want to save the project
- Use the git clone command followed by the repository URL
```
git clone https://github.com/bagisto/opensource-ecommerce-mobile-app.git
```
### [#](https://devdocs.bagisto.com/2.x/introduction/installation.html#install-dependencies) Install dependencies
- Navigate to the project's directory
```
cd
```
- Run the following command to install the required packages
```
flutter pub get
```
### [#](https://devdocs.bagisto.com/2.x/introduction/installation.html#generate-required-files) Generate Required files
- Navigate to the project's directory
```
cd
```
- Run the following command to generate the required files
```
flutter pub run build_runner build --delete-conflicting-outputs
```
### [#](https://devdocs.bagisto.com/2.x/introduction/installation.html#connect-a-device-or-emulator) Connect a device or emulator
- Physical Device
1. Enable USB debugging on your device
2. Connect it to your computer using a USB cable.
- Emulator
1. Start an Android or iOS emulator using your preferred IDE or tools.
### [#](https://devdocs.bagisto.com/2.x/introduction/installation.html#run-the-project) Run the Project
- Use the following command to build and run the project
```
flutter run
```
### [#](https://devdocs.bagisto.com/2.x/introduction/installation.html#minimum-versions) Minimum Versions
- Android: 21
- iOS: 12
### [#](https://devdocs.bagisto.com/2.x/introduction/installation.html#configurations-steps) Configurations Steps
### [#](https://devdocs.bagisto.com/2.x/introduction/installation.html#for-setup) For Setup
Change the baseUrl as per your store
**Path:** lib/utils/server_configuration.dart
```
static const String baseUrl = ‘....’;
```
> Note: Add the value of the complete URL ending with the GraphQL API endpoint. E.g - https://example.com/graphql
### [#](https://devdocs.bagisto.com/2.x/introduction/installation.html#for-theme) For Theme
Change the Theme for your app
**Path:** lib/utils/mobikul_theme.dart
```
static const Color primaryColor = Color(***********);
static const Color accentColor = Color(***********);
```
### [#](https://devdocs.bagisto.com/2.x/introduction/installation.html#for-push-notification-service) For Push Notification Service
- Android
Replace "google-services.json".
- iOS
Replace "GoogleService-Info.plist".
> Helpful Articles
> Android https://mobikul.com/knowledgebase/generating-google-service-file-enable-fcm-firebase-cloud-messaging-android-application/
> iOS https://mobikul.com/knowledgebase/generating-new-googleservice-info-plist-file-fcm-based-project-ios-app/
### [#](https://devdocs.bagisto.com/2.x/introduction/installation.html#for-application-title) For Application Title
- Android
1. **Path:** android/app/src/main/AndroidManifest.xml
2. **Change app name:** android:label="\*\*\*\*\*\*\*\*\*\*\*"
- iOS
1. Go to the general tab and identity change the display name to your app name
> For Homepage Header Title - Go to ‘assets/language/en.json’
> (Note: Here, “en” in en.json refers to the languages that would be supported within the application)
### [#](https://devdocs.bagisto.com/2.x/introduction/installation.html#for-splash-screen) For Splash Screen
- For adding Lottie as Splash Screen
1. **Path:** assets/lottie/splash_screen.json
2. After updating the Lottie file, update the ‘splashLottie’ in lib/utils/assets_constants.
```
static const String splashLottie = "assets/lottie/splash_screen.json";
```
- For adding an Image as a Splash Screen
1. **Path:** assets/images/splash.png
2. After updating the Image file, update the ‘splashImage’ in lib/utils/assets_constants.
```
static const String splashImage = "assets/images/splash.png";
```
### [#](https://devdocs.bagisto.com/2.x/introduction/installation.html#for-app-icon) For App Icon
- **Android:** Open the android folder in Android Studio and then right click app > new > Image Asset set Image.
- **iOS:** Replace the icons over the path > ios/Runner/Assets.xcassets/AppIcon.appiconset
### [#](https://devdocs.bagisto.com/2.x/introduction/installation.html#api-documentation) API Documentation
For the API Documentation, please go through - https://github.com/bagisto/headless-ecommerce/
### [#](https://devdocs.bagisto.com/2.x/introduction/installation.html#contributing) Contributing
Contributions are welcome! Follow the contribution guidelines to get started.
### [#](https://devdocs.bagisto.com/2.x/introduction/installation.html#license) License
Bagisto is open-sourced software licensed under the MIT license.
[Requirements](https://devdocs.bagisto.com/2.x/introduction/requirements.html)[Docker](https://devdocs.bagisto.com/2.x/introduction/docker.html)
## Bagisto Locales API
Heads up: You are viewing outdated documentation for Bagisto. Please consider upgrading to [v2.3](https://devdocs.bagisto.com/2.3/prologue) for the latest information.
# [#](https://devdocs.bagisto.com/1.x/api/locales.html#locales) Locales
In this section, we will see all the APIs which are related to locales.
## [#](https://devdocs.bagisto.com/1.x/api/locales.html#get-all-locales) Get all locales
You can get all the locales from the Bagisto store. You can achieve this job by using the `locales` API call resource.
- Headers
| Key | Value |
| ------ | ---------------- |
| Accept | application/json |
- Request
`GET /api/locales(?limit,page,pagination)`
- Params
| Name | Info | Type |
| ---------- | -------------------------------------------- | ------ |
| limit | Maximum number of records in each request | Number |
| page | Records for specific page based on the limit | Number |
| pagination | Will display all the records if set to `0` | Number |
TIP
If you are using pagination and want to know more info about responses then check the [explanation](https://devdocs.bagisto.com/1.x/api/explanation) portion.
### [#](https://devdocs.bagisto.com/1.x/api/locales.html#examples) Examples
#### [#](https://devdocs.bagisto.com/1.x/api/locales.html#_1-records-for-specific-page) 1\. Records for specific page
- Headers
| Key | Value |
| ------ | ---------------- |
| Accept | application/json |
- Request
`GET http(s)://example.com/api/locales?page=1`
TIP
If you didn't use the page (?page=x) filter, then it returns the data of the first page by default.
`GET http(s)://example.com/api/locales`
Response
```
{
"data": [\
{\
"id": 4,\
"code": "tr",\
"name": "Türkçe",\
"created_at": null,\
"updated_at": null\
},\
{\
"id": 3,\
"code": "nl",\
"name": "Dutch",\
"created_at": null,\
"updated_at": null\
},\
{\
"id": 2,\
"code": "fr",\
"name": "French",\
"created_at": null,\
"updated_at": null\
},\
{\
"id": 1,\
"code": "en",\
"name": "English",\
"created_at": null,\
"updated_at": null\
}\
],
"links": {
"first": "https://example.com/api/locales?page=1",
"last": "https://example.com/api/locales?page=1",
"prev": null,
"next": null
},
"meta": {
"current_page": 1,
"from": 1,
"last_page": 1,
"links": [\
{\
"url": null,\
"label": "« Previous",\
"active": false\
},\
{\
"url": "https://example.com/api/locales?page=1",\
"label": "1",\
"active": true\
},\
{\
"url": null,\
"label": "Next »",\
"active": false\
}\
],
"path": "https://example.com/api/locales",
"per_page": 10,
"to": 4,
"total": 4
}
}
```
#### [#](https://devdocs.bagisto.com/1.x/api/locales.html#_2-get-all-locales-without-pagination) 2\. Get all locales without pagination
You can also get all the locales at once from the Bagisto store without pagination. For this, you have to pass `pagination=0` in the query parameter with the `locales` resource in the API URL.
- Headers
| Key | Value |
| ------ | ---------------- |
| Accept | application/json |
- Request
`GET http(s)://example.com/public/api/locales?pagination=0`
Response
```
{
"data": [\
{\
"id": 4,\
"code": "tr",\
"name": "Türkçe",\
"created_at": null,\
"updated_at": null\
},\
{\
"id": 3,\
"code": "nl",\
"name": "Dutch",\
"created_at": null,\
"updated_at": null\
},\
{\
"id": 2,\
"code": "fr",\
"name": "French",\
"created_at": null,\
"updated_at": null\
},\
{\
"id": 1,\
"code": "en",\
"name": "English",\
"created_at": null,\
"updated_at": null\
}\
]
}
```
## [#](https://devdocs.bagisto.com/1.x/api/locales.html#get-locale-by-id) Get locale by id
To get the specific locale details, you have to pass an `locale_id` as a request payload in the API URL.
- Headers
| Key | Value |
| ------ | ---------------- |
| Accept | application/json |
- Request
`GET /api/locales/{locale_id}`
- Params
| Name | Info | Type |
| --------- | ----------- | ------ |
| locale_id | Locale's ID | Number |
### [#](https://devdocs.bagisto.com/1.x/api/locales.html#examples-2) Examples
Let's fetch specific locale,
- Headers
| Key | Value |
| ------ | ---------------- |
| Accept | application/json |
- Request
`GET http(s)://example.com/api/locales/1`
Response
```
{
"data": {
"id": 1,
"code": "en",
"name": "English",
"created_at": null,
"updated_at": null
}
}
```
[Customers](https://devdocs.bagisto.com/1.x/api/customers.html)[Addresses](https://devdocs.bagisto.com/1.x/api/addresses.html)
## Bagisto Wishlist API
Heads up: You are viewing outdated documentation for Bagisto. Please consider upgrading to [v2.3](https://devdocs.bagisto.com/2.3/prologue) for the latest information.
# [#](https://devdocs.bagisto.com/1.x/api/wishlists.html#wishlists) Wishlists
In this section, we will see how wishlists' API works.
## [#](https://devdocs.bagisto.com/1.x/api/wishlists.html#get-all-wishlists) Get all wishlists
You can also get all the wishlists of store's customers. To get the wishlists, customer must be logged-in to the Bagisto store.
- Headers
| Key | Value | Info |
| ------------- | --------------------- | ------------------------------------ |
| Accept | application/json | |
| Authorization | Bearer `token-string` | Use only when you pass `?token=true` |
- Request
`GET /api/wishlist(?limit,page,pagination)`
- Params
| Name | Info | Type |
| ---------- | -------------------------------------------- | ------ |
| limit | Maximum number of records in each request | Number |
| page | Records for specific page based on the limit | Number |
| pagination | Will display all the records if set to `0` | Number |
TIP
If you are using pagination and want to know more info about responses then check the [explanation](https://devdocs.bagisto.com/1.x/api/explanation) portion.
### [#](https://devdocs.bagisto.com/1.x/api/wishlists.html#examples) Examples
#### [#](https://devdocs.bagisto.com/1.x/api/wishlists.html#_1-get-wishlists-for-specific-page) 1\. Get wishlists for specific page
- Headers
| Key | Value | Info |
| ------------- | --------------------- | ------------------------------------ |
| Accept | application/json | |
| Authorization | Bearer `token-string` | Use only when you pass `?token=true` |
- Request
`GET http(s)://example.com/api/wishlist?page=1`
#### [#](https://devdocs.bagisto.com/1.x/api/wishlists.html#_2-get-wishlists-for-specific-page-with-limit) 2\. Get wishlists for specific page with limit
- Headers
| Key | Value | Info |
| ------------- | --------------------- | ------------------------------------ |
| Accept | application/json | |
| Authorization | Bearer `token-string` | Use only when you pass `?token=true` |
- Request
`GET http(s)://example.com/api/wishlist?limit=2&page=1`
Response (Example 1 & 2)
#### [#](https://devdocs.bagisto.com/1.x/api/wishlists.html#_3-get-all-wishlists-without-pagination) 3\. Get all wishlists without pagination
- Headers
| Key | Value | Info |
| ------------- | --------------------- | ------------------------------------ |
| Accept | application/json | |
| Authorization | Bearer `token-string` | Use only when you pass `?token=true` |
- Request
`GET http(s)://example.com/api/wishlist?pagination=0`
Response
```
{
"data": [\
{\
"id": 9,\
"product": {\
"id": 5,\
"type": "simple",\
"name": "Home Decor Bottles",\
"url_key": "home-decor-bottles",\
"price": 10,\
"formated_price": "$10.00",\
"short_description": "Home Decor Bottles
",\
"description": "Home Decor Bottles
",\
"sku": "bottles",\
}\
},\
{\
"id": 8,\
"product": {...}\
},\
{\
"id": 7,\
"product": {...}\
}\
]
}
```
## [#](https://devdocs.bagisto.com/1.x/api/wishlists.html#get-wishlists-by-customer-s-id) Get wishlists by customer's id
To get all wishlists of a specific customer, you have to pass a `customer_id` as a query parameter in API url.
- Headers
| Key | Value | Info |
| ------------- | --------------------- | ------------------------------------ |
| Accept | application/json | |
| Authorization | Bearer `token-string` | Use only when you pass `?token=true` |
- Request
`GET /api/wishlist(?customer_id,limit,page,pagination)`
- Params
| Name | Info | Type |
| ----------- | -------------------------------------------- | ------ |
| customer_id | Customer's ID | Number |
| limit | Maximum number of records in each request | Number |
| page | Records for specific page based on the limit | Number |
| pagination | Will display all the records if set to `0` | Number |
### [#](https://devdocs.bagisto.com/1.x/api/wishlists.html#examples-2) Examples
#### [#](https://devdocs.bagisto.com/1.x/api/wishlists.html#_1-if-you-want-all-the-wishlists-by-customer-id) 1\. If you want all the wishlists by `customer_id`
- Headers
| Key | Value | Info |
| ------------- | --------------------- | ------------------------------------ |
| Accept | application/json | |
| Authorization | Bearer `token-string` | Use only when you pass `?token=true` |
- Request
`GET http(s)://example.com/api/wishlist?customer_id=1&pagination=0`
Response:
```
{
"data": [\
{\
"id": 7,\
"product": {...},\
},\
{...},\
{...},\
{...},\
...\
{...}\
]
}
```
#### [#](https://devdocs.bagisto.com/1.x/api/wishlists.html#_2-if-you-want-wishlists-for-specific-page-by-customer-id) 2\. If you want wishlists for specific page by `customer_id`
- Headers
| Key | Value | Info |
| ------------- | --------------------- | ------------------------------------ |
| Accept | application/json | |
| Authorization | Bearer `token-string` | Use only when you pass `?token=true` |
- Request
`GET http(s)://example.com/api/wishlist?customer_id=1&page=1`
Response:
```
{
"data": [\
{\
"id": 7,\
"product": {...},\
},\
{...},\
{...},\
{...},\
...\
{...}\
],
"links": {
"first": "https://example.com/api/wishlist?customer_id=1&page=1",
"last": "https://example.com/api/wishlist?customer_id=1&page=1",
"prev": null,
"next": null
},
"meta": {
"current_page": 1,
"from": 1,
"last_page": 1,
"path": "https://example.com/api/wishlist",
"per_page": 10,
"to": 2,
"total": 9
}
}
```
## [#](https://devdocs.bagisto.com/1.x/api/wishlists.html#add-product-to-wishlist) Add product to wishlist
To add a product to customer's wishlist, you have to pass a `product_id` as a request payload like `wishlist/add/{product_id}` in API URL.
- Headers
| Key | Value | Info |
| ------------- | --------------------- | ------------------------------------ |
| Accept | application/json | |
| Authorization | Bearer `token-string` | Use only when you pass `?token=true` |
- Request
`GET http(s)://example.com/api/wishlist/add/{product_id}`
- Params
| Name | Info | Type |
| ---------- | ---------- | ------ |
| product_id | Product ID | Number |
### [#](https://devdocs.bagisto.com/1.x/api/wishlists.html#examples-3) Examples
Let's add one product to wishlist,
- Headers
| Key | Value | Info |
| ------------- | --------------------- | ------------------------------------ |
| Accept | application/json | |
| Authorization | Bearer `token-string` | Use only when you pass `?token=true` |
- Request
`GET http(s)://example.com/api/wishlist/add/11`
Response
```
{
"data": {
"id": 11,
"product": {
"id": 1,
"type": "simple",
"name": "Leather Shoes",
"url_key": "leather-shoes",
"price": 50,
"formated_price": "$50.00",
"short_description": "Leather Shoes
",
"description": "Leather Shoes
",
"sku": "men-leather-shoes"
}
},
"message": "Item Successfully Added To Wishlist"
}
```
## [#](https://devdocs.bagisto.com/1.x/api/wishlists.html#remove-product-from-wishlist) Remove product from wishlist
For removing the product from the wishlist, you need to hit the same add API again. Just like a toggle. It will remove if the wishlist is already added.
### [#](https://devdocs.bagisto.com/1.x/api/wishlists.html#examples-4) Examples
Hitting the same add API again,
- Headers
| Key | Value | Info |
| ------------- | --------------------- | ------------------------------------ |
| Accept | application/json | |
| Authorization | Bearer `token-string` | Use only when you pass `?token=true` |
- Request
`GET http(s)://example.com/api/wishlist/add/11`
Response
```
{
"data": null,
"message": "Item removed from wishlist successfully."
}
```
[Reviews](https://devdocs.bagisto.com/1.x/api/reviews.html)[Bagisto GraphQL Admin API](https://devdocs.bagisto.com/1.x/graphql-admin-api)
## Laravel Octane Performance
Heads up: You are viewing outdated documentation for Bagisto. Please consider upgrading to [v2.3](https://devdocs.bagisto.com/2.3/prologue) for the latest information.
# [#](https://devdocs.bagisto.com/2.2/performance/octane.html#laravel-octane) Laravel Octane
[Laravel Octane(opens new window)](https://laravel.com/docs/10.x/octane) is a performance-boosting package designed to enhance the speed, efficiency, and scalability of Laravel applications, including Bagisto.
- Drives remarkable improvements in page load times, ensuring a seamless and responsive shopping experience.
- Provides the scalability required to accommodate the growth of e-commerce businesses.
- Forms the foundation for optimizing Bagisto's performance and meeting the demands of modern e-commerce.
[Full Page Cache](https://devdocs.bagisto.com/2.2/performance/fpc.html)[Load Balancing](https://devdocs.bagisto.com/2.2/performance/loadbalancing.html)
## Laravel Octane Performance
This is the documentation for the current version (v2.3) of Bagisto. Stay informed and make the most of Bagisto's capabilities.
# [#](https://devdocs.bagisto.com/2.3/performance/octane.html#laravel-octane) Laravel Octane
[Laravel Octane(opens new window)](https://laravel.com/docs/10.x/octane) is a performance-boosting package designed to enhance the speed, efficiency, and scalability of Laravel applications, including Bagisto.
- Drives remarkable improvements in page load times, ensuring a seamless and responsive shopping experience.
- Provides the scalability required to accommodate the growth of e-commerce businesses.
- Forms the foundation for optimizing Bagisto's performance and meeting the demands of modern e-commerce.
[Full Page Cache](https://devdocs.bagisto.com/2.3/performance/fpc.html)[Load Balancing](https://devdocs.bagisto.com/2.3/performance/loadbalancing.html)
## Bagisto Views Documentation
This is the documentation for the current version (v2.3) of Bagisto. Stay informed and make the most of Bagisto's capabilities.
# [#](https://devdocs.bagisto.com/2.3/packages/views.html#views) Views
- [Introduction](https://devdocs.bagisto.com/2.3/packages/views.html#introduction)
- [Directory Structure](https://devdocs.bagisto.com/2.3/packages/views.html#directory-structure)
- [Adding HTML Content](https://devdocs.bagisto.com/2.3/packages/views.html#adding-html-content)
- [Load Views from Package](https://devdocs.bagisto.com/2.3/packages/views.html#load-views-from-package)
- [Rendering Views](https://devdocs.bagisto.com/2.3/packages/views.html#rendering-views)
- [Blade File Naming Convention](https://devdocs.bagisto.com/2.3/packages/views.html#blade-file-naming-convention)
- [Listing (Index Blade):](https://devdocs.bagisto.com/2.3/packages/views.html#listing-index-blade)
- [Creation (Create Blade):](https://devdocs.bagisto.com/2.3/packages/views.html#creation-create-blade)
- [Updating (Edit Blade):](https://devdocs.bagisto.com/2.3/packages/views.html#updating-edit-blade)
## [#](https://devdocs.bagisto.com/2.3/packages/views.html#introduction) Introduction
Views in Laravel are responsible for separating the application's logic from the presentation layer. They provide a clean way to manage and organize the HTML content of your application. Views are typically stored in the `resources/views` directory and are rendered using the Blade templating engine, which offers a simple and powerful way to create dynamic content.
By using views, you can create reusable templates and components, making your code more maintainable and easier to understand. Blade templates allow you to use control structures like loops and conditionals, as well as to include other templates, which helps to keep your views organized and modular.
To learn in detail about Views, you can visit the Laravel documentation [here(opens new window)](https://laravel.com/docs/11.x/views).
Here's a basic example of a Blade template:
## [#](https://devdocs.bagisto.com/2.3/packages/views.html#directory-structure) Directory Structure
To organize the views for our blog package, we need to set up a specific directory structure. Follow the steps below to create the necessary folders.
#### [#](https://devdocs.bagisto.com/2.3/packages/views.html#create-the-resources-folder) Create the `Resources` Folder
- Navigate to the `packages/Webkul/Blog/src` directory.
- Create a folder named `Resources`.
#### [#](https://devdocs.bagisto.com/2.3/packages/views.html#create-the-views-folder) Create the `views` Folder
- Inside the `Resources` folder, create another folder named `views`.
#### [#](https://devdocs.bagisto.com/2.3/packages/views.html#create-the-admin-and-shop-folders) Create the `admin` and `shop` Folders
- Inside the `views` folder, create two folders named `admin` and `shop`.
The updated directory structure will look like this:
```
└── packages
└── Webkul
└── Blog
└── src
├── ...
└── Resources
└── views
├── admin
└── shop
```
#### [#](https://devdocs.bagisto.com/2.3/packages/views.html#create-the-index-blade-php-file-in-the-shop-folder) Create the `index.blade.php` File in the `shop` Folder
- Inside the `shop/default` folder, create a file named `index.blade.php`, `create.blade.php`, `edit.blade.php` .
```
└── packages
└── Webkul
└── Blog
└── src
├── ...
└── Resources
└── views
├── admin
│ └── index.blade.php
└── shop
└── index.blade.php
└── create.blade.php
└── edit.blade.php
```
### [#](https://devdocs.bagisto.com/2.3/packages/views.html#adding-html-content) Adding HTML Content
Below is an example of basic HTML content that you can add to each `index.blade.php` file.
#### [#](https://devdocs.bagisto.com/2.3/packages/views.html#index-blade-php-in-the-admin-folder) `index.blade.php` in the `admin` Folder
```
Admin - Blog Posts
Admin - Blog Posts
Welcome to the admin section for managing blog posts.
```
#### [#](https://devdocs.bagisto.com/2.3/packages/views.html#index-blade-php-in-the-default-folder) `index.blade.php` in the `default` Folder
```
Shop - Blog Posts
Shop - Blog Posts
Welcome to the shop section for viewing blog posts.
```
## [#](https://devdocs.bagisto.com/2.3/packages/views.html#load-views-from-package) Load Views from Package
To make the views in our package accessible, we need to register them in the service provider's `boot` method. This involves updating the `BlogServiceProvider.php` file to include the view loading logic. Follow the steps below:
#### [#](https://devdocs.bagisto.com/2.3/packages/views.html#open-the-service-provider-file) Open the Service Provider File
- Navigate to the `packages/Webkul/Blog/src/Providers` directory.
- Open the `BlogServiceProvider.php` file.
#### [#](https://devdocs.bagisto.com/2.3/packages/views.html#update-the-boot-method) Update the `boot` Method
- Inside the `boot` method of the `BlogServiceProvider` class, add the logic to load views from the package.
#### [#](https://devdocs.bagisto.com/2.3/packages/views.html#updated-blogserviceprovider-php) Updated `BlogServiceProvider.php`
Here is the updated code for `BlogServiceProvider.php`:
```
loadViewsFrom(__DIR__ . '/../Resources/views', 'blog');
}
}
```
#### [#](https://devdocs.bagisto.com/2.3/packages/views.html#explanation) Explanation
- The `namespace` keyword defines the namespace for the `BlogServiceProvider` class, which is `Webkul\Blog\Providers`.
- The `BlogServiceProvider` class extends Laravel's base `ServiceProvider` class.
- The `boot` method is used to bootstrap any application services.
- Inside the `boot` method, we use the `$this->loadViewsFrom` method to register the views from the package.
- The `loadViewsFrom` method takes two arguments:
- The path to the views directory within the package: `__DIR__ . '/../Resources/views'`.
- A namespace for the views: `'blog'`.
## [#](https://devdocs.bagisto.com/2.3/packages/views.html#rendering-views) Rendering Views
In Laravel applications, views are typically rendered from controller methods using the `view` helper function. This section describes how views are invoked and passed data from a controller.
```
postRepository->with(['author'])->all();
return view('blog::shop.index', compact('blogs'));
}
}
```
#### [#](https://devdocs.bagisto.com/2.3/packages/views.html#explanation-2) Explanation
- The `view` helper function in Laravel is used within the `index` method of the `PostController` to render the `shop.index` view.
- It accepts two parameters the name of the view ( `blog::shop.index`) and an array of data ( `compact('blogs')`) to pass to the `view`.
## [#](https://devdocs.bagisto.com/2.3/packages/views.html#blade-file-naming-convention) Blade File Naming Convention
Bagisto utilizes Blade templates to handle `listing`, `creation`, and `updating` operations for resources like products, posts, and categories. This section provides a detailed guide on how to implement these operations using Blade templates within your Bagisto package.
### [#](https://devdocs.bagisto.com/2.3/packages/views.html#listing-index-blade) Listing (Index Blade):
- The `index.blade.php` template is used to display a list of all records (posts).
- The controller's `index` method fetches all posts and passes them to the view.
### [#](https://devdocs.bagisto.com/2.3/packages/views.html#creation-create-blade) Creation (Create Blade):
- The `create.blade.php` template contains a form for creating new records.
- The controller's `create` method renders this view.
### [#](https://devdocs.bagisto.com/2.3/packages/views.html#updating-edit-blade) Updating (Edit Blade):
- The `edit.blade.php` template contains a form for editing existing records.
- The controller's `edit` method fetches the specific post and passes it to the view.
By following these steps, you can effectively utilize Blade templates in Bagisto for listing, creating, and updating resources, ensuring a structured and maintainable approach to managing CRUD operations within your application.
[Controllers](https://devdocs.bagisto.com/2.3/packages/controllers.html)[Localization](https://devdocs.bagisto.com/2.3/packages/localization.html)
## Bagisto Helper Methods
This is the documentation for the current version (v2.3) of Bagisto. Stay informed and make the most of Bagisto's capabilities.
# [#](https://devdocs.bagisto.com/2.3/advanced/helpers.html#helpers) Helpers
- [Introduction](https://devdocs.bagisto.com/2.3/advanced/helpers.html#introduction)
- [Core Helpers](https://devdocs.bagisto.com/2.3/advanced/helpers.html#core-helpers)
- [Get the version number of the Bagisto.](https://devdocs.bagisto.com/2.3/advanced/helpers.html#get-the-version-number-of-the-bagisto)
- [Get all channels](https://devdocs.bagisto.com/2.3/advanced/helpers.html#get-all-channels)
- [Get current channel models](https://devdocs.bagisto.com/2.3/advanced/helpers.html#get-current-channel-models)
- [Set the current channel](https://devdocs.bagisto.com/2.3/advanced/helpers.html#set-the-current-channel)
- [Get current channel code](https://devdocs.bagisto.com/2.3/advanced/helpers.html#get-current-channel-code)
- [Get default channel models](https://devdocs.bagisto.com/2.3/advanced/helpers.html#get-default-channel-models)
- [Set the default channel](https://devdocs.bagisto.com/2.3/advanced/helpers.html#set-the-default-channel)
- [Get the default channel code configured in config/app.php.](https://devdocs.bagisto.com/2.3/advanced/helpers.html#get-the-default-channel-code-configured-in-config-app-php)
- [Get default locale code from default channel](https://devdocs.bagisto.com/2.3/advanced/helpers.html#get-default-locale-code-from-default-channel)
- [Get channel from request](https://devdocs.bagisto.com/2.3/advanced/helpers.html#get-channel-from-request)
- [Get channel code from request](https://devdocs.bagisto.com/2.3/advanced/helpers.html#get-channel-code-from-request)
- [Get the channel name](https://devdocs.bagisto.com/2.3/advanced/helpers.html#get-the-channel-name)
- [Get all locales](https://devdocs.bagisto.com/2.3/advanced/helpers.html#get-all-locales)
- [Get current locale](https://devdocs.bagisto.com/2.3/advanced/helpers.html#get-current-locale)
- [Get locale from request](https://devdocs.bagisto.com/2.3/advanced/helpers.html#get-locale-from-request)
- [Get locale code from request](https://devdocs.bagisto.com/2.3/advanced/helpers.html#get-locale-code-from-request)
- [Check requested locale code in requested channel.](https://devdocs.bagisto.com/2.3/advanced/helpers.html#check-requested-locale-code-in-requested-channel)
- [Get all currencies](https://devdocs.bagisto.com/2.3/advanced/helpers.html#get-all-currencies)
- [Get base currency model](https://devdocs.bagisto.com/2.3/advanced/helpers.html#get-base-currency-model)
- [Get base channel's currency code](https://devdocs.bagisto.com/2.3/advanced/helpers.html#get-base-channel-s-currency-code)
- [Get base channel's currency model](https://devdocs.bagisto.com/2.3/advanced/helpers.html#get-base-channel-s-currency-model)
- [Get base channel's currency code](https://devdocs.bagisto.com/2.3/advanced/helpers.html#get-base-channel-s-currency-code)
- [Set current currency](https://devdocs.bagisto.com/2.3/advanced/helpers.html#set-current-currency)
- [Get current channel's currency model](https://devdocs.bagisto.com/2.3/advanced/helpers.html#get-current-channel-s-currency-model)
- [Get exchange rates](https://devdocs.bagisto.com/2.3/advanced/helpers.html#get-exchange-rates)
- [Converts price.](https://devdocs.bagisto.com/2.3/advanced/helpers.html#converts-price)
- [Converts to base price](https://devdocs.bagisto.com/2.3/advanced/helpers.html#converts-to-base-price)
- [Format and convert price with currency symbol](https://devdocs.bagisto.com/2.3/advanced/helpers.html#format-and-convert-price-with-currency-symbol)
- [Get currency symbol from currency code](https://devdocs.bagisto.com/2.3/advanced/helpers.html#get-currency-symbol-from-currency-code)
- [Format and convert price with currency symbol](https://devdocs.bagisto.com/2.3/advanced/helpers.html#format-and-convert-price-with-currency-symbol)
- [Format price with base currency symbol.](https://devdocs.bagisto.com/2.3/advanced/helpers.html#format-price-with-base-currency-symbol)
- [Checks if current date of the given channel (in the channel timezone) is within the range](https://devdocs.bagisto.com/2.3/advanced/helpers.html#checks-if-current-date-of-the-given-channel-in-the-channel-timezone-is-within-the-range)
- [Get channel timestamp, timestamp will be builded with channel timezone settings.](https://devdocs.bagisto.com/2.3/advanced/helpers.html#get-channel-timestamp-timestamp-will-be-builded-with-channel-timezone-settings)
- [Check whether sql date is empty.](https://devdocs.bagisto.com/2.3/advanced/helpers.html#check-whether-sql-date-is-empty)
- [Format date using current channel.](https://devdocs.bagisto.com/2.3/advanced/helpers.html#format-date-using-current-channel)
- [Retrieve information from configuration](https://devdocs.bagisto.com/2.3/advanced/helpers.html#retrieve-information-from-configuration)
- [Retrieve all countries](https://devdocs.bagisto.com/2.3/advanced/helpers.html#retrieve-all-countries)
- [Get country name by code](https://devdocs.bagisto.com/2.3/advanced/helpers.html#get-country-name-by-code)
- [Retrieve all country states](https://devdocs.bagisto.com/2.3/advanced/helpers.html#retrieve-all-country-states)
- [Retrieve all grouped states by country code.](https://devdocs.bagisto.com/2.3/advanced/helpers.html#retrieve-all-grouped-states-by-country-code)
- [Get states by country code.](https://devdocs.bagisto.com/2.3/advanced/helpers.html#get-states-by-country-code)
- [Get guest customer group](https://devdocs.bagisto.com/2.3/advanced/helpers.html#get-guest-customer-group)
- [Is country required](https://devdocs.bagisto.com/2.3/advanced/helpers.html#is-country-required)
- [Is state required](https://devdocs.bagisto.com/2.3/advanced/helpers.html#is-state-required)
- [Is postcode required.](https://devdocs.bagisto.com/2.3/advanced/helpers.html#is-postcode-required)
- [Week range](https://devdocs.bagisto.com/2.3/advanced/helpers.html#week-range)
- [Method to sort through the acl items and put them in order](https://devdocs.bagisto.com/2.3/advanced/helpers.html#method-to-sort-through-the-acl-items-and-put-them-in-order)
- [Get config field](https://devdocs.bagisto.com/2.3/advanced/helpers.html#get-config-field)
- [Convert to associative array](https://devdocs.bagisto.com/2.3/advanced/helpers.html#convert-to-associative-array)
- [Array set](https://devdocs.bagisto.com/2.3/advanced/helpers.html#array-set)
- [Convert empty strings to null.](https://devdocs.bagisto.com/2.3/advanced/helpers.html#convert-empty-strings-to-null)
- [Create singleton object through single facade.](https://devdocs.bagisto.com/2.3/advanced/helpers.html#create-singleton-object-through-single-facade)
- [Returns a string as selector part for identifying elements in views.](https://devdocs.bagisto.com/2.3/advanced/helpers.html#returns-a-string-as-selector-part-for-identifying-elements-in-views)
- [Get tax category through Id.](https://devdocs.bagisto.com/2.3/advanced/helpers.html#get-tax-category-through-id)
- [Get Shop email sender details](https://devdocs.bagisto.com/2.3/advanced/helpers.html#get-shop-email-sender-details)
- [Get Admin email details](https://devdocs.bagisto.com/2.3/advanced/helpers.html#get-admin-email-details)
- [Get core config values](https://devdocs.bagisto.com/2.3/advanced/helpers.html#get-core-config-values)
- [Get default config](https://devdocs.bagisto.com/2.3/advanced/helpers.html#get-default-config)
- [Get max upload size from the php.ini file](https://devdocs.bagisto.com/2.3/advanced/helpers.html#get-max-upload-size-from-the-php-ini-file)
## [#](https://devdocs.bagisto.com/2.3/advanced/helpers.html#introduction) Introduction
Bagisto provides a range of helper methods in its packages to streamline and simplify the development process. These helpers are designed to offer utility functions that facilitate common tasks, reducing the amount of boilerplate code developers need to write and enhancing overall productivity.
## [#](https://devdocs.bagisto.com/2.3/advanced/helpers.html#core-helpers) Core Helpers
The core helper methods are part of the Core class in the `Webkul\Core` namespace. These methods provide essential functionality that can be utilized across different parts of the application, making development more efficient and consistent. Let's explore some common methods:
### [#](https://devdocs.bagisto.com/2.3/advanced/helpers.html#get-the-version-number-of-the-bagisto) Get the version number of the Bagisto.
To get the version number of your Bagisto application, you can use the `core()->version()` method as shown below:
```
core()->version()
```
### [#](https://devdocs.bagisto.com/2.3/advanced/helpers.html#get-all-channels) Get all channels
The `core()->getAllChannels()` method is a helper function in Bagisto that retrieves all the available channels in the application. Channels in Bagisto represent different storefronts or websites, allowing for multi-channel retailing from a single Bagisto installation. This method is useful for obtaining a list of all configured channels, which can be utilized in various parts of the application.
To get all the channels in your Bagisto application, you can use the `core()->getAllChannels()` method as shown below
```
core()->getAllChannels()
```
### [#](https://devdocs.bagisto.com/2.3/advanced/helpers.html#get-current-channel-models) Get current channel models
The `core()->getCurrentChannel()` method is a helper function in Bagisto that retrieves the current channel being accessed in the application. Channels in Bagisto represent different storefronts or websites, allowing for multi-channel retailing from a single installation. This method is useful for obtaining details about the specific channel currently in use.
```
core()->getCurrentChannel()
```
### [#](https://devdocs.bagisto.com/2.3/advanced/helpers.html#set-the-current-channel) Set the current channel
The `core()->setCurrentChannel($channel)` method is a helper function in Bagisto that allows you to set the current channel being accessed in the application. This can be useful in scenarios where you need to dynamically change the active channel based on certain conditions.
```
core()->setCurrentChannel($channel)
```
### [#](https://devdocs.bagisto.com/2.3/advanced/helpers.html#get-current-channel-code) Get current channel code
The `core()->getCurrentChannelCode()` method is a helper function in Bagisto that retrieves the code of the currently active channel. This is particularly useful when you need to identify the channel context in which your application is operating.
```
core()->getCurrentChannelCode()
```
### [#](https://devdocs.bagisto.com/2.3/advanced/helpers.html#get-default-channel-models) Get default channel models
The `core()->getDefaultChannel()` method in Bagisto is a helper function that retrieves the default channel model. This is useful when you need to access the default channel's details, such as its configuration, settings, and associated models.
```
core()->getDefaultChannel()
```
### [#](https://devdocs.bagisto.com/2.3/advanced/helpers.html#set-the-default-channel) Set the default channel
Setting the default channel in Bagisto typically involves configuration settings rather than a direct method call like `core()->setDefaultChannel()`. Normally, you would define the default channel in your configuration files or through administrative settings in Bagisto's admin panel. Here’s a general approach to setting the default channel:
```
core()->setDefaultChannel()
```
### [#](https://devdocs.bagisto.com/2.3/advanced/helpers.html#get-the-default-channel-code-configured-in-config-app-php) Get the default channel code configured in `config/app.php`.
To retrieve the default channel code configured in config/app.php using Bagisto's helper function `core()->getDefaultChannelCode()`, you typically need to ensure that Bagisto explicitly defines this helper function to access configuration settings directly related to channels. Here’s how you would typically use it:
```
core()->getDefaultChannelCode()
```
### [#](https://devdocs.bagisto.com/2.3/advanced/helpers.html#get-default-locale-code-from-default-channel) Get default locale code from default channel
The function `core()->getDefaultLocaleCodeFromDefaultChannel()` retrieves the locale code for the default language set in the default channel of Bagisto. This can be useful for ensuring that content is displayed in the correct language based on the default settings of the e-commerce platform.
```
core()->getDefaultLocaleCodeFromDefaultChannel()
```
### [#](https://devdocs.bagisto.com/2.3/advanced/helpers.html#get-channel-from-request) Get channel from request
The function `core()->getRequestedChannel()` retrieves the current channel from the request. This is useful in a multi-channel environment where different settings, configurations, or customizations might be needed based on the channel from which the request originated.
```
core()->getRequestedChannel()
```
### [#](https://devdocs.bagisto.com/2.3/advanced/helpers.html#get-channel-code-from-request) Get channel code from request
The function `core()->getRequestedChannelCode()` retrieves the code of the current channel from the request. This helps identify which channel the request is associated with, allowing for channel-specific processing or configurations in a multi-channel setup.
```
core()->getRequestedChannelCode()
```
### [#](https://devdocs.bagisto.com/2.3/advanced/helpers.html#get-the-channel-name) Get the channel name
The function `core()->getChannelName()` retrieves the name of the current channel. This is useful for displaying or logging the name of the channel that is currently active or being accessed.
```
core()->getChannelName()
```
### [#](https://devdocs.bagisto.com/2.3/advanced/helpers.html#get-all-locales) Get all locales
The function `core()->getChannelName()` retrieves the name of the current channel. This is useful for displaying or logging the name of the channel that is currently active or being accessed.
```
core()->getAllLocales()
```
### [#](https://devdocs.bagisto.com/2.3/advanced/helpers.html#get-current-locale) Get current locale
The function `core()->getCurrentLocale()` retrieves the current locale being used. This is useful for determining the language and regional settings that are currently active, allowing for appropriate content and formatting adjustments based on the locale.
```
core()->getCurrentLocale()
```
### [#](https://devdocs.bagisto.com/2.3/advanced/helpers.html#get-locale-from-request) Get locale from request
The function `core()->getRequestedLocale()` retrieves the locale from the current request. This is useful for determining the language and regional settings that the user has requested, allowing the application to display content in the appropriate language and format.
```
core()->getRequestedLocale()
```
### [#](https://devdocs.bagisto.com/2.3/advanced/helpers.html#get-locale-code-from-request) Get locale code from request
The function `core()->getRequestedLocaleCode($localeKey = 'locale', $fallback = true)` retrieves the locale code from the current request.
- `$localeKey (default is 'locale')`: Specifies the key to look for in the request to get the locale code.
- `$fallback (default is true)`: If set to true, it will provide a fallback locale code if the requested locale is not found.
```
core()->getRequestedLocaleCode($localeKey = 'locale', $fallback = true)
```
Here if you want to use admin locale, you can pass it as an argument.
This function is useful for obtaining the locale code based on user requests, with the option to fall back to a default or administrative locale if necessary.
### [#](https://devdocs.bagisto.com/2.3/advanced/helpers.html#check-requested-locale-code-in-requested-channel) Check requested locale code in requested channel.
The function `core()->getRequestedLocaleCodeInRequestedChannel()` checks and retrieves the locale code from the current request within the context of the requested channel. This ensures that the locale code being used is valid and applicable for the specified channel, allowing for accurate localization based on both the channel and the user's request.
```
core()->getRequestedLocaleCodeInRequestedChannel()
```
If not found, then set channel default locale code.
### [#](https://devdocs.bagisto.com/2.3/advanced/helpers.html#get-all-currencies) Get all currencies
The function `core()->getAllCurrencies()` retrieves a list of all available currencies in the system. This can be useful for displaying currency options to users, configuring pricing, or handling multi-currency setups in an e-commerce platform.
```
core()->getAllCurrencies()
```
### [#](https://devdocs.bagisto.com/2.3/advanced/helpers.html#get-base-currency-model) Get base currency model
The function `core()->getBaseCurrency()` retrieves the base currency model used in the application. This is typically the default currency against which other currencies are converted or displayed in multi-currency environments within an e-commerce platform.
```
core()->getBaseCurrency()
```
### [#](https://devdocs.bagisto.com/2.3/advanced/helpers.html#get-base-channel-s-currency-code) Get base channel's currency code
The function `core()->getBaseCurrencyCode()` retrieves the currency code of the base channel, which is essential for operations involving currency management and display within an e-commerce application.
```
core()->getBaseCurrencyCode()
```
### [#](https://devdocs.bagisto.com/2.3/advanced/helpers.html#get-base-channel-s-currency-model) Get base channel's currency model
The function `core()->getChannelBaseCurrency()` retrieves the currency model of the base channel in Bagisto. This is useful for accessing detailed information about the currency, such as its code, symbol, conversion rates, and other attributes related to currency management within the e-commerce platform.
```
core()->getChannelBaseCurrency()
```
### [#](https://devdocs.bagisto.com/2.3/advanced/helpers.html#get-base-channel-s-currency-code-2) Get base channel's currency code
This function `core()->getChannelBaseCurrencyCode()` retrieves the currency code of the base channel, which is essential for operations involving currency management and display within an e-commerce application.
```
core()->getChannelBaseCurrencyCode()
```
### [#](https://devdocs.bagisto.com/2.3/advanced/helpers.html#set-current-currency) Set current currency
To set the current currency in Bagisto using the `core()->setCurrentCurrency()` method, you typically need to pass the desired currency code as an argument. Here's how you can do it:
```
core()->setCurrentCurrency()
```
### [#](https://devdocs.bagisto.com/2.3/advanced/helpers.html#get-current-channel-s-currency-model) Get current channel's currency model
```
core()->getCurrentCurrency()
```
- **Get current channel's currency code.**
To retrieve the current channel's currency model in Bagisto, you should use the `core()->getCurrentCurrency()` method. Here's how you can use it:
```
core()->getCurrentCurrencyCode()
```
This function call retrieves the currency model of the current channel, allowing you to access attributes such as the currency code, symbol, exchange rates, and other relevant information related to currency management within your e-commerce application.
### [#](https://devdocs.bagisto.com/2.3/advanced/helpers.html#get-exchange-rates) Get exchange rates
To get exchange rates in Bagisto, you typically need to specify the base currency and the target currency for which you want to retrieve the exchange rate. Here's how you can achieve this:
```
core()->getExchangeRate()
```
### [#](https://devdocs.bagisto.com/2.3/advanced/helpers.html#converts-price) Converts price.
The `core()->convertPrice()` function in Bagisto is used to convert a given amount from the base currency to a specified target currency. Here's how you can use it:
```
$amount = 100; // Replace with the amount you want to convert
$targetCurrencyCode = 'EUR'; // Replace with the target currency code
$convertedAmount = core()->convertPrice($amount, $targetCurrencyCode);
```
### [#](https://devdocs.bagisto.com/2.3/advanced/helpers.html#converts-to-base-price) Converts to base price
The `core()->convertToBasePrice()` function in Bagisto is used to convert a given amount from a specified currency (target currency) to the base currency of the application. Here's how you can use it:
```
$amount = 200; // Replace with the amount you want to convert to the base currency
$targetCurrencyCode = 'EUR'; // Replace with the target currency code
$baseAmount = core()->convertToBasePrice($amount, $targetCurrencyCode);
```
### [#](https://devdocs.bagisto.com/2.3/advanced/helpers.html#format-and-convert-price-with-currency-symbol) Format and convert price with currency symbol
To format and convert a price to the base currency while including the currency symbol, you typically need to use formatting functions along with conversion. Here’s how you can achieve this in Bagisto:
```
core()->convertToBasePrice($amount)
```
### [#](https://devdocs.bagisto.com/2.3/advanced/helpers.html#get-currency-symbol-from-currency-code) Get currency symbol from currency code
To get the currency symbol from a currency code in Bagisto, you typically use the `currencySymbol()` method with the currency code as an argument. Here's how you can do it:
```
core()->currencySymbol($amount)
```
### [#](https://devdocs.bagisto.com/2.3/advanced/helpers.html#format-and-convert-price-with-currency-symbol-2) Format and convert price with currency symbol
To format and convert a price with a currency symbol in Bagisto, you can use the `core()->formatPrice()` method. Here’s how you can use it:
```
$price = 100; // Replace with the price you want to format and convert
$currencyCode = 'USD'; // Replace with the currency code you want to use, if different from the default
$formattedPrice = core()->formatPrice($price, $currencyCode);
```
This function retrieves the formatted price as a string with the currency symbol based on the provided or default currency code.
### [#](https://devdocs.bagisto.com/2.3/advanced/helpers.html#format-price-with-base-currency-symbol) Format price with base currency symbol.
In Bagisto, if you want to format a price with the base currency symbol, considering the option to encode it, you would typically handle it like this:
This method also give ability to encode the base currency symbol and its optional.
```
core()->formatBasePrice($price, $isEncoded = false)
```
### [#](https://devdocs.bagisto.com/2.3/advanced/helpers.html#checks-if-current-date-of-the-given-channel-in-the-channel-timezone-is-within-the-range) Checks if current date of the given channel (in the channel timezone) is within the range
The `core()->isChannelDateInInterval($dateFrom = null, $dateTo = null)` function in Bagisto checks if the current date of the given channel (considering the channel's timezone) falls within the specified date range.
```
core()->isChannelDateInInterval($dateFrom = null, $dateTo = null)
```
### [#](https://devdocs.bagisto.com/2.3/advanced/helpers.html#get-channel-timestamp-timestamp-will-be-builded-with-channel-timezone-settings) Get channel timestamp, timestamp will be builded with channel timezone settings.
To retrieve a timestamp that adheres to a specific channel's timezone settings in Bagisto, you typically use the `core()->channelTimeStamp($channel)` function. Here's how you can implement it:
```
core()->channelTimeStamp($channel)
```
Ensure that the $channel variable is correctly instantiated with the channel object before passing it to `core()->channelTimeStamp()`. This method ensures that timestamps align with the timezone settings defined for each channel in your Bagisto application.
### [#](https://devdocs.bagisto.com/2.3/advanced/helpers.html#check-whether-sql-date-is-empty) Check whether sql date is empty.
In Bagisto, there isn't a specific `core()->is_empty_date()` function predefined. However, if you need to check whether a SQL date field is empty or null in PHP, you can do it as follows
```
core()->is_empty_date($date)
```
This function retrieves the date in the specified format, adjusted according to the timezone and locale settings of the current channel in Bagisto
### [#](https://devdocs.bagisto.com/2.3/advanced/helpers.html#format-date-using-current-channel) Format date using current channel.
In Bagisto, you can format a date using the current channel's timezone and locale using the `core()->formatDate()` function. Here's how you can use it
```
core()->formatDate($date = null, $format = 'd-m-Y H:i:s')
```
### [#](https://devdocs.bagisto.com/2.3/advanced/helpers.html#retrieve-information-from-configuration) Retrieve information from configuration
In Bagisto, to retrieve information from configuration using `core()->getConfigData()`, you can fetch specific configuration fields based on the provided parameters. Here’s how you can use it
```
core()->getConfigData($field, $channel = null, $locale = null)
```
### [#](https://devdocs.bagisto.com/2.3/advanced/helpers.html#retrieve-all-countries) Retrieve all countries
To retrieve all countries in Bagisto, you can use the `core()->countries()` function. Here's how you can fetch and utilize this data:
```
core()->countries()
```
### [#](https://devdocs.bagisto.com/2.3/advanced/helpers.html#get-country-name-by-code) Get country name by code
To get the country name by its ISO 3166-1 alpha-2 code in Bagisto, you can use the `core()->country_name($code)` function. Here's how you can use it
```
core()->country_name($code)
```
This function retrieves the full name of the country based on its ISO 3166-1 alpha-2 code ($code).
### [#](https://devdocs.bagisto.com/2.3/advanced/helpers.html#retrieve-all-country-states) Retrieve all country states
To retrieve all states (or provinces) of a specific country in Bagisto, you can use the `core()->states($countryCode)` function. Here's how you can use it
```
core()->states($countryCode)
```
This function returns a collection of state objects for the specified country
### [#](https://devdocs.bagisto.com/2.3/advanced/helpers.html#retrieve-all-grouped-states-by-country-code) Retrieve all grouped states by country code.
In Bagisto, to retrieve all states grouped by country code, you can use the `core()->groupedStatesByCountries()` function. This function organizes states or provinces by their respective countries. Here's how you can use it:
```
core()->groupedStatesByCountries()
```
### [#](https://devdocs.bagisto.com/2.3/advanced/helpers.html#get-states-by-country-code) Get states by country code.
To retrieve states (or provinces) by country code in Bagisto, you can use the `core()->findStateByCountryCode($countryCode, $stateCode = null)` function. Here’s how you can use it
```
core()->findStateByCountryCode($countryCode = null, $stateCode = null)
```
### [#](https://devdocs.bagisto.com/2.3/advanced/helpers.html#get-guest-customer-group) Get guest customer group
In Bagisto, to get the guest customer group, you can use the `core()->getGuestCustomerGroup()` function. Here's how you can use it
```
core()->getGuestCustomerGroup()
```
This function retrieves the guest customer group configured in your Bagisto application. It returns an object representing the guest customer group
### [#](https://devdocs.bagisto.com/2.3/advanced/helpers.html#is-country-required) Is country required
In Bagisto, to check if a country selection is required (typically in address forms or checkout processes), you can use the `core()->isCountryRequired()` function. Here's how you can use it:
```
core()->isCountryRequired()
```
This function returns a boolean (true or false) indicating whether the country selection is mandatory
### [#](https://devdocs.bagisto.com/2.3/advanced/helpers.html#is-state-required) Is state required
In Bagisto, to check if a state or province selection is required (typically in address forms or checkout processes), you can use the `core()->isStateRequired()` function. Here's how you can use it:
```
core()->isStateRequired()
```
### [#](https://devdocs.bagisto.com/2.3/advanced/helpers.html#is-postcode-required) Is postcode required.
This function returns a boolean (true or false) indicating whether the postcode (or ZIP code) selection is mandatory.
```
core()->isPostCodeRequired()
```
### [#](https://devdocs.bagisto.com/2.3/advanced/helpers.html#week-range) Week range
In Bagisto, there isn't a specific `core()->xWeekRange()` function predefined. However, if you need to calculate a date range based on a given date and the number of weeks before or after that date, you can achieve this using PHP's DateTime and DateInterval classes. Here’s how you can calculate a week range
```
core()->xWeekRange($date, $day)
```
### [#](https://devdocs.bagisto.com/2.3/advanced/helpers.html#method-to-sort-through-the-acl-items-and-put-them-in-order) Method to sort through the acl items and put them in order
In Bagisto, there isn't a specific `core()->sortItems()` function predefined for sorting ACL items directly. However, you can implement a custom function to sort ACL items based on your specific criteria
```
core()->sortItems($items)
```
### [#](https://devdocs.bagisto.com/2.3/advanced/helpers.html#get-config-field) Get config field
You can retrieve a specific configuration field value using a method like `core()->getConfigField($fieldName)`
```
core()->getConfigField($fieldName)
```
### [#](https://devdocs.bagisto.com/2.3/advanced/helpers.html#convert-to-associative-array) Convert to associative array
In Bagisto, there isn't a specific `core()->convertToAssociativeArray()` function predefined for converting items into associative arrays directly. However, you can easily achieve this using PHP's array functions and loops. Here's a straightforward way to convert a list of items into an associative array based on a key:
```
core()->convertToAssociativeArray($items)
```
### [#](https://devdocs.bagisto.com/2.3/advanced/helpers.html#array-set) Array set
There is a helper function array_set() that allows you to set a value within a nested array using a dot-notation key.
```
core()->array_set($array, $key, $value)
```
### [#](https://devdocs.bagisto.com/2.3/advanced/helpers.html#convert-empty-strings-to-null) Convert empty strings to null.
`convertEmptyStringsToNull` function is designed to convert empty strings ('') or the string 'null' to null within an array. Let's break down the function and how it works:
```
core()->convertEmptyStringsToNull($array)
```
### [#](https://devdocs.bagisto.com/2.3/advanced/helpers.html#create-singleton-object-through-single-facade) Create singleton object through single facade.
By using getSingletonInstance() method in Bagisto you can Create singleton object through single facade.
```
core()->getSingletonInstance($className)
```
### [#](https://devdocs.bagisto.com/2.3/advanced/helpers.html#returns-a-string-as-selector-part-for-identifying-elements-in-views) Returns a string as selector part for identifying elements in views.
The `taxRateAsIdentifier` function provided is a helper function in Bagisto that generates a string identifier based on a tax rate. Here’s a breakdown of how it works and how you can use it in your Bagisto application:
It Returns a string as selector part for identifying elements in views.
```
core()->taxRateAsIdentifier(float $taxRate)
```
### [#](https://devdocs.bagisto.com/2.3/advanced/helpers.html#get-tax-category-through-id) Get tax category through Id.
To retrieve a tax category by its ID using a method like `core()->getTaxCategoryById($id)` in Bagisto or Laravel, you typically need to access the appropriate repository or model where tax categories are stored. Here’s how you can implement such a method assuming you are working within the Bagisto framework
```
core()->getTaxCategoryById($id)
```
### [#](https://devdocs.bagisto.com/2.3/advanced/helpers.html#get-shop-email-sender-details) Get Shop email sender details
To retrieve the shop email sender details in Bagisto or Laravel, you typically need to access configuration settings where these details are stored, such as in the environment configuration or a dedicated settings repository. Here’s a conceptual implementation of how you might achieve this functionality:
```
core()->getSenderEmailDetails()
```
### [#](https://devdocs.bagisto.com/2.3/advanced/helpers.html#get-admin-email-details) Get Admin email details
To retrieve the admin email details in Bagisto, you typically need to access the configuration settings where these details are stored. Here’s how you can conceptualize and implement the `core()->getAdminEmailDetails()` function:
```
core()->getAdminEmailDetails()
```
By implementing `getAdminEmailDetails()` in your Bagisto application, you can efficiently retrieve and utilize the configured admin details for various administrative functionalities, ensuring clarity and reliability in your communication processes.
### [#](https://devdocs.bagisto.com/2.3/advanced/helpers.html#get-core-config-values) Get core config values
To retrieve core configuration values in Bagisto application using a method like `core()->getCoreConfig($field, $channel, $locale)`, you would typically access configuration settings specific to your application's setup. Here’s a conceptual implementation for such a method:
```
core()->getCoreConfig($field, $channel, $locale)
```
### [#](https://devdocs.bagisto.com/2.3/advanced/helpers.html#get-default-config) Get default config
By using the `getDefaultConfig($field)` method, you can achieve the default config.
```
core()->getDefaultConfig($field)
```
### [#](https://devdocs.bagisto.com/2.3/advanced/helpers.html#get-max-upload-size-from-the-php-ini-file) Get max upload size from the php.ini file
By using the `getMaxUploadSize` method, you can achieve the maximum upload size.
```
core()->getMaxUploadSize()
```
These core helper methods provide various functionalities to simplify common tasks and streamline development in Bagisto.
[Events Listeners](https://devdocs.bagisto.com/2.3/advanced/events.html)[Override Core Models](https://devdocs.bagisto.com/2.3/advanced/override-core-model.html)
## Bagisto Frontend Architecture
Heads up: You are viewing outdated documentation for Bagisto. Please consider upgrading to [v2.3](https://devdocs.bagisto.com/2.3/prologue) for the latest information.
# [#](https://devdocs.bagisto.com/2.1/architecture/frontend.html#bagisto-frontend-overview) Bagisto Frontend Overview
- [Tailwind CSS](https://devdocs.bagisto.com/2.1/architecture/frontend.html#tailwind-css)
- [Vue.js](https://devdocs.bagisto.com/2.1/architecture/frontend.html#vue-js)
- [Blade](https://devdocs.bagisto.com/2.1/architecture/frontend.html#blade)
Bagisto's frontend leverages powerful tools and frameworks to create a dynamic, responsive, and visually appealing user interface.
## [#](https://devdocs.bagisto.com/2.1/architecture/frontend.html#tailwind-css) Tailwind CSS
Bagisto uses [Tailwind CSS(opens new window)](https://tailwindcss.com/) for its styling needs. Tailwind CSS is a highly customizable, utility-first CSS framework that allows developers to build responsive and modern designs efficiently.
- **Customization**: Tailwind CSS provides extensive configuration options, enabling developers to tailor the design system to specific project requirements.
- **Utility-First Approach**: It offers utility classes that can be combined to create any design directly in your HTML.
To configure Tailwind CSS in Bagisto, you need to define your Blade file path along with the JavaScript file directory in the `tailwind.config.js` file. Tailwind CSS will compile all the CSS defined at the specified location.
## [#](https://devdocs.bagisto.com/2.1/architecture/frontend.html#vue-js) Vue.js
The dynamic user interfaces in Bagisto are powered by [Vue.js(opens new window)](https://vuejs.org/), a robust and flexible JavaScript framework.
- **Reactive Components**: Vue.js enables the development of reactive components that update seamlessly as the data changes.
- **Component-Based Architecture**: This promotes reusability and maintainability of code by breaking down the UI into isolated, reusable components.
In conjunction with Vue.js, Bagisto uses [Vite(opens new window)](https://vitejs.dev/) as the build tool. Vite offers a fast and efficient development environment, replacing the older [Laravel Mix(opens new window)](https://laravel.com/docs/10.x/mix) tool. The `vite.config.js` file defines the build directory path, and Vite compiles all CSS and JavaScript assets into the public directory.
## [#](https://devdocs.bagisto.com/2.1/architecture/frontend.html#blade) Blade
Bagisto utilizes the Blade template engine, which is integrated with [Laravel(opens new window)](https://laravel.com/). Blade allows developers to use both Blade components and plain PHP code within templates, providing flexibility and power for crafting dynamic and efficient solutions.
- **Template Inheritance**: Blade supports template inheritance, which allows for a modular and maintainable template structure.
- **Directives**: Blade includes various directives that simplify common tasks, such as loops and conditionals.
For more insights into Bagisto's directory structure and package configuration, refer to the [documentation(opens new window)](https://devdocs.bagisto.com/2.1/packages/views.html#directory-structure).
[Packages](https://devdocs.bagisto.com/2.1/architecture/packages.html)[Theme](https://devdocs.bagisto.com/2.1/architecture/theme.html)
## Bagisto Layouts Guide
Heads up: You are viewing outdated documentation for Bagisto. Please consider upgrading to [v2.3](https://devdocs.bagisto.com/2.3/prologue) for the latest information.
# [#](https://devdocs.bagisto.com/2.2/packages/layouts.html#layouts) Layouts
- [Introduction](https://devdocs.bagisto.com/2.2/packages/layouts.html#introduction)
- [Admin Layout](https://devdocs.bagisto.com/2.2/packages/layouts.html#admin-layout)
- [Shop Layout](https://devdocs.bagisto.com/2.2/packages/layouts.html#shop-layout)
## [#](https://devdocs.bagisto.com/2.2/packages/layouts.html#introduction) Introduction
Layouts in Bagisto are fundamental to structuring your application's views in a consistent and reusable way. They provide a template for rendering HTML across multiple pages, ensuring a unified design and user experience. By defining layouts, you can streamline development, improve maintainability, and enhance the overall aesthetics of your web application.
To learn in detail about Layouts, you can visit the Laravel documentation [here(opens new window)](https://laravel.com/docs/11.x/blade).
## [#](https://devdocs.bagisto.com/2.2/packages/layouts.html#admin-layout) Admin Layout
`` This component serves as the container for your extended admin layout. It encapsulates the entire layout structure, including the title and content.
To extend the default layout of the Bagisto admin panel, you'll create or modify the `index.blade.php` file located at `packages/Webkul/Blog/src/Resources/views/admin/index.blade.php`. Below is a detailed breakdown of how to integrate and customize the layout:
```
@lang('blog::app.admin.index.page-title')
@lang('blog::app.admin.index.page-title')
```
## [#](https://devdocs.bagisto.com/2.2/packages/layouts.html#shop-layout) Shop Layout
`` This component serves as the container for your extended admin layout. It encapsulates the entire layout structure, including the title and content.
To extend the shop layout in Bagisto, modify or create the `index.blade.php` file located at `packages/Webkul/Blog/src/Resources/views/shop/default/index.blade.php`. Below is a detailed breakdown of how to integrate and customize the shop layout:
```
@lang('blog::app.shop.blogs.page-title')
@lang('blog::app.shop.blogs.page-title')
```
| Prop Name | Description | Default Value |
| ----------------- | ------------------------------------------------------------------ | ------------- |
| **`has-header`** | Determines whether to include a header section in the component. | `true` |
| **`has-feature`** | Controls the visibility of a feature section within the component. | `true` |
| **`has-footer`** | Specifies whether to display a footer section in the component. | `true` |
WARNING
Notice that there are translations used in the blade files, so you will also need to add the corresponding translations in **`lang/app.php`**.
If you don't want to include these layouts, you can create your own master file.
[Blade Components](https://devdocs.bagisto.com/2.2/packages/blade-components.html)[Bundling Assets](https://devdocs.bagisto.com/2.2/packages/bundling-assets.html)
## Bagisto Performance Optimization
Heads up: You are viewing outdated documentation for Bagisto. Please consider upgrading to [v2.3](https://devdocs.bagisto.com/2.3/prologue) for the latest information.
# [#](https://devdocs.bagisto.com/2.x/architecture/performance.html#performance) Performance
- [Indexing](https://devdocs.bagisto.com/2.x/architecture/performance.html#indexing)
- [Price Indexing](https://devdocs.bagisto.com/2.x/architecture/performance.html#price-indexing)
- [Inventory Indexing](https://devdocs.bagisto.com/2.x/architecture/performance.html#inventory-indexing)
- [ElasticSearch](https://devdocs.bagisto.com/2.x/architecture/performance.html#elasticsearch)
- [Reindexing](https://devdocs.bagisto.com/2.x/architecture/performance.html#reindexing)
- [Full Page Cache](https://devdocs.bagisto.com/2.x/architecture/performance.html#full-page-cache)
- [How to Enable Full Page Cache In Bagisto](https://devdocs.bagisto.com/2.x/architecture/performance.html#how-to-enable-full-page-cache-in-bagisto)
- [How to set Cache duration and other Configuration](https://devdocs.bagisto.com/2.x/architecture/performance.html#how-to-set-cache-duration-and-other-configuration)
- [Full page cache supported pages](https://devdocs.bagisto.com/2.x/architecture/performance.html#full-page-cache-supported-pages)
- [Supported Cache Drivers](https://devdocs.bagisto.com/2.x/architecture/performance.html#supported-cache-drivers)
- [Clearing Response Cache with Artisan Commands:](https://devdocs.bagisto.com/2.x/architecture/performance.html#clearing-response-cache-with-artisan-commands)
- [Cache invalidation](https://devdocs.bagisto.com/2.x/architecture/performance.html#cache-invalidation)
- [Laravel Octane](https://devdocs.bagisto.com/2.x/architecture/performance.html#laravel-octane)
In the realm of online stores, [web vitals(opens new window)](https://web.dev/vitals/) have become increasingly crucial. **Bagisto** prioritises good [LCP(opens new window)](https://web.dev/lcp/) and [CLS(opens new window)](https://web.dev/cls/) to ensure an optimal user experience.
Additionally, **Bagisto** has seamlessly integrated [ElasticSearch(opens new window)](https://bagisto.com/en/elasticsearch-for-bagisto/) to further enhance user experience.
## [#](https://devdocs.bagisto.com/2.x/architecture/performance.html#indexing) Indexing
When dealing with large volumes of data and retrieving complex information like variants and prices, optimizing queries becomes a challenge.
Indexers create and maintain indexes, which are data structures optimized for quick retrieval of information. When data is added to a system, the indexer analyzes it and extracts key information or metadata. This metadata is then stored in the index, along with pointers to the original data.
By indexing data, the system can quickly locate relevant information without having to scan through every piece of data sequentially. This greatly speeds up search and retrieval operations, especially in large datasets.
Indexers improve the overall user experience. Users can quickly find what they're looking for, leading to increased satisfaction and productivity.
To enhance **Bagisto's** performance, the following indexers play a crucial role:
### [#](https://devdocs.bagisto.com/2.x/architecture/performance.html#price-indexing) Price Indexing
Price indexing is a crucial component of eCommerce operations, ensuring that product prices are accurately reflected across the storefront. This documentation will delve into how Bagisto handles price indexing.
The price indexing process in Bagisto involves updating product prices in the database whenever changes occur. This process ensures that the latest price information is reflected accurately across the storefront.
### [#](https://devdocs.bagisto.com/2.x/architecture/performance.html#inventory-indexing) Inventory Indexing
Similar to price indexing, the inventory indexing process in Bagisto involves updating product quantities in the database. Whenever a product is purchased, returned, or restocked, Bagisto automatically adjusts the inventory levels accordingly. This real-time synchronization ensures that inventory information remains accurate and up to date.
### [#](https://devdocs.bagisto.com/2.x/architecture/performance.html#elasticsearch) ElasticSearch
As Elastic is designed to handle large amounts of data and provide fast and scalable search capabilities, **Bagisto** leverages its capabilities to index all products, thereby significantly enhancing the search functionality.
#### [#](https://devdocs.bagisto.com/2.x/architecture/performance.html#configuration-setup) Configuration Setup:
To configure Elasticsearch, please refer to the [Configuration Setup(opens new window)](https://devdocs.bagisto.com/2.x/advanced/indexing-products-to-elasticsearch.html) documentation.
### [#](https://devdocs.bagisto.com/2.x/architecture/performance.html#reindexing) Reindexing
The `ReindexCommands` console command is responsible for reindexing data within Bagisto, facilitating efficient data retrieval and search functionality. This command offers flexibility in selecting specific indexers and reindexing modes to suit varying requirements.
By default, reindexing is executed at the scheduled time or based on specific events, such as product creation or updates. However, there may be situations where you need to manually trigger reindexing. This can be done using the following commands:
#### [#](https://devdocs.bagisto.com/2.x/architecture/performance.html#command-signature) Command Signature
The command `php artisan indexer:index` in Bagisto is used to manage the reindexing of various indexers. Here is a detailed description of its usage:
```
php artisan indexer:index {--type=*} {--mode=*}
```
- **--type**: Specifies the type of indexers to reindex.
- **--mode**: Specifies the reindexing mode, either `full` for full reindexing or selective for `selective` reindexing (default).
- **Full Reindexing for All Types**
```
php artisan indexer:index --mode=full
```
This command performs a full reindexing for all indexers by default.
- **Selective Reindexing**
```
php artisan indexer:index --type=price
```
This command performs selective reindexing specifically for the price indexer.
Price and price rule indexing are scheduled to reindex at a specific time each day to ensure that the latest pricing information is accurately reflected in searches and displays. The following commands are scheduled to run daily at 00:01 AM:
```
$schedule->command('indexer:index --type=price')->dailyAt('00:01');
```
## [#](https://devdocs.bagisto.com/2.x/architecture/performance.html#full-page-cache) Full Page Cache
Bagisto introduces Full Page Cache support to deliver lightning-fast page loading, improved SEO, scalability, and reduced server load for enhanced eCommerce performance.
Full Page Cache is a mechanism that stores entire HTML pages in the cache. When a request is made for the same page, the cache seamlessly serves the page without the need for re-executing server-side logic. This process allows for faster page load times as the cache provides a quick and efficient way to serve the requested page without the need to run the server-side logic again. This reduces the need for database queries, template rendering, and other resource-intensive tasks, resulting in faster page load times.
We used the Spatie Laravel Responsecache Package in Bagisto
### [#](https://devdocs.bagisto.com/2.x/architecture/performance.html#how-to-enable-full-page-cache-in-bagisto) How to Enable Full Page Cache In Bagisto
- Go to the .env Configuration file
- Set RESPONSE_CACHE_ENABLED=true
### [#](https://devdocs.bagisto.com/2.x/architecture/performance.html#how-to-set-cache-duration-and-other-configuration) How to set Cache duration and other Configuration
- Navigate to `config/responsecache.php.` this path to adjust cache duration and explore other configuration settings for Full Page Cache in Bagisto. Here, you’ll find all the configurations related to Full Page Cache.
### [#](https://devdocs.bagisto.com/2.x/architecture/performance.html#full-page-cache-supported-pages) Full page cache supported pages
- Home Page
- Category Page
- Product Page
### [#](https://devdocs.bagisto.com/2.x/architecture/performance.html#supported-cache-drivers) Supported Cache Drivers
- File
- Memcached
- Redis
- DynamoDB
### [#](https://devdocs.bagisto.com/2.x/architecture/performance.html#clearing-response-cache-with-artisan-commands) Clearing Response Cache with Artisan Commands:
To effortlessly clear your application’s response cache in Bagisto, utilize the following command:
```
php artisan cache:clear
```
### [#](https://devdocs.bagisto.com/2.x/architecture/performance.html#cache-invalidation) Cache invalidation
Here are some common techniques for cache invalidation in Laravel:
**Create the EventServiceProvider class**
We create an EventServiceProvider in the `packages/Webkul/FPC/src/Providers/EventServiceProvider.php` directory. This file contains the code for the event service provider, which can be used to register events and their listeners. To register an event and its listener, you can add them to the $listen array in the EventServiceProvider class.
```
[\
'Webkul\FPC\Listeners\Review@afterUpdate',\
],\
];
}
```
**Register the service in the FPC service provider**
In the `packages/Webkul/FPC/src/Providers/FPCServiceProvider.php` file, locate the boot() method. Here you can see we add EventServiceProvider within the boot() method.
```
app->register(EventServiceProvider::class);
}
/**
* Register services.
*
* @return void
*/
public function register()
{
}
}
```
For instance, in the realm of event-based cache management, consider the event ‘customer.review.update.after’ triggered from the review controller upon a review update. This seamless integration guarantees swift cache clearance or update, maintaining synchronization with the latest review modifications.
```
/**
* Update the specified resource in storage.
*
* @param int $id
* @return \Illuminate\Http\Response
*/
public function update($id)
{
Event::dispatch('customer.review.update.before', $id);
$review = $this->productReviewRepository->update(request()->only(['status']), $id);
Event::dispatch('customer.review.update.after', $review);
session()->flash('success', trans('admin::app.customers.reviews.update-success', ['name' => 'admin::app.customers.reviews.review']));
return redirect()->route('admin.customers.customers.review.index');
}
```
In the directory `packages/Webkul/FPC/src/Listeners` you can find the `afterUpdate()` method. This method clears the cache using the `forget()` method when a review is updated.
```
/**
* After review is updated
*
* @param \Webkul\Product\Contracts\Review $review
* @return void
*/
public function afterUpdate($review)
{
ResponseCache::forget('/' . $review->product->url_key);
}
```
## [#](https://devdocs.bagisto.com/2.x/architecture/performance.html#laravel-octane) Laravel Octane
[Laravel Octane(opens new window)](https://laravel.com/docs/10.x/octane) is a performance-boosting package designed to enhance the speed, efficiency, and scalability of Laravel applications, including Bagisto.
- Drives remarkable improvements in page load times, ensuring a seamless and responsive shopping experience.
- Provides the scalability required to accommodate the growth of e-commerce businesses.
- Forms the foundation for optimizing Bagisto's performance and meeting the demands of modern e-commerce.
[Theme](https://devdocs.bagisto.com/2.x/architecture/theme.html)[Repository Pattern](https://devdocs.bagisto.com/2.x/architecture/repository-pattern.html)
## Bagisto Frontend Architecture
Heads up: You are viewing outdated documentation for Bagisto. Please consider upgrading to [v2.3](https://devdocs.bagisto.com/2.3/prologue) for the latest information.
# [#](https://devdocs.bagisto.com/2.x/architecture/frontend.html#bagisto-frontend-overview) Bagisto Frontend Overview
- [Tailwind CSS](https://devdocs.bagisto.com/2.x/architecture/frontend.html#tailwind-css)
- [Vue.js](https://devdocs.bagisto.com/2.x/architecture/frontend.html#vue-js)
- [Blade](https://devdocs.bagisto.com/2.x/architecture/frontend.html#blade)
Bagisto's frontend leverages powerful tools and frameworks to create a dynamic, responsive, and visually appealing user interface.
## [#](https://devdocs.bagisto.com/2.x/architecture/frontend.html#tailwind-css) Tailwind CSS
Bagisto uses [Tailwind CSS(opens new window)](https://tailwindcss.com/) for its styling needs. Tailwind CSS is a highly customizable, utility-first CSS framework that allows developers to build responsive and modern designs efficiently.
- **Customization**: Tailwind CSS provides extensive configuration options, enabling developers to tailor the design system to specific project requirements.
- **Utility-First Approach**: It offers utility classes that can be combined to create any design directly in your HTML.
To configure Tailwind CSS in Bagisto, you need to define your Blade file path along with the JavaScript file directory in the `tailwind.config.js` file. Tailwind CSS will compile all the CSS defined at the specified location.
## [#](https://devdocs.bagisto.com/2.x/architecture/frontend.html#vue-js) Vue.js
The dynamic user interfaces in Bagisto are powered by [Vue.js(opens new window)](https://vuejs.org/), a robust and flexible JavaScript framework.
- **Reactive Components**: Vue.js enables the development of reactive components that update seamlessly as the data changes.
- **Component-Based Architecture**: This promotes reusability and maintainability of code by breaking down the UI into isolated, reusable components.
In conjunction with Vue.js, Bagisto uses [Vite(opens new window)](https://vitejs.dev/) as the build tool. Vite offers a fast and efficient development environment, replacing the older [Laravel Mix(opens new window)](https://laravel.com/docs/10.x/mix) tool. The `vite.config.js` file defines the build directory path, and Vite compiles all CSS and JavaScript assets into the public directory.
## [#](https://devdocs.bagisto.com/2.x/architecture/frontend.html#blade) Blade
Bagisto utilizes the Blade template engine, which is integrated with [Laravel(opens new window)](https://laravel.com/). Blade allows developers to use both Blade components and plain PHP code within templates, providing flexibility and power for crafting dynamic and efficient solutions.
- **Template Inheritance**: Blade supports template inheritance, which allows for a modular and maintainable template structure.
- **Directives**: Blade includes various directives that simplify common tasks, such as loops and conditionals.
For more insights into Bagisto's directory structure and package configuration, refer to the [documentation(opens new window)](https://devdocs.bagisto.com/2.x/packages/views.html#directory-structure).
[Packages](https://devdocs.bagisto.com/2.x/architecture/packages.html)[Theme](https://devdocs.bagisto.com/2.x/architecture/theme.html)
## Bagisto Localization Guide
Heads up: You are viewing outdated documentation for Bagisto. Please consider upgrading to [v2.3](https://devdocs.bagisto.com/2.3/prologue) for the latest information.
# [#](https://devdocs.bagisto.com/2.2/packages/localization.html#localization) Localization
- [Introduction](https://devdocs.bagisto.com/2.2/packages/localization.html#introduction)
- [Publishing the Language Files](https://devdocs.bagisto.com/2.2/packages/localization.html#publishing-the-language-files)
- [Configuring the Locale](https://devdocs.bagisto.com/2.2/packages/localization.html#configuring-the-locale)
- [Create a new Locale](https://devdocs.bagisto.com/2.2/packages/localization.html#create-a-new-locale)
- [Directory Structure](https://devdocs.bagisto.com/2.2/packages/localization.html#directory-structure)
- [Writing a Translation in app.php](https://devdocs.bagisto.com/2.2/packages/localization.html#writing-a-translation-in-app-php)
- [Load Translation from Package](https://devdocs.bagisto.com/2.2/packages/localization.html#load-translation-from-package)
- [Update the Service Provider](https://devdocs.bagisto.com/2.2/packages/localization.html#update-the-service-provider)
- [Use Translations in Blade Files](https://devdocs.bagisto.com/2.2/packages/localization.html#use-translations-in-blade-files)
## [#](https://devdocs.bagisto.com/2.2/packages/localization.html#introduction) Introduction
Laravel's localization features provide a convenient way to retrieve strings in various languages, allowing you to easily support multiple languages within your application.
Language strings may be stored in files within the application's lang directory. Within this directory, there may be subdirectories for each language supported by the application. This is the approach Laravel uses to manage translation strings for built-in Laravel features such as validation error messages:
To learn in detail about Localization, you can visit the Laravel documentation [here(opens new window)](https://laravel.com/docs/11.x/localization).
## [#](https://devdocs.bagisto.com/2.2/packages/localization.html#publishing-the-language-files) Publishing the Language Files
By default, the Laravel application skeleton does not include the lang directory. If you would like to customize Laravel's language files or create your own, you should scaffold the lang directory via the lang:publish Artisan command. The lang:publish command will create the lang directory in your application and publish the default set of language files used by Laravel:
```
php artisan lang:publish
```
## [#](https://devdocs.bagisto.com/2.2/packages/localization.html#configuring-the-locale) Configuring the Locale
The default language for your application is stored in the `config/app.php` configuration file's `locale` configuration option, which is typically set using the `APP_LOCALE` environment variable. You are free to modify this value to suit the needs of your application.
You may also configure a `"fallback language"`, which will be used when the default language does not contain a given translation string. Like the default language, the fallback language is also configured in the `config/app.php` configuration file, and its value is typically set using the APP_FALLBACK_LOCALE environment variable.
```
/*
|--------------------------------------------------------------------------
| Application Locale Configuration
|--------------------------------------------------------------------------
|
| The application locale determines the default locale that will be used
| by the translation service provider. You are free to set this value
| to any of the locales which will be supported by the application.
|
*/
'locale' => env('APP_LOCALE', 'en'),
/*
|--------------------------------------------------------------------------
| Application Fallback Locale
|--------------------------------------------------------------------------
|
| The fallback locale determines the locale to use when the current one
| is not available. You may change the value to correspond to any of
| the language folders that are provided through your application.
|
*/
'fallback_locale' => 'en',
```
## [#](https://devdocs.bagisto.com/2.2/packages/localization.html#create-a-new-locale) Create a new Locale
To support localization in your package, you need to create language files. Follow the steps below to set up a language file for English translations.
#### [#](https://devdocs.bagisto.com/2.2/packages/localization.html#create-the-lang-folder) Create the `lang` Folder
- Navigate to the `packages/Webkul/Blog/src/Resources` directory.
- Create a folder named `lang`.
#### [#](https://devdocs.bagisto.com/2.2/packages/localization.html#create-language-code-folders) Create Language Code Folders
- Inside the `lang` folder, create different folders for each language you want to support. For example, you can create folders for English ( `en`), Hindi ( `hi`), etc.
- For now, let's create a folder named `en` to represent English.
#### [#](https://devdocs.bagisto.com/2.2/packages/localization.html#create-the-app-php-file) Create the `app.php` File
- Inside the `en` folder, create a file named `app.php` for language translations.
### [#](https://devdocs.bagisto.com/2.2/packages/localization.html#directory-structure) Directory Structure
The updated directory structure will look like this:
```
└── packages
└── Webkul
└── Blog
└── src
├── ...
└── Resources
├── ...
└── lang
└── en
└── app.php
```
### [#](https://devdocs.bagisto.com/2.2/packages/localization.html#writing-a-translation-in-app-php) Writing a Translation in `app.php`
To add translations for your package, you can edit the `app.php` file located in the language folder ( `en` in this case). Below is an example of how you can define translations:
#### [#](https://devdocs.bagisto.com/2.2/packages/localization.html#open-the-app-php-file) Open the `app.php` File
- Navigate to `packages/Webkul/Blog/src/Resources/lang/en`.
- Open the `app.php` file.
#### [#](https://devdocs.bagisto.com/2.2/packages/localization.html#add-the-translation) Add the Translation
- Inside `app.php`, define your translations as an associative array. For example:
```
[\
'name' => 'John Doe'\
]\
];
```
## [#](https://devdocs.bagisto.com/2.2/packages/localization.html#load-translation-from-package) Load Translation from Package
To make translations from your package accessible, you need to register the language file in the service provider and then use them in your Blade templates.
### [#](https://devdocs.bagisto.com/2.2/packages/localization.html#update-the-service-provider) Update the Service Provider
- Open the `BlogServiceProvider.php` file located in `packages/Webkul/Blog/src/Providers`.
- Add the following code to the `boot` method:
```
loadTranslationsFrom(__DIR__ . '/../Resources/lang', 'blog');
}
}
```
#### [#](https://devdocs.bagisto.com/2.2/packages/localization.html#explanation) Explanation
- This code uses `$this->loadTranslationsFrom` to register translations from the lang directory of your package ( `packages/ Webkul/Blog/src/Resources/lang`) under the namespace `'blog'`.
- The `loadTranslationsFrom` method registers translations for the `'blog'` namespace from the specified path ( `__DIR__ . '/../Resources/lang'`).
- This makes translations accessible throughout your Laravel application using the `'blog'` namespace prefix.
### [#](https://devdocs.bagisto.com/2.2/packages/localization.html#use-translations-in-blade-files) Use Translations in Blade Files
In your Blade templates ( `.blade.php` files), you can use the `@lang` helper function to retrieve translations. Use the namespace 'blog' followed by the translation key. For example:
```
@lang('blog::app.admin.name')
```
#### [#](https://devdocs.bagisto.com/2.2/packages/localization.html#explanation-2) Explanation
- The `@lang('blog::app.admin.name')` syntax fetches the translation for `'name'` under the `'admin'` section from your package's translation file ( `app.php`).
- Replace `'app.admin.name'` with your actual translation keys to use different translations as needed in your application.
By following these steps, you've effectively loaded translations from your package and integrated them into your Laravel application's Blade templates. This allows you to maintain language-specific content and support localization within your package.
[Views](https://devdocs.bagisto.com/2.2/packages/views.html)[Blade Components](https://devdocs.bagisto.com/2.2/packages/blade-components.html)
## Bagisto Installation Guide
Heads up: You are viewing outdated documentation for Bagisto. Please consider upgrading to [v2.3](https://devdocs.bagisto.com/2.3/prologue) for the latest information.
# [#](https://devdocs.bagisto.com/1.x/introduction/installation.html#installation) Installation
## [#](https://devdocs.bagisto.com/1.x/introduction/installation.html#use-our-gui-installer) Use Our GUI Installer
1. [Download Bagisto(opens new window)](https://bagisto.com/en/download/)
2. Extract the contents of the zip file.
3. Point your HTTP server to the public/ directory of the project and open it on your browser.
For example:
- `https://example.com/`
4. This will detect Bagisto and start the installer.
## [#](https://devdocs.bagisto.com/1.x/introduction/installation.html#install-bagisto-using-composer) Install Bagisto Using _composer_
```
composer create-project bagisto/bagisto
```
- Start the installation script.
```
php artisan bagisto:install
```
### [#](https://devdocs.bagisto.com/1.x/introduction/installation.html#features-of-above-installation-command) Features of above installation command
WARNING
It will check existence of the .env file, if it exists then please update the file manually with the below details.
```
- APP_TIMEZONE
- APP_LOCALE
- LOG_CHANNEL
- APP_CURRENCY
- DB_DATABASE
- DB_USERNAME
- DB_PASSWORD
```
WARNING
If the .env file does not exists then it will ask to provide the details on command prompts.
- To start the installation, provide the details of the following command prompts:
```
- Please select the default locale or press enter to continue [en]:
- Please enter the default timezone [Asia/Kolkata]:
- Please enter the default currency [USD]:
- What is the database name to be used by Bagisto?:
- What is your database username?:
- What is your database password?:
```
# [#](https://devdocs.bagisto.com/1.x/introduction/installation.html#start-using-bagisto) Start Using Bagisto
### [#](https://devdocs.bagisto.com/1.x/introduction/installation.html#on-a-production-server) On a production server
- Open your domain on the browser.
For example:
- `https://example.com/`
### [#](https://devdocs.bagisto.com/1.x/introduction/installation.html#on-your-local-device) On your local device
```
php artisan serve
```
### [#](https://devdocs.bagisto.com/1.x/introduction/installation.html#how-to-log-in-to-your-domain-as-an-admin) How to log in to your domain as an admin
Go to `https://example.com/admin/`, in case `php artisan bagisto:install` is opted, use the following credentials.
```
email: admin@example.com
password: admin123
```
### [#](https://devdocs.bagisto.com/1.x/introduction/installation.html#how-to-log-in-to-your-domain-as-a-customer) How to log in to your domain as a customer
You can directly register on `https://example.com/customer/register` as a customer, and then log in to your domain.
[Requirements](https://devdocs.bagisto.com/1.x/introduction/requirements.html)[Upgrade Bagisto](https://devdocs.bagisto.com/1.x/introduction/upgrade-to-latest-bagisto.html)
## Bagisto Cart API
Heads up: You are viewing outdated documentation for Bagisto. Please consider upgrading to [v2.3](https://devdocs.bagisto.com/2.3/prologue) for the latest information.
# [#](https://devdocs.bagisto.com/1.x/api/cart.html#cart) Cart
In this section, we will use the cart's API. We will see how to add the product to the cart, fetching cart details, updating cart, and many more things related to the cart.
## [#](https://devdocs.bagisto.com/1.x/api/cart.html#add-product-to-cart) Add product to cart
By using this API call you can add new products to the cart and also you can add quantity to the existing product in the cart. To do this task, you have to use the `checkout/cart/add/{product_id}` as a request payload in the API URL. This API call will work with both customer's authentication or without customer's authentication.
Currently,Bagisto support the following types of product,
- [Simple](https://devdocs.bagisto.com/1.x/api/cart.html#simple-and-virtual-product)
- [Configurable](https://devdocs.bagisto.com/1.x/api/cart.html#configurable-product)
- [Bundle](https://devdocs.bagisto.com/1.x/api/cart.html#bundle-product)
- [Grouped](https://devdocs.bagisto.com/1.x/api/cart.html#grouped-product)
- [Downloadable](https://devdocs.bagisto.com/1.x/api/cart.html#downloadable-product)
- [Virtual](https://devdocs.bagisto.com/1.x/api/cart.html#simple-and-virtual-product)
Let us discuss each product,
### [#](https://devdocs.bagisto.com/1.x/api/cart.html#simple-and-virtual-product) Simple And Virtual Product
A simple product is a physical item with no configurable option like size, color, etc. Whereas virtual product is slightly same as simple but is not a physical item.
- Headers
| Key | Value | Info |
| ------------- | --------------------- | ------------------------------------ |
| Accept | application/json | |
| Authorization | Bearer `token-string` | Use only when you pass `?token=true` |
- Request
`POST /api/checkout/cart/add/{product_id}`
- Params
| Name | Info | Type |
| ---------- | ------------ | ------ |
| product_id | Product's ID | Number |
| quantity | Quantity | Number |
```
{
"product_id": "product_id",
"quantity": "quantity"
}
```
### [#](https://devdocs.bagisto.com/1.x/api/cart.html#configurable-product) Configurable Product
A Configurable product allows the seller to sell the product in a different variation in Bagisto.
- Headers
| Key | Value | Info |
| ------------- | --------------------- | ------------------------------------ |
| Accept | application/json | |
| Authorization | Bearer `token-string` | Use only when you pass `?token=true` |
- Request
`POST /api/checkout/cart/add/{product_id}`
- Params
| Name | Info | Type |
| ---------------------------- | --------------------------------- | ------ |
| product_id | Product's ID | Number |
| quantity | Quantity | Number |
| selected_configurable_option | Configurable product variant's ID | Number |
| super_attribute | Attribute's ID collections | Object |
```
{
"product_id": "product_id",
"quantity": "quantity",
"selected_configurable_option": "configurable_product_variant_id",
"super_attribute": {
"attribute_id": "attribute_option_id",
"attribute_id": "attribute_option_id"
}
}
```
### [#](https://devdocs.bagisto.com/1.x/api/cart.html#bundle-product) Bundle Product
A bundle product includes a customizable product that you can build for your own.
- Headers
| Key | Value | Info |
| ------------- | --------------------- | ------------------------------------ |
| Accept | application/json | |
| Authorization | Bearer `token-string` | Use only when you pass `?token=true` |
- Request
`POST /api/checkout/cart/add/{product_id}`
- Params
| Name | Info | Type |
| ----------------- | -------------------------- | ------ |
| product_id | Product's ID | Number |
| quantity | Quantity | Number |
| bundle_options | Bundle options collections | Object |
| bundle_option_qty | Bundle options qunatity | Object |
```
{
"product_id": "product_id",
"quantity": "quantity",
"bundle_options": {
"first_option_id": {
"index_0": "option_product_id"
},
"second_option_id": {
"index_0": "option_product_id",
"index_1": "another_option_product_id"
}
},
"bundle_option_qty": {
"first_option_id": "quantity"
}
}
```
### [#](https://devdocs.bagisto.com/1.x/api/cart.html#grouped-product) Grouped Product
A grouped product is a group of simple products that can be combined together.
- Headers
| Key | Value | Info |
| ------------- | --------------------- | ------------------------------------ |
| Accept | application/json | |
| Authorization | Bearer `token-string` | Use only when you pass `?token=true` |
- Request
`POST /api/checkout/cart/add/{product_id}`
- Params
| Name | Info | Type |
| ---------- | ----------------------------------- | ------ |
| product_id | Product's ID | Number |
| quantity | Quantity | Number |
| qty | Collection of product with quantity | Object |
```
{
"product_id": "product_id",
"quantity": "quantity",
"qty": {
"product_id_1": "quantity",
"product_id_2": "quantity",
"product_id_3": "quantity",
"product_id_4": "quantity"
}
}
```
### [#](https://devdocs.bagisto.com/1.x/api/cart.html#downloadable-product) Downloadable Product
Downloadable product allows you to sell digital products, such as eBooks, software applications, music, updates, games, etc.
- Headers
| Key | Value | Info |
| ------------- | --------------------- | ------------------------------------ |
| Accept | application/json | |
| Authorization | Bearer `token-string` | Use only when you pass `?token=true` |
- Request
`POST /api/checkout/cart/add/{product_id}`
- Params
| Name | Info | Type |
| ---------- | ------------------- | ------ |
| product_id | Product's ID | Number |
| quantity | Quantity | Number |
| links | Collection of links | Object |
```
{
"product_id": "product_id",
"quantity": "quantity",
"links": {
"0": "link_id_1",
"1": "link_id_2"
}
}
```
### [#](https://devdocs.bagisto.com/1.x/api/cart.html#examples) Examples
#### [#](https://devdocs.bagisto.com/1.x/api/cart.html#_1-for-simple-product) 1\. For simple product
- Headers
| Key | Value | Info |
| ------------- | --------------------- | ------------------------------------ |
| Accept | application/json | |
| Authorization | Bearer `token-string` | Use only when you pass `?token=true` |
- Request
`POST http(s)://example.com/api/checkout/cart/add/24`
- Params
```
{
"product_id": 24,
"quantity": 2
}
```
#### [#](https://devdocs.bagisto.com/1.x/api/cart.html#_2-for-configurable-product) 2\. For configurable product
- Headers
| Key | Value | Info |
| ------------- | --------------------- | ------------------------------------ |
| Accept | application/json | |
| Authorization | Bearer `token-string` | Use only when you pass `?token=true` |
- Request
`POST http(s)://example.com/api/checkout/cart/add/6`
- Params
```
{
"product_id": 6,
"quantity": 1,
"selected_configurable_option": 26,
"super_attribute": {
"23": 2,
"24": 6
}
}
```
Response
```
{
"message": "Product added to cart successfully.",
"data": {
"id": 4,
"customer_email": "johndoe@example.com",
"customer_first_name": "John",
"customer_last_name": "Doe",
"shipping_method": null,
"items_qty": "1.0000",
"grand_total": "50.0000",
"sub_total": "50.0000",
"tax_total": "0.0000",
"discount": "0.0000",
"checkout_method": null,
"is_guest": 0,
"items": [\
{...}, // Cart Item 1\
{...}, // Cart Item 2\
],
"selected_shipping_rate": null,
"payment": null,
"billing_address": null,
"shipping_address": null,
}
}
```
#### [#](https://devdocs.bagisto.com/1.x/api/cart.html#_3-adding-more-products-to-the-same-cart) 3\. Adding more products to the same cart
For this, you need to pass the `product_id` in the request body also.
- Headers
| Key | Value | Info |
| ------------- | --------------------- | ------------------------------------ |
| Accept | application/json | |
| Authorization | Bearer `token-string` | Use only when you pass `?token=true` |
- Request
`POST http(s)://example.com/api/checkout/cart/add/25`
- Params
```
{
"product_id": 25,
"quantity": 2
}
```
## [#](https://devdocs.bagisto.com/1.x/api/cart.html#get-complete-cart-details) Get complete cart details
To get the current cart details, you have to use the `checkout/cart` resource in the API URL. You will see in all the `cart` related API, we used the `checkout` prefix. This API call will work with both customer's authentication or without customer's authentication. If the customer is not logged-in to the store, then this API resource will return the guest's cart detail.
- Headers
| Key | Value | Info |
| ------------- | --------------------- | ------------------------------------ |
| Accept | application/json | |
| Authorization | Bearer `token-string` | Use only when you pass `?token=true` |
- Request
`GET /api/checkout/cart`
### [#](https://devdocs.bagisto.com/1.x/api/cart.html#examples-2) Examples
#### [#](https://devdocs.bagisto.com/1.x/api/cart.html#_1-in-case-of-guest-customer) 1\. In case of guest customer
In, Bagisto guest cart is handled by session, and Laravel handles session by cookies. So you need to save the cookies for the guest cart when you are adding product to the cart and then send it as a header when you want to fetch.
- Headers
| Key | Value |
| ------ | ------------------- |
| Accept | application/json |
| Cookie | bagisto_session=key |
- Request
`GET http(s)://example.com/api/checkout/cart`
Response
```
{
"data": {
"id": 7,
"customer_email": null,
"customer_first_name": null,
"customer_last_name": null,
"shipping_method": null,
"items_qty": "1.0000",
"grand_total": "50.0000",
"sub_total": "50.0000",
"tax_total": "0.0000",
"discount": "0.0000",
"checkout_method": null,
"is_guest": 1,
"items": [\
{...}, // Cart Item 1\
{...} // Cart Item 2\
],
"selected_shipping_rate": null,
"payment": null,
"billing_address": null,
"shipping_address": null,
}
}
```
#### [#](https://devdocs.bagisto.com/1.x/api/cart.html#_2-in-case-of-logged-in-customer) 2\. In case of logged in customer
In the case of the logged-in user, no need for cookies as the cart is in the database and linked with the customer.
- Headers
| Key | Value | Info |
| ------------- | --------------------- | ------------------------------------ |
| Accept | application/json | |
| Authorization | Bearer `token-string` | Use only when you pass `?token=true` |
- Request
`GET http(s)://example.com/api/checkout/cart`
Response
```
{
"data": {
"id": 6,
"customer_email": "johndoe@example.com",
"customer_first_name": "John",
"customer_last_name": "Doe",
"shipping_method": null,
"items_count": 2,
"items_qty": "2.0000",
"grand_total": "170.0000",
"sub_total": "170.0000",
"tax_total": "0.0000",
"discount": "0.0000",
"checkout_method": null,
"is_guest": 0,
"items": [\
{...}, // Cart Item 1\
{...} // Cart Item 2\
],
"selected_shipping_rate": null,
"payment": null,
"billing_address": null,
"shipping_address": null,
}
}
```
## [#](https://devdocs.bagisto.com/1.x/api/cart.html#empty-cart) Empty cart
By using this API call you can remove all the products from the cart. To do this task, you have to use the `checkout/cart/empty` resource in the API URL. This API call will work both with customer's authentication or without customer's authentication.
- Headers
| Key | Value | Info |
| ------------- | --------------------- | ------------------------------------ |
| Accept | application/json | |
| Authorization | Bearer `token-string` | Use only when you pass `?token=true` |
- Request
`GET /api/checkout/cart/empty`
### [#](https://devdocs.bagisto.com/1.x/api/cart.html#examples-3) Examples
- Headers
| Key | Value | Info |
| ------------- | --------------------- | ------------------------------------ |
| Accept | application/json | |
| Authorization | Bearer `token-string` | Use only when you pass `?token=true` |
- Request
`GET http(s)://example.com/api/checkout/cart/empty`
Response
```
{
"message": "Cart removed successfully.",
"data": null
}
```
## [#](https://devdocs.bagisto.com/1.x/api/cart.html#update-cart) Update cart
By using this API call you can update the cart's product(s) quantity. To do this task, you have to use the `checkout/cart/update` resource in the API URL. This API call will work with both customer's authentication or without customer's authentication.
- Headers
| Key | Value | Info |
| ------------- | --------------------- | ------------------------------------ |
| Accept | application/json | |
| Authorization | Bearer `token-string` | Use only when you pass `?token=true` |
- Request
`PUT /api/checkout/cart/update`
- Params
```
{
"qty": {
"cart_item_id": "quantity"
}
}
```
### [#](https://devdocs.bagisto.com/1.x/api/cart.html#examples-4) Examples
- Headers
| Key | Value | Info |
| ------------- | --------------------- | ------------------------------------ |
| Accept | application/json | |
| Authorization | Bearer `token-string` | Use only when you pass `?token=true` |
- Request
`PUT http(s)://example.com/api/checkout/cart/update`
- Params
```
{
"qty": {
"4": 2
}
}
```
Response:
```
{
"message": "Cart updated successfully.",
"data": {
"id": 7,
"customer_email": "johndoe@example.com",
"customer_first_name": "John",
"customer_last_name": "Doe",
"shipping_method": null,
"items_qty": "7.0000",
"grand_total": "450.0000",
"sub_total": "450.0000",
"tax_total": "0.0000",
"discount": "0.0000",
"checkout_method": null,
"is_guest": 0,
"items": [\
{...}, // Cart Item 1\
{...}, // Cart Item 2\
{...} // Cart Item 3\
],
"selected_shipping_rate": null,
"payment": null,
"billing_address": null,
"shipping_address": null,
}
}
```

## [#](https://devdocs.bagisto.com/1.x/api/cart.html#apply-coupon) Apply coupon
You can also apply the coupon by using the `checkout/cart/coupon` endpoint.
- Headers
| Key | Value | Info |
| ------------- | --------------------- | ------------------------------------ |
| Accept | application/json | |
| Authorization | Bearer `token-string` | Use only when you pass `?token=true` |
- Request
`POST /api/checkout/cart/coupon`
- Params
```
{
"code": "OFFER20"
}
```
### [#](https://devdocs.bagisto.com/1.x/api/cart.html#examples-5) Examples
Now, let's apply the coupon and check the responses,
- Headers
| Key | Value | Info |
| ------------- | --------------------- | ------------------------------------ |
| Accept | application/json | |
| Authorization | Bearer `token-string` | Use only when you pass `?token=true` |
- Request
`POST http(s)://example.com/api/checkout/cart/coupon`
- Params
```
{
"code": "OFFER20"
}
```
Response
```
{
"success": true,
"message": "Coupon code applied successfully."
}
```
## [#](https://devdocs.bagisto.com/1.x/api/cart.html#remove-coupon) Remove coupon
For removing the coupon, you just need to hit the `checkout/cart/coupon` endpoint with the `DELETE` method.
- Headers
| Key | Value | Info |
| ------------- | --------------------- | ------------------------------------ |
| Accept | application/json | |
| Authorization | Bearer `token-string` | Use only when you pass `?token=true` |
- Request
`DELETE /api/checkout/cart/coupon`
### [#](https://devdocs.bagisto.com/1.x/api/cart.html#examples-6) Examples
Let's remove the coupon and check the responses,
- Headers
| Key | Value | Info |
| ------------- | --------------------- | ------------------------------------ |
| Accept | application/json | |
| Authorization | Bearer `token-string` | Use only when you pass `?token=true` |
- Request
`DELETE http(s)://example.com/api/checkout/cart/coupon`
Response
```
{
"success": true,
"message": "Remove Coupon"
}
```
## [#](https://devdocs.bagisto.com/1.x/api/cart.html#remove-specific-product-from-cart) Remove specific product from cart
You can remove any particular product from the cart. To do this task, you have to use the `checkout/cart/remove-item/{cart_item_id}` as request payload in the API URL. This API call will work with both customer's authentication or without customer's authentication.
- Headers
| Key | Value | Info |
| ------------- | --------------------- | ------------------------------------ |
| Accept | application/json | |
| Authorization | Bearer `token-string` | Use only when you pass `?token=true` |
- Request
`GET /api/checkout/cart/remove-item/{cart_item_id}`
- Params
| Name | Info | Type |
| ------------ | -------------- | ------ |
| cart_item_id | Cart item's ID | Number |
### [#](https://devdocs.bagisto.com/1.x/api/cart.html#examples-7) Examples
- Request
`GET http(s)://example.com/api/checkout/cart/remove-item/15`
Response
```
{
"message": "Cart removed successfully.",
"data": {
"id": 6,
"customer_email": "johndoe@example.com",
"customer_first_name": "John",
"customer_last_name": "Doe",
"shipping_method": null,
"items_count": 2,
"items_qty": "5.0000",
"grand_total": "210.0000",
"sub_total": "210.0000",
"tax_total": "0.0000",
"discount": "0.0000",
"checkout_method": null,
"is_guest": 0,
"items": [\
{...},\
{...}\
],
"selected_shipping_rate": null,
"payment": null,
"billing_address": null,
"shipping_address": null,
}
}
```
{:class="screenshot-dimension center"}
## [#](https://devdocs.bagisto.com/1.x/api/cart.html#move-product-from-cart-to-wishlist) Move product from cart to wishlist
You can move a product from cart to wishlist. To do this task, you have to use the `checkout/cart/move-to-wishlist/{cart_item_id}` as request payload in the API URL.
- Headers
| Key | Value | Info |
| ------------- | --------------------- | ------------------------------------ |
| Accept | application/json | |
| Authorization | Bearer `token-string` | Use only when you pass `?token=true` |
- Request
`GET /api/checkout/cart/move-to-wishlist/{cart_item_id}`
- Params
| Name | Info | Type |
| ------------ | -------------- | ------ |
| cart_item_id | Cart item's ID | Number |
### [#](https://devdocs.bagisto.com/1.x/api/cart.html#examples-8) Examples
- Request
`http(s)://example.com/api/checkout/cart/move-to-wishlist/16`
Response:
```
{
"message": "Cart item moved to wishlist successfully.",
"data": {
"id": 1,
"customer_email": "johndoe@example.com",
"customer_first_name": "John",
"customer_last_name": "Doe",
"shipping_method": null,
"items_qty": "1.0000",
"grand_total": "50.0000",
"sub_total": "50.0000",
"tax_total": "0.0000",
"discount": "0.0000",
"checkout_method": null,
"is_guest": 0,
"items": [\
{...} // Remaining Cart Item\
],
"selected_shipping_rate": null,
"payment": null,
"billing_address": null,
"shipping_address": null,
}
}
```
## [#](https://devdocs.bagisto.com/1.x/api/cart.html#save-addresses-to-cart) Save addresses to cart
At the checkout step, customers can create new addresses or select from the existing addresses for billing & shipping the cart's item. You can achieve this task by using the `checkout/save-address` resource in the API URL. This API will work for both logged-in customers and guest users.
- Request
`POST /api/checkout/save-address`
### [#](https://devdocs.bagisto.com/1.x/api/cart.html#examples-9) Examples
#### [#](https://devdocs.bagisto.com/1.x/api/cart.html#_1-for-logged-in-user) 1\. For logged in user,
- Request
`POST http(s)://example.com/api/checkout/save-address`
- Params
```
{
"billing": {
"address1": {
"0": ""
},
"use_for_shipping": "false",
"first_name": "john",
"last_name": "doe",
"email": "john@gmail.com",
"address_id": 1
},
"shipping": {
"address1": {
"0": ""
},
"first_name": "john",
"last_name": "doe",
"email": "john@gmail.com",
"address_id": 2
}
}
```
#### [#](https://devdocs.bagisto.com/1.x/api/cart.html#_2-for-guest-user) 2\. For guest user
- Headers
| Key | Value |
| ------ | ---------------- |
| Accept | application/json |
- Request
`POST http(s)://example.com/api/checkout/save-address`
- Params
```
{
"billing": {
"address1": {
"0": "H 23"
},
"use_for_shipping": "true",
"first_name": "john",
"last_name": "doe",
"email": "john@webkul.com",
"city": "noida",
"state": "DL",
"postcode": "110092",
"country": "IN",
"phone": "8802097347"
},
"shipping": {
"address1": {
"0": ""
}
}
}
```
Response
```
{
"data": {
"rates": [{...},{...}],
"cart": {
"id": 6,
"customer_email": "johndoe@example.com",
"items": [{...}, {...}],
"billing_address": {
"id": 7,
"first_name": "John",
"last_name": "Doe",
"name": "John Doe",
"email": "johndoe@example.com",
"address1": [\
"Block H-ARP Park, Sector 63 "\
],
"country": "IN",
"country_name": "India",
"state": "UP",
"city": "Noida",
"postcode": 201301,
"phone": "0132456789"
},
"shipping_address": {
"id": 8,
"first_name": "John",
"last_name": "Doe",
"name": "John Doe",
"email": "johndoe@example.com",
"address1": [\
"Block H-ARP Park, Sector 63 "\
],
"country": "IN",
"country_name": "India",
"state": "UP",
"city": "Noida",
"postcode": 201301,
"phone": "0132456789"
}
}
}
}
```
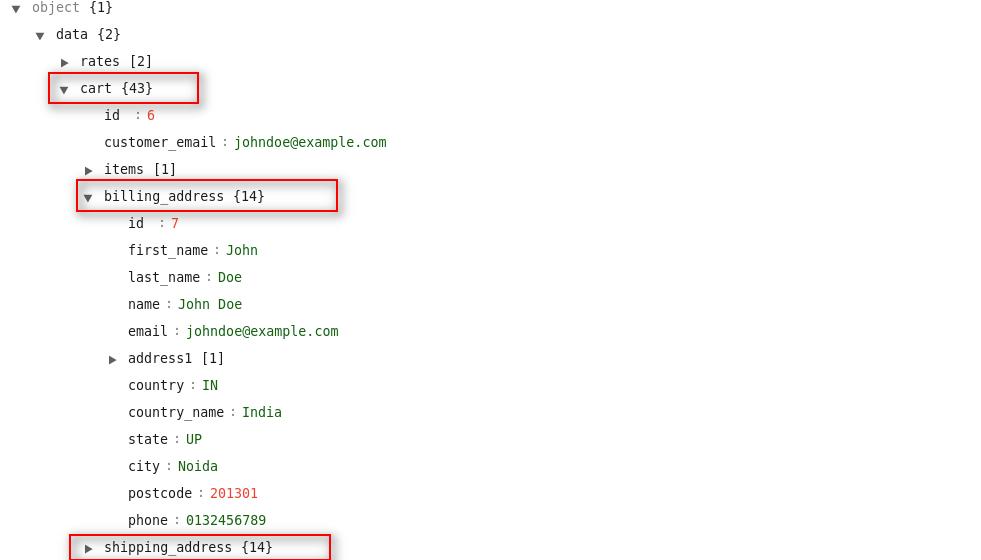
## [#](https://devdocs.bagisto.com/1.x/api/cart.html#save-shipping-method-to-cart) Save shipping method to cart
After saving the customer's addresses to the cart, you have to select a shipping method to proceed for completing the order. You can achieve this task by using the `checkout/save-shipping` resource in the API URL. The shipping method and changes will apply to the cart through this API call. This API will work for both logged-in customers and guest users.
- Headers
| Key | Value | Info |
| ------------- | --------------------- | ------------------------------------ |
| Accept | application/json | |
| Authorization | Bearer `token-string` | Use only when you pass `?token=true` |
- Request
`POST /api/checkout/save-shipping`
- Params
```
{
"shipping_method": "shipping_method_key"
}
```
### [#](https://devdocs.bagisto.com/1.x/api/cart.html#examples-10) Examples
- Headers
| Key | Value | Info |
| ------------- | --------------------- | ------------------------------------ |
| Accept | application/json | |
| Authorization | Bearer `token-string` | Use only when you pass `?token=true` |
- Request
`POST http(s)://example.com/api/checkout/save-shipping`
- Params
```
{
"shipping_method": "flatrate_flatrate"
}
```
Response
```
{
"data": {
"methods": [{...},{...}],
"cart": {
"id": 6,
"customer_email": "johndoe@example.com",
"customer_first_name": "John",
"customer_last_name": "Doe",
"shipping_method": "flatrate_flatrate",
"items": [{...}],
"selected_shipping_rate": {
"id": 9,
"carrier": "flatrate",
"carrier_title": "Flat Rate",
"method": "flatrate_flatrate",
"method_title": "Flat Rate",
"method_description": "This is a flat rate",
"price": 20,
},
"payment": null,
"billing_address": {...},
"shipping_address": {...}
}
}
}
```

## [#](https://devdocs.bagisto.com/1.x/api/cart.html#save-payment-method-to-cart) Save payment method to cart
After applying the shipping method to the cart, you have to select a payment method to proceed for completing the order. You can achieve this task by using the `checkout/save-payment` resource in the API URL. By using this API payment method will apply to the cart and will work with both logged-in customers and as well as guest users.
- Headers
| Key | Value | Info |
| ------------- | --------------------- | ------------------------------------ |
| Accept | application/json | |
| Authorization | Bearer `token-string` | Use only when you pass `?token=true` |
- Request
`POST /api/checkout/save-payment`
- Params
```
{
"payment": {
"method": "payment_method_key"
}
}
```
### [#](https://devdocs.bagisto.com/1.x/api/cart.html#examples-11) Examples
- Headers
| Key | Value | Info |
| ------------- | --------------------- | ------------------------------------ |
| Accept | application/json | |
| Authorization | Bearer `token-string` | Use only when you pass `?token=true` |
- Request
`POST http(s)://example.com/api/checkout/save-payment`
- Params
```
{
"payment": {
"method": "cashondelivery"
}
}
```
Response
```
{
"data": {
"cart": {
"id": 6,
"customer_email": "johndoe@example.com",
"customer_first_name": "John",
"customer_last_name": "Doe",
"shipping_method": "flatrate_flatrate",
"items": [{...}],
"selected_shipping_rate": {...},
"payment": {
"id": 4,
"method": "cashondelivery",
"method_title": "Cash On Delivery"
},
"billing_address": {...},
"shipping_address": {...}
}
}
}
```
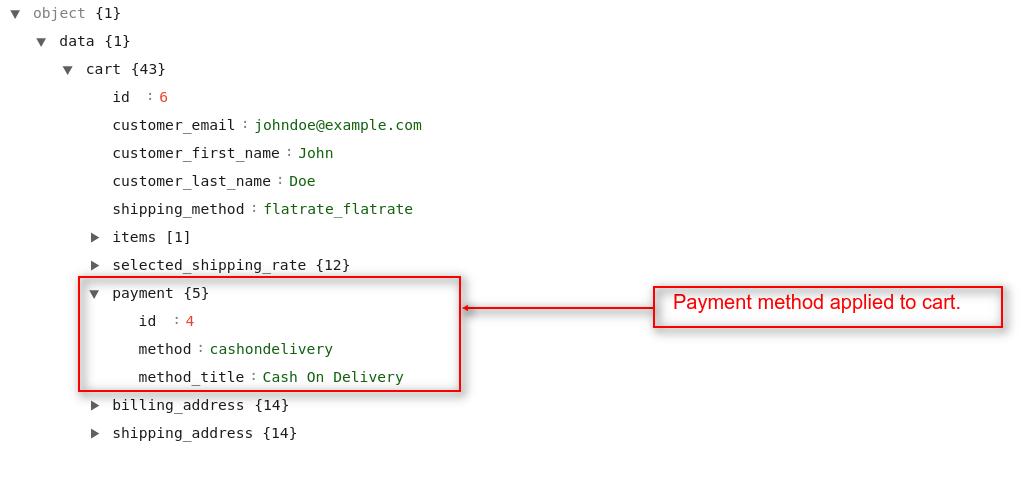
## [#](https://devdocs.bagisto.com/1.x/api/cart.html#save-order) Save Order
After applying shipping addresses, shipping methods, and payment methods to the cart, now finally you have to create/save the order. You can achieve this task by using the `checkout/save-order` resource in the API URL. By using this API order will be placed and save to the current store and this API will work for both logged-in customers and with guest users.
- Headers
| Key | Value | Info |
| ------------- | --------------------- | ------------------------------------ |
| Accept | application/json | |
| Authorization | Bearer `token-string` | Use only when you pass `?token=true` |
- Request
`POST /api/checkout/save-order`
### [#](https://devdocs.bagisto.com/1.x/api/cart.html#examples-12) Examples
- Headers
| Key | Value |
| ------ | ---------------- |
| Accept | application/json |
- Request
`POST http(s)://example.com/api/checkout/save-order`
Response
```
{
"success": true,
"order": {
"id": 4,
"status": "pending",
"customer_email": "johndoe@example.com",
"customer_first_name": "John",
"customer_last_name": "Doe",
"shipping_title": "Flat Rate - Flat Rate",
"payment_title": "Cash On Delivery",
"total_qty_ordered": "2.0000",
"grand_total": "120.0000",
"shipping_amount": 20,
"customer": {...},
"shipping_address": {...},
"billing_address": {...},
"items": [{...}],
"invoices": [],
"shipments": []
}
}
```
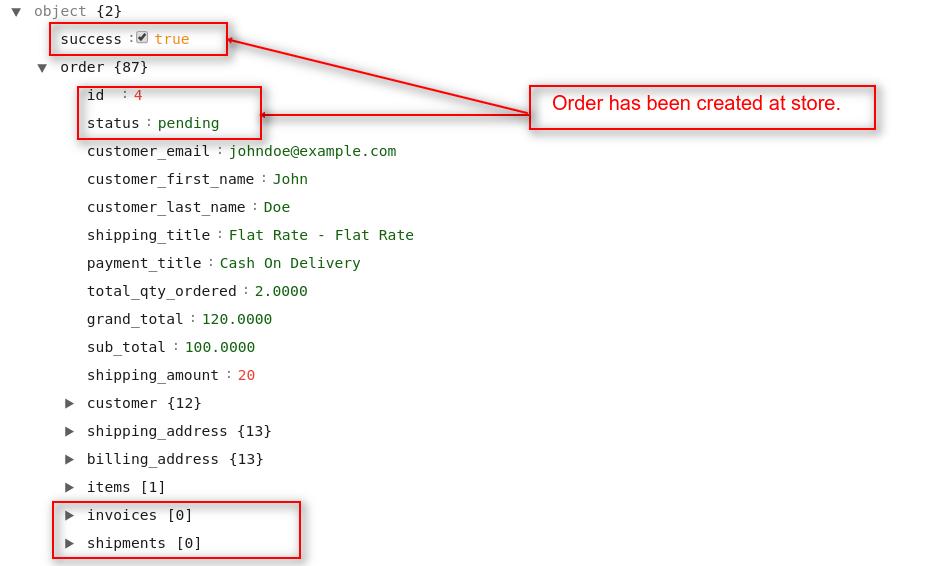
[Attribute Families](https://devdocs.bagisto.com/1.x/api/attribute-families.html)[Orders](https://devdocs.bagisto.com/1.x/api/orders.html)
## Bagisto Validation Guide
This is the documentation for the current version (v2.3) of Bagisto. Stay informed and make the most of Bagisto's capabilities.
# [#](https://devdocs.bagisto.com/2.3/packages/validation.html#validation) Validation
- [Validation Using Laravel](https://devdocs.bagisto.com/2.3/packages/validation.html#validation-using-laravel)
- [Introduction](https://devdocs.bagisto.com/2.3/packages/validation.html#introduction)
- [Usage](https://devdocs.bagisto.com/2.3/packages/validation.html#usage)
- [Using the validate Method on Request](https://devdocs.bagisto.com/2.3/packages/validation.html#using-the-validate-method-on-request)
- [Using the Validator Facade](https://devdocs.bagisto.com/2.3/packages/validation.html#using-the-validator-facade)
- [Validation Using Vue](https://devdocs.bagisto.com/2.3/packages/validation.html#validation-using-vue)
- [Introduction](https://devdocs.bagisto.com/2.3/packages/validation.html#introduction)
- [Installation](https://devdocs.bagisto.com/2.3/packages/validation.html#installation)
- [Configuration](https://devdocs.bagisto.com/2.3/packages/validation.html#configuration)
- [Examples](https://devdocs.bagisto.com/2.3/packages/validation.html#examples)
- [Available Custom Validation in bagisto](https://devdocs.bagisto.com/2.3/packages/validation.html#available-custom-validation-in-bagisto)
## [#](https://devdocs.bagisto.com/2.3/packages/validation.html#validation-using-laravel) Validation Using Laravel
### [#](https://devdocs.bagisto.com/2.3/packages/validation.html#introduction) Introduction
Laravel offers multiple approaches to validate incoming data in your application, ensuring that your data is accurate and meets the specified requirements before it is processed. The most common method is to use the validate method available on incoming HTTP requests.
This method is easy to use and integrates seamlessly with Laravel's request lifecycle. By leveraging Laravel's built-in validation rules and custom validation logic, you can ensure your application handles data validation efficiently and effectively.
For detailed information about validation in Laravel, refer to the [Laravel documentation(opens new window)](https://laravel.com/docs/11.x/validation).
### [#](https://devdocs.bagisto.com/2.3/packages/validation.html#usage) Usage
Laravel provides multiple ways to handle validation in your application, ensuring your data meets specified criteria before processing it. Here are the two most common methods:
### [#](https://devdocs.bagisto.com/2.3/packages/validation.html#using-the-validate-method-on-request) Using the validate Method on Request
The simplest and most common way to validate incoming data is to use the `validate` method available on incoming HTTP requests. Here’s an example of how you can use this method to validate data in a controller method:
```
/**
* Store a new blog post.
*/
public function store(Request $request)
{
$validated = $request->validate([\
'title' => 'required|unique:posts|max:255',\
'body' => 'required',\
]);
}
```
In this example, the validate method takes an array of validation rules. If the validation fails, a ValidationException is thrown, and the user is redirected back to the previous page with error messages.
### [#](https://devdocs.bagisto.com/2.3/packages/validation.html#using-the-validator-facade) Using the Validator Facade
For more complex validation scenarios, you can manually create a validator instance using the `Validator` facade. This approach gives you more control over the validation process and is useful for custom validation messages and handling errors in a more customized way.
Here’s an example of how to use the Validator facade:
```
'required',\
'email' => 'required|email',\
'message' => 'required|max:250',\
];
$customMessages = [\
'required' => 'The :attribute field is required.',\
];
$this->validate($request, $rules, $customMessages);
}
}
```
- `Defining Rules` The $rules array contains the validation rules for each field.
- `Custom Messages` The $customMessages array allows you to define custom validation messages.
- `Creating Validator` The Validator::make method creates a validator instance.
- `Handling Failure` If validation fails, the user is redirected back with the validation errors and input data.
Both methods provide a robust way to ensure data integrity and user input validation in your Laravel application.
## [#](https://devdocs.bagisto.com/2.3/packages/validation.html#validation-using-vue) Validation Using Vue
### [#](https://devdocs.bagisto.com/2.3/packages/validation.html#introduction-2) Introduction
VeeValidate is a powerful validation library for Vue.js that provides an extensive set of validation rules out of the box, along with support for custom rules. It is template-based, making it easy to validate HTML5 inputs as well as custom Vue components. VeeValidate also supports localization with 44 languages maintained by the community.
For detailed information about validation in Vue.js using VeeValidate v4, refer to the [VeeValidate documentation(opens new window)](https://vee-validate.logaretm.com/v4/guide/overview/).
### [#](https://devdocs.bagisto.com/2.3/packages/validation.html#installation) Installation
Bagisto already includes the VeeValidate v4 library, so there is no need to install it separately.
### [#](https://devdocs.bagisto.com/2.3/packages/validation.html#configuration) Configuration
Bagisto comes with pre-configured settings for `vee-validate`. You can find the configuration in the following path: `bagisto/packages/Webkul/Admin/src/Resources/assets/js/app.js`.
```
/**
* This will track all the images and fonts for publishing.
*/
import.meta.glob(["../images/**", "../fonts/**"]);
/**
* Main vue bundler.
*/
import { createApp } from "vue/dist/vue.esm-bundler";
/**
* We are defining all the global rules here and configuring
* all the `vee-validate` settings.
*/
import { configure, defineRule } from "vee-validate";
import { localize } from "@vee-validate/i18n";
import en from "@vee-validate/i18n/dist/locale/en.json";
import { all } from '@vee-validate/rules';
/**
* Registration of all global validators.
*/
Object.entries(all).forEach(([name, rule]) => defineRule(name, rule));
/**
* This regular expression allows phone numbers with the following conditions:
* - The phone number can start with an optional "+" sign.
* - After the "+" sign, there should be one or more digits.
*
* This validation is sufficient for global-level phone number validation. If
* someone wants to customize it, they can override this rule.
*/
defineRule("phone", (value) => {
if (! value || ! value.length) {
return true;
}
if (!/^\+?\d+$/.test(value)) {
return false;
}
return true;
});
defineRule("decimal", (value, { decimals = '*', separator = '.' } = {}) => {
if (value === null || value === undefined || value === '') {
return true;
}
if (Number(decimals) === 0) {
return /^-?\d*$/.test(value);
}
const regexPart = decimals === '*' ? '+' : `{1,${decimals}}`;
const regex = new RegExp(`^[-+]?\\d*(\\${separator}\\d${regexPart})?([eE]{1}[-]?\\d+)?$`);
return regex.test(value);
});
defineRule("required_if", (value, { condition = true } = {}) => {
if (condition) {
if (value === null || value === undefined || value === '') {
return false;
}
}
return true;
});
defineRule("", () => true);
configure({
/**
* Built-in error messages and custom error messages are available. Multiple
* locales can be added in the same way.
*/
generateMessage: localize({
en: {
...en,
messages: {
...en.messages,
phone: "This {field} must be a valid phone number",
},
},
}),
validateOnBlur: true,
validateOnInput: true,
validateOnChange: true,
});
```
### [#](https://devdocs.bagisto.com/2.3/packages/validation.html#examples) Examples
Below are examples of how to use VeeValidate for validation in Vue components within Bagisto:
```
@lang('blog::app.admin.blog.create.title')
```
### [#](https://devdocs.bagisto.com/2.3/packages/validation.html#available-custom-validation-in-bagisto) Available Custom Validation in bagisto
- `phone` The phone validation rule is designed to ensure that the input is a valid phone number.
```
defineRule("phone", (value) => {
if (! value || ! value.length) {
return true;
}
if (!/^\+?\d+$/.test(value)) {
return false;
}
return true;
});
```
- `address` The address validation rule typically ensures that an address field is not left empty and may include additional logic to check for valid address formats.
```
defineRule("address", (value) => {
if (! value || ! value.length) {
return true;
}
if (
!/^[a-zA-Z0-9\s.\/*'\u0600-\u06FF\u0750-\u077F\u08A0-\u08FF\u0590-\u05FF\u3040-\u309F\u30A0-\u30FF\u0400-\u04FF\u0D80-\u0DFF\u3400-\u4DBF\u2000-\u2A6D\u00C0-\u017F\u0980-\u09FF\u0900-\u097F\u4E00-\u9FFF,\(\)-]{1,60}$/iu.test(
value
)
) {
return false;
}
return true;
});
```
- `postcode` The postcode validation rule is designed to ensure that the input is a valid post code.
```
defineRule("postcode", (value) => {
if (! value || ! value.length) {
return true;
}
if (! /^[a-zA-Z0-9][a-zA-Z0-9\s-]*[a-zA-Z0-9]$/.test(value)) {
return false;
}
return true;
});
```
- `decimal` The decimal validation rule ensures that the input is a valid decimal number. This rule allows specifying the number of decimal places and the decimal separator. By default, it accepts any number of decimal places and uses the period (".") as the separator.
```
defineRule(
"decimal",
(value, { decimals = "*", separator = "." } = {}) => {
if (value === null || value === undefined || value === "") {
return true;
}
if (Number(decimals) === 0) {
return /^-?\d*$/.test(value);
}
const regexPart = decimals === "*" ? "+" : `{1,${decimals}}`;
const regex = new RegExp(
`^[-+]?\\d*(\\${separator}\\d${regexPart})?([eE]{1}[-]?\\d+)?$`
);
return regex.test(value);
}
);
```
- `required_if` The required_if validation rule ensures that a value is required based on a given condition. If the specified condition evaluates to true, the input must not be null, undefined, or an empty string. If the condition is false, the validation passes regardless of the input value.
```
defineRule("required_if", (value, { condition = true } = {}) => {
if (condition) {
if (value === null || value === undefined || value === '') {
return false;
}
}
return true;
});
```
[Admin Menu](https://devdocs.bagisto.com/2.3/packages/add-menu-in-admin.html)[DataGrid](https://devdocs.bagisto.com/2.3/packages/datagrid.html)
## Bagisto Events Management
Heads up: You are viewing outdated documentation for Bagisto. Please consider upgrading to [v2.3](https://devdocs.bagisto.com/2.3/prologue) for the latest information.
# [#](https://devdocs.bagisto.com/2.2/advanced/events.html#events) Events
- [Introduction](https://devdocs.bagisto.com/2.2/advanced/events.html#introduction)
- [Creating an Event Class](https://devdocs.bagisto.com/2.2/advanced/events.html#creating-an-event-class)
- [Using Package Generator](https://devdocs.bagisto.com/2.2/advanced/events.html#using-package-generator)
- [Manually Registering Events](https://devdocs.bagisto.com/2.2/advanced/events.html#manually-registering-events)
- [Manually Registering Listeners](https://devdocs.bagisto.com/2.2/advanced/events.html#manually-registering-listeners)
- [Specifying Events](https://devdocs.bagisto.com/2.2/advanced/events.html#specifying-events)
- [Events Fired in Bagisto](https://devdocs.bagisto.com/2.2/advanced/events.html#events-fired-in-bagisto)
- [Events Listen in Bagisto](https://devdocs.bagisto.com/2.2/advanced/events.html#events-listen-in-bagisto)
- [Listening to Existing Events](https://devdocs.bagisto.com/2.2/advanced/events.html#listening-to-existing-events)
- [Registering a Listener](https://devdocs.bagisto.com/2.2/advanced/events.html#registering-a-listener)
## [#](https://devdocs.bagisto.com/2.2/advanced/events.html#introduction) Introduction
Event Listeners in Bagisto are a way to implement the observer pattern, where listeners respond to events that occur in the application. Events can be thought of as announcements made by the application, and listeners are the actions taken in response to those announcements. All event classes in Bagisto are stored in the `Providers` folder, and the listeners are stored in the `Listeners` folder.
In Bagisto, events and listeners are organized in a clear and structured manner:
- Events are typically stored in the Events folder.
- Listeners are stored in the Listeners folder.
This organization makes it easy to manage and locate the event-driven components of your application.
To learn in detail about Events, you can visit the Laravel documentation [here(opens new window)](https://laravel.com/docs/11.x/events).
## [#](https://devdocs.bagisto.com/2.2/advanced/events.html#creating-an-event-class) Creating an Event Class
### [#](https://devdocs.bagisto.com/2.2/advanced/events.html#using-package-generator) Using Package Generator
If you have the Bagisto Package Generator installed, you can use the following command to create a new event class in the `packages/Webkul/CustomEvent/src/Events` directory:
```
php artisan package:make-event CustomEvent Webkul/CustomEvent
```
If the event class already exists, you can use the --force option to overwrite it:
```
php artisan package:make-event CustomEvent Webkul/CustomEvent --force
```
Alternatively, if you don't have the package generator, you can create the file manually by creating a new class in the `packages/Webkul/CustomEvent/src/Events` directory.
### [#](https://devdocs.bagisto.com/2.2/advanced/events.html#manually-registering-events) Manually Registering Events
In Bagisto, you register events manually in the `boot` method of your `EventServiceProvider.php` file. Here is an example of how to register events:
```
/**
* Register any other events for your application.
*
* @return void
*/
public function boot()
{
//...
Event::listen('event.name', 'path-upto-listener@function');
}
```
In this example, `event.name` is the name of the event, and `path-upto-listener@function` is the listener method that will handle the event.
### [#](https://devdocs.bagisto.com/2.2/advanced/events.html#manually-registering-listeners) Manually Registering Listeners
When registering events, you specify the listener function to be executed when an event is triggered. Here is an example of how to register a listener:
```
class EventServiceProvider extends ServiceProvider
{
/**
* Bootstrap services.
*
* @return void
*/
public function boot()
{
//...
Event::listen('checkout.order.save.after', 'Webkul\Admin\Listeners\Order@sendNewOrderMail');
}
}
```
In this example, the `checkout.order.save.after` event will trigger the `sendNewOrderMail` method of the `Order` listener in the `Webkul\Admin\Listeners` namespace.
## [#](https://devdocs.bagisto.com/2.2/advanced/events.html#specifying-events) Specifying Events
In Bagisto, events are typically fired before and after the execution of CRUD operations. This allows listeners to perform additional actions, such as logging, notifications, or data manipulation, at specific points in the lifecycle of an operation.
For example, you might have events fired during product creation, updating, or deletion. Here’s an example of firing events before and after saving an order:
```
namespace Webkul\Sales\Repositories;
use Webkul\Sales\Contracts\Order;
class OrderRepository extends Repository
{
public function create(array $data)
{
Event::dispatch('sales.order.create.before', $data);
$order = parent::create($data);
Event::dispatch('sales.order.create.after', $order);
return $order;
}
}
```
## [#](https://devdocs.bagisto.com/2.2/advanced/events.html#events-fired-in-bagisto) Events Fired in Bagisto
In Bagisto, there are several events fired throughout its operations, allowing developers to hook into specific points in the application's lifecycle to customize behavior or add functionality. Here's a list of events that are fired in Bagisto, which you can listen to and handle as needed by creating event listeners:
| Events Name | Functionality | Arguments |
| -------------------------------------------------- | ----------------------------------------------------------------- | ------------------------- |
| catalog.attribute.create.before | This event will be fired before attribute gets created. | - |
| catalog.attribute.create.after | This event will be fired after attribute gets created. | `attribute` |
| catalog.attribute.update.before | This event will be fired before attribute gets updated. | - |
| catalog.attribute.update.after | This event will be fired after attribute gets updated. | `$attribute` |
| catalog.attribute.delete.before | This event will be fired before attribute gets deleted. | `$id` |
| catalog.attribute.delete.after | This event will be fired after attribute gets deleted. | `$id` |
| catalog.attribute_family.create.before | This event will be fired before attribute family gets created. | - |
| catalog.attribute_family.create.after | This event will be fired after attribute family gets created. | `attribute_family` |
| catalog.attribute_family.update.before | This event will be fired before updating attribute family. | `$id` |
| catalog.attribute_family.update.after | This event will be fired after updating attribute family. | `$attributeFamily` |
| catalog.attribute_family.delete.before | This event will be fired before deleting attribute family. | `$id` |
| catalog.attribute_family.delete.after | This event will be fired after deleting attribute family. | `$id` |
| catalog.category.create.before | This event will be fired before creating category. | - |
| catalog.category.create.after | This event will be fired after creating category. | `$category` |
| catalog.category.update.before | This event will be fired before updating category. | `$id` |
| catalog.category.update.after | This event will be fired after updating category. | `$category` |
| catalog.category.delete.before | This event will be fired before deleting category. | `$id` |
| catalog.category.delete.after | This event will be fired after deleting category. | `$id` |
| catalog.categories.mass-update.before | This event will be fired before bulk category update. | `$categoryId` |
| catalog.categories.mass-update.after | This event will be fired after bulk category update. | `$category` |
| catalog.product.create.before | This event will be fired before product gets created. | - |
| catalog.product.create.after | This event will be fired after product gets created. | `$product` |
| catalog.product.update.before | This event will be fired before product gets updated. | `$id` |
| catalog.product.update.after | This event will be fired after product gets updated. | `$product` |
| catalog.product.delete.before | This event will be fired before product gets deleted. | `$id` |
| catalog.product.delete.after | This event will be fired after product gets deleted. | `$id` |
| products.datagrid.sync | This event will be fired to syncing datagrid product. | `true` |
| cms.page.create.before | This event will be fired before cms page gets created. | - |
| cms.page.create.after | This event will be fired after cms page gets created. | `$page` |
| cms.page.update.before | This event will be fired before cms page gets updated. | `$id` |
| cms.page.update.after | This event will be fired after cms page gets updated. | `$page` |
| cms.page.delete.before | This event will be fired before cms page gets deleted. | `$id` |
| cms.page.delete.after | This event will be fired after cms page gets deleted. | `id` |
| customer.addresses.create.before | This event will be fired before customer address gets created. | - |
| customer.addresses.create.after | This event will be fired after customer address gets created. | `$address` |
| customer.addresses.update.before | This event will be fired before customer address gets updated. | `$id` |
| customer.addresses.update.after | This event will be fired after customer address gets updated. | `$address` |
| customer.addresses.delete.before | This event will be fired before customer address gets deleted. | `$id` |
| customer.addresses.delete.after | This event will be fired after customer address gets deleted. | `$id` |
| customer.registration.before | This event will be fired before customer gets created. | - |
| customer.registration.after | This event will be fired after customer gets created. | - |
| customer.update.before | This event will be fired before customer gets updated. | `$id` |
| customer.update.after | This event will be fired after customer gets updated. | `$customer` |
| customer.password.update.after | This event will be fired after customer password gets updated. | `$customer` |
| customer.note.create.before | This event will be fired before customer note gets created. | `$id` |
| customer.note.create.after | This event will be fired after customer note gets created. | `$customerNote` |
| customer.subscription.before | This event will be fired before customer gets subscription. | - |
| customer.subscription.after | This event will be fired after customer gets subscription. | `$subscription` |
| customer.after.login | This event will be fired after customer login. | `auth()->guard()->user()` |
| customer.delete.before | This event will be fired before customer gets deleted. | `$customer` |
| customer.delete.after | This event will be fired after customer gets deleted. | `$customer` |
| customer.customer_group.create.before | This event will be fired before customer group gets created. | - |
| customer.customer_group.create.after | This event will be fired after customer group gets created. | `$customerGroup` |
| customer.customer_group.update.before | This event will be fired before customer group gets updated. | `$id` |
| customer.customer_group.update.after | This event will be fired after customer group gets updated. | `$customerGroup` |
| customer.customer_group.delete.before | This event will be fired before customer group gets deleted. | `$id` |
| customer.customer_group.delete.after | This event will be fired after customer group gets deleted. | `$id` |
| customer.review.update.before | This event will be fired before customer review gets updated. | `$id` |
| customer.review.update.after | This event will be fired after customer review gets updated. | `$review` |
| customer.review.delete.before | This event will be fired before customer review gets deleted. | `$id` |
| customer.review.delete.after | This event will be fired after customer review gets deleted. | `$id` |
| marketing.search_seo.sitemap.create.before | This event will be fired before sitemaps gets created. | - |
| marketing.search_seo.sitemap.create.after | This event will be fired after sitemaps gets created. | `$sitemap` |
| marketing.search_seo.sitemap.update.before | This event will be fired before sitemaps gets updated. | `$id` |
| marketing.search_seo.sitemap.update.after | This event will be fired after sitemaps gets updated. | `$sitemap` |
| marketing.search_seo.sitemap.delete.before | This event will be fired before sitemaps gets deleted. | `$id` |
| marketing.search_seo.sitemap.delete.after | This event will be fired after sitemaps gets deleted. | `$id` |
| marketing.search_seo.search_synonyms.create.before | This event will be fired before search synonyms created | - |
| marketing.search_seo.search_synonyms.create.after | This event will be fired after search synonyms created | `$searchSynonym` |
| marketing.search_seo.search_synonyms.update.before | This event will be fired before synonyms gets updated. | `$id` |
| marketing.search_seo.search_synonyms.update.after | This event will be fired after synonyms gets updated. | `$searchSynonym` |
| marketing.search_seo.search_synonyms.delete.before | This event will be fired before synonyms gets deleted. | `$id` |
| marketing.search_seo.search_synonyms.delete.after | This event will be fired before synonyms gets deleted. | `$id` |
| marketing.search_seo.search_terms.create.before | This event will be fired before search search terms created | - |
| marketing.search_seo.search_terms.create.after | This event will be fired after search search terms created | `$searchTerm` |
| marketing.search_seo.search_terms.update.before | This event will be fired before search search terms updated | `$id` |
| marketing.search_seo.search_terms.update.after | This event will be fired after search search terms updated | `$searchTerm` |
| marketing.search_seo.search_terms.delete.before | This event will be fired before search search terms gets deleted | `$id` |
| marketing.search_seo.search_terms.delete.after | This event will be fired after search search terms gets deleted | `$id` |
| marketing.search_seo.url_rewrites.create.before | This event will be fired before search url rewrites gets created | - |
| marketing.search_seo.url_rewrites.create.after | This event will be fired after search url rewrites gets created | `$urlRewrite` |
| marketing.search_seo.url_rewrites.update.before | This event will be fired before search url rewrites gets updated | `$id` |
| marketing.search_seo.url_rewrites.update.after | This event will be fired after search url rewrites gets updated | `$urlRewrite` |
| marketing.search_seo.url_rewrites.delete.before | This event will be fired before search url rewrites gets deleted | `$id` |
| marketing.search_seo.url_rewrites.delete.after | This event will be fired after search url rewrites gets deleted | `$id` |
| marketing.campaigns.create.before | This event will be fired before campaigns gets created. | - |
| marketing.campaigns.create.after | This event will be fired after campaigns gets created. | `$campaign` |
| marketing.campaigns.update.before | This event will be fired before campaigns gets updated. | `$id` |
| marketing.campaigns.update.after | This event will be fired after campaigns gets updated. | `$campaign` |
| marketing.campaigns.delete.before | This event will be fired before campaigns gets deleted. | `$id` |
| marketing.campaigns.delete.after | This event will be fired after campaigns gets deleted. | `$id` |
| marketing.events.create.before | This event will be fired before marketing event gets created. | - |
| marketing.events.create.after | This event will be fired after marketing event gets created. | `$event` |
| marketing.events.update.before | This event will be fired before marketing event gets updated. | `$id` |
| marketing.events.update.after | This event will be fired after marketing event gets updated. | `$event` |
| marketing.events.delete.before | This event will be fired before marketing event gets deleted. | `$id` |
| marketing.events.delete.after | This event will be fired after marketing event gets deleted. | `$id` |
| marketing.templates.create.before | This event will be fired before templates gets created. | - |
| marketing.templates.create.after | This event will be fired after templates gets created. | `$template` |
| marketing.templates.update.before | This event will be fired before templates gets updated. | `$id` |
| marketing.templates.update.after | This event will be fired after templates gets updated. | `$template` |
| marketing.templates.delete.before | This event will be fired before templates gets deleted. | `$id` |
| marketing.templates.delete.after | This event will be fired after templates gets deleted. | `$id` |
| promotions.cart_rule.create.before | This event will be fired before cart rule gets created. | - |
| promotions.cart_rule.create.after | This event will be fired after cart rule gets created. | `$cartRule` |
| promotions.cart_rule.update.before | This event will be fired before cart rule gets updated. | `$id` |
| promotions.cart_rule.update.after | This event will be fired after cart rule gets updated. | `$cartRule` |
| promotions.cart_rule.delete.before | This event will be fired before cart rule gets deleted. | `$id` |
| promotions.cart_rule.delete.after | This event will be fired after cart rule gets deleted. | `$id` |
| promotions.catalog_rule.create.before | This event will be fired before catalog rule gets created. | - |
| promotions.catalog_rule.create.after | This event will be fired after catalog rule gets created. | `$catalogRule` |
| promotions.catalog_rule.update.before | This event will be fired before catalog rule gets updated. | `$id` |
| promotions.catalog_rule.update.after | This event will be fired after catalog rule gets updated. | `$catalogRule` |
| promotions.catalog_rule.delete.before | This event will be fired before catalog rule gets deleted. | `$id` |
| promotions.catalog_rule.delete.after | This event will be fired after catalog rule gets deleted. | `$id` |
| sales.order.comment.create.before | This event will be fired before order comment gets created. | - |
| sales.order.comment.create.after | This event will be fired after order comment gets created. | `$comment` |
| core.channel.create.before | This event will be fired before channel gets created. | - |
| core.channel.create.after | This event will be fired after channel gets created. | `$channel` |
| core.channel.update.before | This event will be fired before channel gets updated. | `$id` |
| core.channel.update.after | This event will be fired after channel gets updated. | `$channel` |
| core.channel.delete.before | This event will be fired before channel gets deleted. | `$id` |
| core.channel.delete.after | This event will be fired after channel gets deleted. | `$id` |
| core.exchange_rate.create.before | This event will be fired before exchange rate gets created. | - |
| core.exchange_rate.create.after | This event will be fired after exchange rate gets created. | |
| core.exchange_rate.update.before | This event will be fired before exchange rate gets updated. | `request()->id` |
| core.exchange_rate.update.after | This event will be fired after exchange rate gets updated. | `$exchangeRate` |
| core.exchange_rate.delete.before | This event will be fired before exchange rate gets deleted. | `$id` |
| core.exchange_rate.delete.after | This event will be fired after exchange rate gets deleted. | `$id` |
| inventory.inventory_source.create.before | This event will be fired before inventory source gets created. | - |
| inventory.inventory_source.create.after | This event will be fired after inventory source gets created. | `$inventorySource` |
| inventory.inventory_source.update.before | This event will be fired before inventory source gets updated. | `$id` |
| inventory.inventory_source.update.after | This event will be fired after inventory source gets updated. | `$inventorySource` |
| inventory.inventory_source.delete.before | This event will be fired before inventory source gets deleted. | `$id` |
| inventory.inventory_source.delete.after | This event will be fired after inventory source gets deleted. | `$id` |
| user.role.create.before | This event will be fired before role gets created. | - |
| user.role.create.after | This event will be fired after role gets created. | `$role` |
| user.role.update.before | This event will be fired before role gets updated. | `$id` |
| user.role.update.after | This event will be fired after role gets updated. | `$role` |
| user.role.delete.before | This event will be fired before role gets deleted. | `$id` |
| user.role.delete.after | This event will be fired after role gets deleted. | `$id` |
| theme_customization.create.before | This event will be fired before theme customization gets created. | - |
| theme_customization.create.after | This event will be fired after theme customization gets created. | `$id` |
| theme_customization.update.before | This event will be fired before theme customization gets updated. | `$id` |
| theme_customization.update.after | This event will be fired after theme customization gets updated. | `$theme` |
| theme_customization.delete.before | This event will be fired before theme customization gets deleted. | `$id` |
| theme_customization.delete.after | This event will be fired after theme customization gets deleted. | `$id` |
| user.admin.create.before | This event will be fired before admin gets created. | - |
| user.admin.create.after | This event will be fired after admin gets created. | `$admin` |
| user.admin.update.before | This event will be fired before admin gets updated. | `$id` |
| user.admin.update.after | This event will be fired after admin gets updated. | `$admin` |
| admin.password.update.after | This event will be fired after admin password gets updated. | `$admin` |
| user.admin.delete.before | This event will be fired before admin gets deleted. | `$id` |
| user.admin.delete.after | This event will be fired after admin gets deleted. | `$id` |
| tax.category.create.before | This event will be fired before tax category gets created. | - |
| tax.category.create.after | This event will be fired after tax category gets created. | `$taxCategory` |
| tax.category.update.before | This event will be fired before tax category gets updated. | `$id` |
| tax.category.update.after | This event will be fired after tax category gets updated. | `$taxCategory` |
| tax.category.delete.before | This event will be fired before tax category gets deleted. | `$id` |
| tax.category.delete.after | This event will be fired after tax category gets deleted. | `$id` |
| tax.rate.create.before | This event will be fired before tax rate gets created. | - |
| tax.rate.create.after | This event will be fired after tax rate gets created. | `$taxRate` |
| tax.rate.update.before | This event will be fired before tax rate gets updated. | `$id` |
| tax.rate.update.after | This event will be fired after tax rate gets updated. | `$taxRate` |
| tax.rate.delete.before | This event will be fired before tax rate gets deleted. | `$id` |
| tax.rate.delete.after | This event will be fired after tax rate gets deleted. | `$id` |
| checkout.cart.delete.before | This event will be fired before cart item gets deleted. | `$itemId` |
| checkout.cart.delete.after | This event will be fired after cart item gets deleted. | `$itemId` |
| checkout.cart.add.before | This event will be fired before cart item gets created. | `$product->id` |
| checkout.cart.add.after | This event will be fired after cart item gets created. | `$this->cart` |
| checkout.cart.update.before | This event will be fired before cart item gets updated. | `$item` |
| checkout.cart.update.after | This event will be fired after cart item gets updated. | `$item` |
| checkout.cart.collect.totals.before | This event will be fired before collecting cart totals. | `$this->cart` |
| checkout.cart.collect.totals.after | This event will be fired after collecting cart totals. | `$this->cart` |
| checkout.cart.calculate.items.tax.before | This event will be fired before calculating cart items tax. | `$this->cart` |
| checkout.cart.calculate.items.tax.after | This event will be fired after calculating cart items tax. | `$this->cart` |
| core.configuration.save.before | This event will be fired before core configuration gets saved. | - |
| core.configuration.save.after | This event will be fired after core configuration gets saved. | - |
| core.currency.create.before | This event will be fired before currency gets created. | - |
| core.currency.create.after | This event will be fired after currency gets created. | `$currency` |
| core.currency.update.before | This event will be fired before currency gets updated. | `$id` |
| core.currency.update.after | This event will be fired after currency gets updated. | `$currency` |
| core.currency.delete.before | This event will be fired before currency gets deleted. | `$id` |
| core.currency.delete.after | This event will be fired after currency gets deleted. | `$id` |
| core.locale.create.before | This event will be fired before locale gets created. | - |
| core.locale.create.after | This event will be fired after locale gets created. | `$locale` |
| core.locale.update.before | This event will be fired before locale gets updated. | `$id` |
| core.locale.update.after | This event will be fired after locale gets updated. | `$locale` |
| core.locale.delete.before | This event will be fired before locale gets deleted. | `$id` |
| core.locale.delete.after | This event will be fired after locale gets deleted. | `$id` |
| sales.invoice.save.before | This event will be fired before invoice gets saved. | `$data` |
| sales.invoice.save.after | This event will be fired after invoice gets saved. | `$invoice` |
| checkout.order.save.before | This event will be fired before order gets saved. | `[$data]` |
| checkout.order.save.after | This event will be fired after order gets saved. | `$order` |
| checkout.order.orderitem.save.before | This event will be fired before order item gets saved. | `$item` |
| checkout.order.orderitem.save.after | This event will be fired after order item gets saved. | `$orderItem` |
| sales.order.cancel.before | This event will be fired before order gets canceled. | `$order` |
| sales.order.cancel.after | This event will be fired after order gets canceled. | `$order` |
| sales.order.update-status.before | This event will be fired before order status gets updated. | `$order` |
| sales.order.update-status.after | This event will be fired after order status gets updated. | `$order` |
| sales.refund.save.before | This event will be fired before order refund gets saved. | `$data` |
| sales.refund.save.after | This event will be fired after order refund gets saved. | `$refund` |
| sales.shipment.save.before | This event will be fired before shipment gets saved. | `$data` |
| sales.shipment.save.after | This event will be fired after shipment gets saved. | `$shipment` |
| checkout.load.index | This event will be fired on checkout page load. | - |
## [#](https://devdocs.bagisto.com/2.2/advanced/events.html#events-listen-in-bagisto) Events Listen in Bagisto
- Event listen in bagisto is given below with their functionality.
| Events name | functionality |
| ------------------------------------------------- | ------------------------------------------------------------------------ |
| bagisto.shop.layout.body.after | Listing this event to load css of shop layout. |
| bagisto.admin.layout.head | Listing this event to load css of admin layout. |
| checkout.order.save.after | Listing this event to send notification of new order. |
| sales.order.update-status.after | Listing this event to send notification of when order status is changed. |
| sales.invoice.save.after | Listing this event to add paypal smart button. |
| bagisto.shop.customers.login_form_controls.before | Listing this event to add social login buttons. |
| bagisto.shop.products.view.compare.after | Listing this event to add social share buttons. |
## [#](https://devdocs.bagisto.com/2.2/advanced/events.html#listening-to-existing-events) Listening to Existing Events
Bagisto uses events and listeners to implement the observer pattern, allowing you to respond to various actions and events within the application. You can listen to specific events and execute custom code when those events are triggered.
### [#](https://devdocs.bagisto.com/2.2/advanced/events.html#registering-a-listener) Registering a Listener
Open the `EventServiceProvider.php` file located in the `Providers` directory of your Bagisto application. This file is where you register event listeners.
Inside the `boot()` method of `EventServiceProvider.php`, use the `Event::listen` method to register your listener. This method takes the event name and a callback function or a class method that will handle the event.
```
Event::listen('checkout.order.save.after', 'Webkul\Notification\Listeners\Order@createOrder');
```
In the example above, we are listening to the `checkout.order.save.after` event and specifying the `createOrder` function from the `Order` listener class in the `Webkul\Notification\Listeners` namespace.
Replace `'checkout.order.save.after'` with the specific event you want to listen to. In this example, it listens to the event triggered after saving an order during checkout.
By registering the listener, you have associated the **`createOrder`** function with the **`checkout.order.save.after`** event. Whenever this event is triggered, the specified function will be executed.
You can modify the listener function according to your requirements to perform the desired operation.
[Product Type](https://devdocs.bagisto.com/2.2/advanced/create-product-type.html)[Helpers](https://devdocs.bagisto.com/2.2/advanced/helpers.html)
## Bagisto Routes Documentation
Heads up: You are viewing outdated documentation for Bagisto. Please consider upgrading to [v2.3](https://devdocs.bagisto.com/2.3/prologue) for the latest information.
# [#](https://devdocs.bagisto.com/2.2/packages/routes.html#routes) Routes
- [Introduction](https://devdocs.bagisto.com/2.2/packages/routes.html#introduction)
- [Create a new Route](https://devdocs.bagisto.com/2.2/packages/routes.html#create-a-new-route)
- [Admin Routes](https://devdocs.bagisto.com/2.2/packages/routes.html#admin-routes)
- [Shop Routes](https://devdocs.bagisto.com/2.2/packages/routes.html#shop-routes)
- [Loading Routes](https://devdocs.bagisto.com/2.2/packages/routes.html#loading-routes)
- [Register Routes in ServiceProvider](https://devdocs.bagisto.com/2.2/packages/routes.html#register-routes-in-serviceprovider)
- [Available HTTP methods](https://devdocs.bagisto.com/2.2/packages/routes.html#available-http-methods)
- [GET](https://devdocs.bagisto.com/2.2/packages/routes.html#get)
- [POST](https://devdocs.bagisto.com/2.2/packages/routes.html#post)
- [PUT](https://devdocs.bagisto.com/2.2/packages/routes.html#put)
- [DELETE](https://devdocs.bagisto.com/2.2/packages/routes.html#delete)
- [PATCH](https://devdocs.bagisto.com/2.2/packages/routes.html#patch)
## [#](https://devdocs.bagisto.com/2.2/packages/routes.html#introduction) Introduction
Routes in Laravel define the entry points of your application, mapping HTTP requests to specific controllers or closures. They play a crucial role in defining how users interact with your web application's endpoints.
Routes can be defined to handle various HTTP methods (GET, POST, PUT, DELETE, etc.) and can include parameters and route parameters to capture dynamic values from the URL. Laravel's routing system is powerful and flexible, allowing for easy RESTful routing and middleware application to routes.
For detailed information on Laravel routes, including how to define routes, use route parameters, and apply middleware, refer to the [Laravel Documentation on Routing(opens new window)](https://laravel.com/docs/11.x/routing).
## [#](https://devdocs.bagisto.com/2.2/packages/routes.html#create-a-new-route) Create a new Route
Let's start by creating a route to display the blogs. We will assume that the package name is "Blog".
Start by creating a `Routes` folder inside `packages/Webkul/Blog/src`.
Inside the `Routes` folder, create two files named `admin-routes.php` and `shop-routes.php`.
The updated directory structure will look like this:
```
└── packages
└── Webkul
└── Blog
└── src
├── ...
└── Routes
├── admin-routes.php
└── shop-routes.php
```
### [#](https://devdocs.bagisto.com/2.2/packages/routes.html#admin-routes) Admin Routes
`admin-routes.php` This file is for admin routes. Add the following code to this file:
```
['web', 'admin'], 'prefix' => config('app.admin_url')], function () {
/**
* Blog routes.
*/
Route::controller(PostController::class)->prefix('blogs')->group(function () {
Route::get('', 'index')->name('admin.blogs.index');
// Here you can add your own routes related to the blog
});
});
```
#### [#](https://devdocs.bagisto.com/2.2/packages/routes.html#explanation) Explanation
Routes inside `admin-routes.php` are prefixed with the admin URL ( `config('app.admin_url')`) and apply the `web` and `admin` middleware groups. Adjust the middleware and URL prefix according to your application's configuration.
### [#](https://devdocs.bagisto.com/2.2/packages/routes.html#shop-routes) Shop Routes
`shop-routes.php` Define routes for the shop section in this file.
```
['web', 'locale', 'theme', 'currency']], function () {
/**
* Blog routes.
*/
Route::controller(PostController::class)->prefix('blogs')->group(function () {
Route::get('', 'index')->name('shop.blogs.index');
// Here you can add your own routes related to the blog
});
});
```
#### [#](https://devdocs.bagisto.com/2.2/packages/routes.html#explanation-2) Explanation
Routes inside `shop-routes.php` apply middleware groups ( `web`, `theme`, `locale`, `currency`) commonly used for shop-related routes. Adjust middleware as per your application's requirements.
## [#](https://devdocs.bagisto.com/2.2/packages/routes.html#loading-routes) Loading Routes
### [#](https://devdocs.bagisto.com/2.2/packages/routes.html#register-routes-in-serviceprovider) Register Routes in ServiceProvider
In the `BlogServiceProvider.php` class, load the routes using the loadRoutesFrom method inside the boot method.
```
loadRoutesFrom(__DIR__ . '/../Routes/admin-routes.php');
$this->loadRoutesFrom(__DIR__ . '/../Routes/shop-routes.php');
}
}
```
#### [#](https://devdocs.bagisto.com/2.2/packages/routes.html#explanation-3) Explanation
The `loadRoutesFrom` method registers routes defined in `admin-routes.php` and `shop-routes.php` within the Laravel application, integrating them into the routing system.
## [#](https://devdocs.bagisto.com/2.2/packages/routes.html#available-http-methods) Available HTTP methods
Basic routes are the most common type of routes in Laravel. They respond to HTTP requests like `GET`, `POST`, `PUT`, `DELETE`, etc., and map the URL to a specific controller method or closure function. For example:
### [#](https://devdocs.bagisto.com/2.2/packages/routes.html#get) GET
The `GET` method is used to retrieve data from the server. It is typically used to display pages or retrieve information.
```
// Define a route that responds to a GET request
Route::get('/posts', [PostController::class, 'index']);
```
### [#](https://devdocs.bagisto.com/2.2/packages/routes.html#post) POST
The `POST` method is used to submit data to the server. It is commonly used for form submissions.
```
// Define a route that responds to a POST request
Route::post('/posts', [PostController::class, 'store']);
```
### [#](https://devdocs.bagisto.com/2.2/packages/routes.html#put) PUT
The `PUT` method is used to update existing data on the server. It is usually used for updating resources.
```
// Define a route that responds to a PUT request
Route::put('/posts/{id}', [PostController::class, 'update']);
```
### [#](https://devdocs.bagisto.com/2.2/packages/routes.html#delete) DELETE
The `DELETE` method is used to delete data from the server. It is used to remove resources.
```
// Define a route that responds to a DELETE request
Route::delete('/posts/{id}', [PostController::class, 'destroy']);
```
### [#](https://devdocs.bagisto.com/2.2/packages/routes.html#patch) PATCH
The `PATCH` method is similar to `PUT`, but it is used to make partial updates to data on the server.
```
// Define a route that responds to a PATCH request
Route::patch('/posts/{id}', [PostController::class, 'partialUpdate']);
```
[Repositories](https://devdocs.bagisto.com/2.2/packages/store-data-through-repositories.html)[Controllers](https://devdocs.bagisto.com/2.2/packages/controllers.html)
## Bagisto Helper Methods
Heads up: You are viewing outdated documentation for Bagisto. Please consider upgrading to [v2.3](https://devdocs.bagisto.com/2.3/prologue) for the latest information.
# [#](https://devdocs.bagisto.com/2.2/advanced/helpers.html#helpers) Helpers
- [Introduction](https://devdocs.bagisto.com/2.2/advanced/helpers.html#introduction)
- [Core Helpers](https://devdocs.bagisto.com/2.2/advanced/helpers.html#core-helpers)
- [Get the version number of the Bagisto.](https://devdocs.bagisto.com/2.2/advanced/helpers.html#get-the-version-number-of-the-bagisto)
- [Get all channels](https://devdocs.bagisto.com/2.2/advanced/helpers.html#get-all-channels)
- [Get current channel models](https://devdocs.bagisto.com/2.2/advanced/helpers.html#get-current-channel-models)
- [Set the current channel](https://devdocs.bagisto.com/2.2/advanced/helpers.html#set-the-current-channel)
- [Get current channel code](https://devdocs.bagisto.com/2.2/advanced/helpers.html#get-current-channel-code)
- [Get default channel models](https://devdocs.bagisto.com/2.2/advanced/helpers.html#get-default-channel-models)
- [Set the default channel](https://devdocs.bagisto.com/2.2/advanced/helpers.html#set-the-default-channel)
- [Get the default channel code configured in config/app.php.](https://devdocs.bagisto.com/2.2/advanced/helpers.html#get-the-default-channel-code-configured-in-config-app-php)
- [Get default locale code from default channel](https://devdocs.bagisto.com/2.2/advanced/helpers.html#get-default-locale-code-from-default-channel)
- [Get channel from request](https://devdocs.bagisto.com/2.2/advanced/helpers.html#get-channel-from-request)
- [Get channel code from request](https://devdocs.bagisto.com/2.2/advanced/helpers.html#get-channel-code-from-request)
- [Get the channel name](https://devdocs.bagisto.com/2.2/advanced/helpers.html#get-the-channel-name)
- [Get all locales](https://devdocs.bagisto.com/2.2/advanced/helpers.html#get-all-locales)
- [Get current locale](https://devdocs.bagisto.com/2.2/advanced/helpers.html#get-current-locale)
- [Get locale from request](https://devdocs.bagisto.com/2.2/advanced/helpers.html#get-locale-from-request)
- [Get locale code from request](https://devdocs.bagisto.com/2.2/advanced/helpers.html#get-locale-code-from-request)
- [Check requested locale code in requested channel.](https://devdocs.bagisto.com/2.2/advanced/helpers.html#check-requested-locale-code-in-requested-channel)
- [Get all currencies](https://devdocs.bagisto.com/2.2/advanced/helpers.html#get-all-currencies)
- [Get base currency model](https://devdocs.bagisto.com/2.2/advanced/helpers.html#get-base-currency-model)
- [Get base channel's currency code](https://devdocs.bagisto.com/2.2/advanced/helpers.html#get-base-channel-s-currency-code)
- [Get base channel's currency model](https://devdocs.bagisto.com/2.2/advanced/helpers.html#get-base-channel-s-currency-model)
- [Get base channel's currency code](https://devdocs.bagisto.com/2.2/advanced/helpers.html#get-base-channel-s-currency-code)
- [Set current currency](https://devdocs.bagisto.com/2.2/advanced/helpers.html#set-current-currency)
- [Get current channel's currency model](https://devdocs.bagisto.com/2.2/advanced/helpers.html#get-current-channel-s-currency-model)
- [Get exchange rates](https://devdocs.bagisto.com/2.2/advanced/helpers.html#get-exchange-rates)
- [Converts price.](https://devdocs.bagisto.com/2.2/advanced/helpers.html#converts-price)
- [Converts to base price](https://devdocs.bagisto.com/2.2/advanced/helpers.html#converts-to-base-price)
- [Format and convert price with currency symbol](https://devdocs.bagisto.com/2.2/advanced/helpers.html#format-and-convert-price-with-currency-symbol)
- [Get currency symbol from currency code](https://devdocs.bagisto.com/2.2/advanced/helpers.html#get-currency-symbol-from-currency-code)
- [Format and convert price with currency symbol](https://devdocs.bagisto.com/2.2/advanced/helpers.html#format-and-convert-price-with-currency-symbol)
- [Format price with base currency symbol.](https://devdocs.bagisto.com/2.2/advanced/helpers.html#format-price-with-base-currency-symbol)
- [Checks if current date of the given channel (in the channel timezone) is within the range](https://devdocs.bagisto.com/2.2/advanced/helpers.html#checks-if-current-date-of-the-given-channel-in-the-channel-timezone-is-within-the-range)
- [Get channel timestamp, timestamp will be builded with channel timezone settings.](https://devdocs.bagisto.com/2.2/advanced/helpers.html#get-channel-timestamp-timestamp-will-be-builded-with-channel-timezone-settings)
- [Check whether sql date is empty.](https://devdocs.bagisto.com/2.2/advanced/helpers.html#check-whether-sql-date-is-empty)
- [Format date using current channel.](https://devdocs.bagisto.com/2.2/advanced/helpers.html#format-date-using-current-channel)
- [Retrieve information from configuration](https://devdocs.bagisto.com/2.2/advanced/helpers.html#retrieve-information-from-configuration)
- [Retrieve all countries](https://devdocs.bagisto.com/2.2/advanced/helpers.html#retrieve-all-countries)
- [Get country name by code](https://devdocs.bagisto.com/2.2/advanced/helpers.html#get-country-name-by-code)
- [Retrieve all country states](https://devdocs.bagisto.com/2.2/advanced/helpers.html#retrieve-all-country-states)
- [Retrieve all grouped states by country code.](https://devdocs.bagisto.com/2.2/advanced/helpers.html#retrieve-all-grouped-states-by-country-code)
- [Get states by country code.](https://devdocs.bagisto.com/2.2/advanced/helpers.html#get-states-by-country-code)
- [Get guest customer group](https://devdocs.bagisto.com/2.2/advanced/helpers.html#get-guest-customer-group)
- [Is country required](https://devdocs.bagisto.com/2.2/advanced/helpers.html#is-country-required)
- [Is state required](https://devdocs.bagisto.com/2.2/advanced/helpers.html#is-state-required)
- [Is postcode required.](https://devdocs.bagisto.com/2.2/advanced/helpers.html#is-postcode-required)
- [Week range](https://devdocs.bagisto.com/2.2/advanced/helpers.html#week-range)
- [Method to sort through the acl items and put them in order](https://devdocs.bagisto.com/2.2/advanced/helpers.html#method-to-sort-through-the-acl-items-and-put-them-in-order)
- [Get config field](https://devdocs.bagisto.com/2.2/advanced/helpers.html#get-config-field)
- [Convert to associative array](https://devdocs.bagisto.com/2.2/advanced/helpers.html#convert-to-associative-array)
- [Array set](https://devdocs.bagisto.com/2.2/advanced/helpers.html#array-set)
- [Convert empty strings to null.](https://devdocs.bagisto.com/2.2/advanced/helpers.html#convert-empty-strings-to-null)
- [Create singleton object through single facade.](https://devdocs.bagisto.com/2.2/advanced/helpers.html#create-singleton-object-through-single-facade)
- [Returns a string as selector part for identifying elements in views.](https://devdocs.bagisto.com/2.2/advanced/helpers.html#returns-a-string-as-selector-part-for-identifying-elements-in-views)
- [Get tax category through Id.](https://devdocs.bagisto.com/2.2/advanced/helpers.html#get-tax-category-through-id)
- [Get Shop email sender details](https://devdocs.bagisto.com/2.2/advanced/helpers.html#get-shop-email-sender-details)
- [Get Admin email details](https://devdocs.bagisto.com/2.2/advanced/helpers.html#get-admin-email-details)
- [Get core config values](https://devdocs.bagisto.com/2.2/advanced/helpers.html#get-core-config-values)
- [Get default config](https://devdocs.bagisto.com/2.2/advanced/helpers.html#get-default-config)
- [Get max upload size from the php.ini file](https://devdocs.bagisto.com/2.2/advanced/helpers.html#get-max-upload-size-from-the-php-ini-file)
## [#](https://devdocs.bagisto.com/2.2/advanced/helpers.html#introduction) Introduction
Bagisto provides a range of helper methods in its packages to streamline and simplify the development process. These helpers are designed to offer utility functions that facilitate common tasks, reducing the amount of boilerplate code developers need to write and enhancing overall productivity.
## [#](https://devdocs.bagisto.com/2.2/advanced/helpers.html#core-helpers) Core Helpers
The core helper methods are part of the Core class in the `Webkul\Core` namespace. These methods provide essential functionality that can be utilized across different parts of the application, making development more efficient and consistent. Let's explore some common methods:
### [#](https://devdocs.bagisto.com/2.2/advanced/helpers.html#get-the-version-number-of-the-bagisto) Get the version number of the Bagisto.
To get the version number of your Bagisto application, you can use the `core()->version()` method as shown below:
```
core()->version()
```
### [#](https://devdocs.bagisto.com/2.2/advanced/helpers.html#get-all-channels) Get all channels
The `core()->getAllChannels()` method is a helper function in Bagisto that retrieves all the available channels in the application. Channels in Bagisto represent different storefronts or websites, allowing for multi-channel retailing from a single Bagisto installation. This method is useful for obtaining a list of all configured channels, which can be utilized in various parts of the application.
To get all the channels in your Bagisto application, you can use the `core()->getAllChannels()` method as shown below
```
core()->getAllChannels()
```
### [#](https://devdocs.bagisto.com/2.2/advanced/helpers.html#get-current-channel-models) Get current channel models
The `core()->getCurrentChannel()` method is a helper function in Bagisto that retrieves the current channel being accessed in the application. Channels in Bagisto represent different storefronts or websites, allowing for multi-channel retailing from a single installation. This method is useful for obtaining details about the specific channel currently in use.
```
core()->getCurrentChannel()
```
### [#](https://devdocs.bagisto.com/2.2/advanced/helpers.html#set-the-current-channel) Set the current channel
The `core()->setCurrentChannel($channel)` method is a helper function in Bagisto that allows you to set the current channel being accessed in the application. This can be useful in scenarios where you need to dynamically change the active channel based on certain conditions.
```
core()->setCurrentChannel($channel)
```
### [#](https://devdocs.bagisto.com/2.2/advanced/helpers.html#get-current-channel-code) Get current channel code
The `core()->getCurrentChannelCode()` method is a helper function in Bagisto that retrieves the code of the currently active channel. This is particularly useful when you need to identify the channel context in which your application is operating.
```
core()->getCurrentChannelCode()
```
### [#](https://devdocs.bagisto.com/2.2/advanced/helpers.html#get-default-channel-models) Get default channel models
The `core()->getDefaultChannel()` method in Bagisto is a helper function that retrieves the default channel model. This is useful when you need to access the default channel's details, such as its configuration, settings, and associated models.
```
core()->getDefaultChannel()
```
### [#](https://devdocs.bagisto.com/2.2/advanced/helpers.html#set-the-default-channel) Set the default channel
Setting the default channel in Bagisto typically involves configuration settings rather than a direct method call like `core()->setDefaultChannel()`. Normally, you would define the default channel in your configuration files or through administrative settings in Bagisto's admin panel. Here’s a general approach to setting the default channel:
```
core()->setDefaultChannel()
```
### [#](https://devdocs.bagisto.com/2.2/advanced/helpers.html#get-the-default-channel-code-configured-in-config-app-php) Get the default channel code configured in `config/app.php`.
To retrieve the default channel code configured in config/app.php using Bagisto's helper function `core()->getDefaultChannelCode()`, you typically need to ensure that Bagisto explicitly defines this helper function to access configuration settings directly related to channels. Here’s how you would typically use it:
```
core()->getDefaultChannelCode()
```
### [#](https://devdocs.bagisto.com/2.2/advanced/helpers.html#get-default-locale-code-from-default-channel) Get default locale code from default channel
The function `core()->getDefaultLocaleCodeFromDefaultChannel()` retrieves the locale code for the default language set in the default channel of Bagisto. This can be useful for ensuring that content is displayed in the correct language based on the default settings of the e-commerce platform.
```
core()->getDefaultLocaleCodeFromDefaultChannel()
```
### [#](https://devdocs.bagisto.com/2.2/advanced/helpers.html#get-channel-from-request) Get channel from request
The function `core()->getRequestedChannel()` retrieves the current channel from the request. This is useful in a multi-channel environment where different settings, configurations, or customizations might be needed based on the channel from which the request originated.
```
core()->getRequestedChannel()
```
### [#](https://devdocs.bagisto.com/2.2/advanced/helpers.html#get-channel-code-from-request) Get channel code from request
The function `core()->getRequestedChannelCode()` retrieves the code of the current channel from the request. This helps identify which channel the request is associated with, allowing for channel-specific processing or configurations in a multi-channel setup.
```
core()->getRequestedChannelCode()
```
### [#](https://devdocs.bagisto.com/2.2/advanced/helpers.html#get-the-channel-name) Get the channel name
The function `core()->getChannelName()` retrieves the name of the current channel. This is useful for displaying or logging the name of the channel that is currently active or being accessed.
```
core()->getChannelName()
```
### [#](https://devdocs.bagisto.com/2.2/advanced/helpers.html#get-all-locales) Get all locales
The function `core()->getChannelName()` retrieves the name of the current channel. This is useful for displaying or logging the name of the channel that is currently active or being accessed.
```
core()->getAllLocales()
```
### [#](https://devdocs.bagisto.com/2.2/advanced/helpers.html#get-current-locale) Get current locale
The function `core()->getCurrentLocale()` retrieves the current locale being used. This is useful for determining the language and regional settings that are currently active, allowing for appropriate content and formatting adjustments based on the locale.
```
core()->getCurrentLocale()
```
### [#](https://devdocs.bagisto.com/2.2/advanced/helpers.html#get-locale-from-request) Get locale from request
The function `core()->getRequestedLocale()` retrieves the locale from the current request. This is useful for determining the language and regional settings that the user has requested, allowing the application to display content in the appropriate language and format.
```
core()->getRequestedLocale()
```
### [#](https://devdocs.bagisto.com/2.2/advanced/helpers.html#get-locale-code-from-request) Get locale code from request
The function `core()->getRequestedLocaleCode($localeKey = 'locale', $fallback = true)` retrieves the locale code from the current request.
- `$localeKey (default is 'locale')`: Specifies the key to look for in the request to get the locale code.
- `$fallback (default is true)`: If set to true, it will provide a fallback locale code if the requested locale is not found.
```
core()->getRequestedLocaleCode($localeKey = 'locale', $fallback = true)
```
Here if you want to use admin locale, you can pass it as an argument.
This function is useful for obtaining the locale code based on user requests, with the option to fall back to a default or administrative locale if necessary.
### [#](https://devdocs.bagisto.com/2.2/advanced/helpers.html#check-requested-locale-code-in-requested-channel) Check requested locale code in requested channel.
The function `core()->getRequestedLocaleCodeInRequestedChannel()` checks and retrieves the locale code from the current request within the context of the requested channel. This ensures that the locale code being used is valid and applicable for the specified channel, allowing for accurate localization based on both the channel and the user's request.
```
core()->getRequestedLocaleCodeInRequestedChannel()
```
If not found, then set channel default locale code.
### [#](https://devdocs.bagisto.com/2.2/advanced/helpers.html#get-all-currencies) Get all currencies
The function `core()->getAllCurrencies()` retrieves a list of all available currencies in the system. This can be useful for displaying currency options to users, configuring pricing, or handling multi-currency setups in an e-commerce platform.
```
core()->getAllCurrencies()
```
### [#](https://devdocs.bagisto.com/2.2/advanced/helpers.html#get-base-currency-model) Get base currency model
The function `core()->getBaseCurrency()` retrieves the base currency model used in the application. This is typically the default currency against which other currencies are converted or displayed in multi-currency environments within an e-commerce platform.
```
core()->getBaseCurrency()
```
### [#](https://devdocs.bagisto.com/2.2/advanced/helpers.html#get-base-channel-s-currency-code) Get base channel's currency code
The function `core()->getBaseCurrencyCode()` retrieves the currency code of the base channel, which is essential for operations involving currency management and display within an e-commerce application.
```
core()->getBaseCurrencyCode()
```
### [#](https://devdocs.bagisto.com/2.2/advanced/helpers.html#get-base-channel-s-currency-model) Get base channel's currency model
The function `core()->getChannelBaseCurrency()` retrieves the currency model of the base channel in Bagisto. This is useful for accessing detailed information about the currency, such as its code, symbol, conversion rates, and other attributes related to currency management within the e-commerce platform.
```
core()->getChannelBaseCurrency()
```
### [#](https://devdocs.bagisto.com/2.2/advanced/helpers.html#get-base-channel-s-currency-code-2) Get base channel's currency code
This function `core()->getChannelBaseCurrencyCode()` retrieves the currency code of the base channel, which is essential for operations involving currency management and display within an e-commerce application.
```
core()->getChannelBaseCurrencyCode()
```
### [#](https://devdocs.bagisto.com/2.2/advanced/helpers.html#set-current-currency) Set current currency
To set the current currency in Bagisto using the `core()->setCurrentCurrency()` method, you typically need to pass the desired currency code as an argument. Here's how you can do it:
```
core()->setCurrentCurrency()
```
### [#](https://devdocs.bagisto.com/2.2/advanced/helpers.html#get-current-channel-s-currency-model) Get current channel's currency model
```
core()->getCurrentCurrency()
```
- **Get current channel's currency code.**
To retrieve the current channel's currency model in Bagisto, you should use the `core()->getCurrentCurrency()` method. Here's how you can use it:
```
core()->getCurrentCurrencyCode()
```
This function call retrieves the currency model of the current channel, allowing you to access attributes such as the currency code, symbol, exchange rates, and other relevant information related to currency management within your e-commerce application.
### [#](https://devdocs.bagisto.com/2.2/advanced/helpers.html#get-exchange-rates) Get exchange rates
To get exchange rates in Bagisto, you typically need to specify the base currency and the target currency for which you want to retrieve the exchange rate. Here's how you can achieve this:
```
core()->getExchangeRate()
```
### [#](https://devdocs.bagisto.com/2.2/advanced/helpers.html#converts-price) Converts price.
The `core()->convertPrice()` function in Bagisto is used to convert a given amount from the base currency to a specified target currency. Here's how you can use it:
```
$amount = 100; // Replace with the amount you want to convert
$targetCurrencyCode = 'EUR'; // Replace with the target currency code
$convertedAmount = core()->convertPrice($amount, $targetCurrencyCode);
```
### [#](https://devdocs.bagisto.com/2.2/advanced/helpers.html#converts-to-base-price) Converts to base price
The `core()->convertToBasePrice()` function in Bagisto is used to convert a given amount from a specified currency (target currency) to the base currency of the application. Here's how you can use it:
```
$amount = 200; // Replace with the amount you want to convert to the base currency
$targetCurrencyCode = 'EUR'; // Replace with the target currency code
$baseAmount = core()->convertToBasePrice($amount, $targetCurrencyCode);
```
### [#](https://devdocs.bagisto.com/2.2/advanced/helpers.html#format-and-convert-price-with-currency-symbol) Format and convert price with currency symbol
To format and convert a price to the base currency while including the currency symbol, you typically need to use formatting functions along with conversion. Here’s how you can achieve this in Bagisto:
```
core()->convertToBasePrice($amount)
```
### [#](https://devdocs.bagisto.com/2.2/advanced/helpers.html#get-currency-symbol-from-currency-code) Get currency symbol from currency code
To get the currency symbol from a currency code in Bagisto, you typically use the `currencySymbol()` method with the currency code as an argument. Here's how you can do it:
```
core()->currencySymbol($amount)
```
### [#](https://devdocs.bagisto.com/2.2/advanced/helpers.html#format-and-convert-price-with-currency-symbol-2) Format and convert price with currency symbol
To format and convert a price with a currency symbol in Bagisto, you can use the `core()->formatPrice()` method. Here’s how you can use it:
```
$price = 100; // Replace with the price you want to format and convert
$currencyCode = 'USD'; // Replace with the currency code you want to use, if different from the default
$formattedPrice = core()->formatPrice($price, $currencyCode);
```
This function retrieves the formatted price as a string with the currency symbol based on the provided or default currency code.
### [#](https://devdocs.bagisto.com/2.2/advanced/helpers.html#format-price-with-base-currency-symbol) Format price with base currency symbol.
In Bagisto, if you want to format a price with the base currency symbol, considering the option to encode it, you would typically handle it like this:
This method also give ability to encode the base currency symbol and its optional.
```
core()->formatBasePrice($price, $isEncoded = false)
```
### [#](https://devdocs.bagisto.com/2.2/advanced/helpers.html#checks-if-current-date-of-the-given-channel-in-the-channel-timezone-is-within-the-range) Checks if current date of the given channel (in the channel timezone) is within the range
The `core()->isChannelDateInInterval($dateFrom = null, $dateTo = null)` function in Bagisto checks if the current date of the given channel (considering the channel's timezone) falls within the specified date range.
```
core()->isChannelDateInInterval($dateFrom = null, $dateTo = null)
```
### [#](https://devdocs.bagisto.com/2.2/advanced/helpers.html#get-channel-timestamp-timestamp-will-be-builded-with-channel-timezone-settings) Get channel timestamp, timestamp will be builded with channel timezone settings.
To retrieve a timestamp that adheres to a specific channel's timezone settings in Bagisto, you typically use the `core()->channelTimeStamp($channel)` function. Here's how you can implement it:
```
core()->channelTimeStamp($channel)
```
Ensure that the $channel variable is correctly instantiated with the channel object before passing it to `core()->channelTimeStamp()`. This method ensures that timestamps align with the timezone settings defined for each channel in your Bagisto application.
### [#](https://devdocs.bagisto.com/2.2/advanced/helpers.html#check-whether-sql-date-is-empty) Check whether sql date is empty.
In Bagisto, there isn't a specific `core()->is_empty_date()` function predefined. However, if you need to check whether a SQL date field is empty or null in PHP, you can do it as follows
```
core()->is_empty_date($date)
```
This function retrieves the date in the specified format, adjusted according to the timezone and locale settings of the current channel in Bagisto
### [#](https://devdocs.bagisto.com/2.2/advanced/helpers.html#format-date-using-current-channel) Format date using current channel.
In Bagisto, you can format a date using the current channel's timezone and locale using the `core()->formatDate()` function. Here's how you can use it
```
core()->formatDate($date = null, $format = 'd-m-Y H:i:s')
```
### [#](https://devdocs.bagisto.com/2.2/advanced/helpers.html#retrieve-information-from-configuration) Retrieve information from configuration
In Bagisto, to retrieve information from configuration using `core()->getConfigData()`, you can fetch specific configuration fields based on the provided parameters. Here’s how you can use it
```
core()->getConfigData($field, $channel = null, $locale = null)
```
### [#](https://devdocs.bagisto.com/2.2/advanced/helpers.html#retrieve-all-countries) Retrieve all countries
To retrieve all countries in Bagisto, you can use the `core()->countries()` function. Here's how you can fetch and utilize this data:
```
core()->countries()
```
### [#](https://devdocs.bagisto.com/2.2/advanced/helpers.html#get-country-name-by-code) Get country name by code
To get the country name by its ISO 3166-1 alpha-2 code in Bagisto, you can use the `core()->country_name($code)` function. Here's how you can use it
```
core()->country_name($code)
```
This function retrieves the full name of the country based on its ISO 3166-1 alpha-2 code ($code).
### [#](https://devdocs.bagisto.com/2.2/advanced/helpers.html#retrieve-all-country-states) Retrieve all country states
To retrieve all states (or provinces) of a specific country in Bagisto, you can use the `core()->states($countryCode)` function. Here's how you can use it
```
core()->states($countryCode)
```
This function returns a collection of state objects for the specified country
### [#](https://devdocs.bagisto.com/2.2/advanced/helpers.html#retrieve-all-grouped-states-by-country-code) Retrieve all grouped states by country code.
In Bagisto, to retrieve all states grouped by country code, you can use the `core()->groupedStatesByCountries()` function. This function organizes states or provinces by their respective countries. Here's how you can use it:
```
core()->groupedStatesByCountries()
```
### [#](https://devdocs.bagisto.com/2.2/advanced/helpers.html#get-states-by-country-code) Get states by country code.
To retrieve states (or provinces) by country code in Bagisto, you can use the `core()->findStateByCountryCode($countryCode, $stateCode = null)` function. Here’s how you can use it
```
core()->findStateByCountryCode($countryCode = null, $stateCode = null)
```
### [#](https://devdocs.bagisto.com/2.2/advanced/helpers.html#get-guest-customer-group) Get guest customer group
In Bagisto, to get the guest customer group, you can use the `core()->getGuestCustomerGroup()` function. Here's how you can use it
```
core()->getGuestCustomerGroup()
```
This function retrieves the guest customer group configured in your Bagisto application. It returns an object representing the guest customer group
### [#](https://devdocs.bagisto.com/2.2/advanced/helpers.html#is-country-required) Is country required
In Bagisto, to check if a country selection is required (typically in address forms or checkout processes), you can use the `core()->isCountryRequired()` function. Here's how you can use it:
```
core()->isCountryRequired()
```
This function returns a boolean (true or false) indicating whether the country selection is mandatory
### [#](https://devdocs.bagisto.com/2.2/advanced/helpers.html#is-state-required) Is state required
In Bagisto, to check if a state or province selection is required (typically in address forms or checkout processes), you can use the `core()->isStateRequired()` function. Here's how you can use it:
```
core()->isStateRequired()
```
### [#](https://devdocs.bagisto.com/2.2/advanced/helpers.html#is-postcode-required) Is postcode required.
This function returns a boolean (true or false) indicating whether the postcode (or ZIP code) selection is mandatory.
```
core()->isPostCodeRequired()
```
### [#](https://devdocs.bagisto.com/2.2/advanced/helpers.html#week-range) Week range
In Bagisto, there isn't a specific `core()->xWeekRange()` function predefined. However, if you need to calculate a date range based on a given date and the number of weeks before or after that date, you can achieve this using PHP's DateTime and DateInterval classes. Here’s how you can calculate a week range
```
core()->xWeekRange($date, $day)
```
### [#](https://devdocs.bagisto.com/2.2/advanced/helpers.html#method-to-sort-through-the-acl-items-and-put-them-in-order) Method to sort through the acl items and put them in order
In Bagisto, there isn't a specific `core()->sortItems()` function predefined for sorting ACL items directly. However, you can implement a custom function to sort ACL items based on your specific criteria
```
core()->sortItems($items)
```
### [#](https://devdocs.bagisto.com/2.2/advanced/helpers.html#get-config-field) Get config field
You can retrieve a specific configuration field value using a method like `core()->getConfigField($fieldName)`
```
core()->getConfigField($fieldName)
```
### [#](https://devdocs.bagisto.com/2.2/advanced/helpers.html#convert-to-associative-array) Convert to associative array
In Bagisto, there isn't a specific `core()->convertToAssociativeArray()` function predefined for converting items into associative arrays directly. However, you can easily achieve this using PHP's array functions and loops. Here's a straightforward way to convert a list of items into an associative array based on a key:
```
core()->convertToAssociativeArray($items)
```
### [#](https://devdocs.bagisto.com/2.2/advanced/helpers.html#array-set) Array set
There is a helper function array_set() that allows you to set a value within a nested array using a dot-notation key.
```
core()->array_set($array, $key, $value)
```
### [#](https://devdocs.bagisto.com/2.2/advanced/helpers.html#convert-empty-strings-to-null) Convert empty strings to null.
`convertEmptyStringsToNull` function is designed to convert empty strings ('') or the string 'null' to null within an array. Let's break down the function and how it works:
```
core()->convertEmptyStringsToNull($array)
```
### [#](https://devdocs.bagisto.com/2.2/advanced/helpers.html#create-singleton-object-through-single-facade) Create singleton object through single facade.
By using getSingletonInstance() method in Bagisto you can Create singleton object through single facade.
```
core()->getSingletonInstance($className)
```
### [#](https://devdocs.bagisto.com/2.2/advanced/helpers.html#returns-a-string-as-selector-part-for-identifying-elements-in-views) Returns a string as selector part for identifying elements in views.
The `taxRateAsIdentifier` function provided is a helper function in Bagisto that generates a string identifier based on a tax rate. Here’s a breakdown of how it works and how you can use it in your Bagisto application:
It Returns a string as selector part for identifying elements in views.
```
core()->taxRateAsIdentifier(float $taxRate)
```
### [#](https://devdocs.bagisto.com/2.2/advanced/helpers.html#get-tax-category-through-id) Get tax category through Id.
To retrieve a tax category by its ID using a method like `core()->getTaxCategoryById($id)` in Bagisto or Laravel, you typically need to access the appropriate repository or model where tax categories are stored. Here’s how you can implement such a method assuming you are working within the Bagisto framework
```
core()->getTaxCategoryById($id)
```
### [#](https://devdocs.bagisto.com/2.2/advanced/helpers.html#get-shop-email-sender-details) Get Shop email sender details
To retrieve the shop email sender details in Bagisto or Laravel, you typically need to access configuration settings where these details are stored, such as in the environment configuration or a dedicated settings repository. Here’s a conceptual implementation of how you might achieve this functionality:
```
core()->getSenderEmailDetails()
```
### [#](https://devdocs.bagisto.com/2.2/advanced/helpers.html#get-admin-email-details) Get Admin email details
To retrieve the admin email details in Bagisto, you typically need to access the configuration settings where these details are stored. Here’s how you can conceptualize and implement the `core()->getAdminEmailDetails()` function:
```
core()->getAdminEmailDetails()
```
By implementing `getAdminEmailDetails()` in your Bagisto application, you can efficiently retrieve and utilize the configured admin details for various administrative functionalities, ensuring clarity and reliability in your communication processes.
### [#](https://devdocs.bagisto.com/2.2/advanced/helpers.html#get-core-config-values) Get core config values
To retrieve core configuration values in Bagisto application using a method like `core()->getCoreConfig($field, $channel, $locale)`, you would typically access configuration settings specific to your application's setup. Here’s a conceptual implementation for such a method:
```
core()->getCoreConfig($field, $channel, $locale)
```
### [#](https://devdocs.bagisto.com/2.2/advanced/helpers.html#get-default-config) Get default config
By using the `getDefaultConfig($field)` method, you can achieve the default config.
```
core()->getDefaultConfig($field)
```
### [#](https://devdocs.bagisto.com/2.2/advanced/helpers.html#get-max-upload-size-from-the-php-ini-file) Get max upload size from the php.ini file
By using the `getMaxUploadSize` method, you can achieve the maximum upload size.
```
core()->getMaxUploadSize()
```
These core helper methods provide various functionalities to simplify common tasks and streamline development in Bagisto.
[Events Listeners](https://devdocs.bagisto.com/2.2/advanced/events.html)[Override Core Models](https://devdocs.bagisto.com/2.2/advanced/override-core-model.html)
## Customer API Overview
Heads up: You are viewing outdated documentation for Bagisto. Please consider upgrading to [v2.3](https://devdocs.bagisto.com/2.3/prologue) for the latest information.
# [#](https://devdocs.bagisto.com/1.x/api/customers.html#customers) Customers
In this section, we will use all APIs which relates to customer like registration, authentication, details and reset password.
Let's start with registration first,
## [#](https://devdocs.bagisto.com/1.x/api/customers.html#registration) Registration
You can create/register a new customer in the Bagisto store. To achieve this task, you can use the `customer/register` API call resource.
- Headers
| Key | Value |
| ------------ | ---------------- |
| Accept | application/json |
| Content-Type | application/json |
- Request
`POST /api/v1/customer/register`
- Params
| Name | Info | Type |
| --------------------- | ---------------- | ------ |
| email | Email | String |
| first_name | First Name | String |
| last_name | Last Name | String |
| password | Password | String |
| password_confirmation | Confirm Password | String |
### [#](https://devdocs.bagisto.com/1.x/api/customers.html#examples) Examples
#### [#](https://devdocs.bagisto.com/1.x/api/customers.html#_1-let-s-register-create-a-new-customer) 1\. Let's register/create a new customer
- Headers
| Key | Value |
| ------------ | ---------------- |
| Accept | application/json |
| Content-Type | application/json |
- Request
`POST http(s)://example.com/api/v1/customer/register`
- Params
| Name | Value |
| --------------------- | -------------------- |
| email | customer@example.com |
| first_name | John |
| last_name | Doe |
| password | customer123 |
| password_confirmation | customer123 |
Response
```
{
message: "Your account has been created successfully."
}
```
#### [#](https://devdocs.bagisto.com/1.x/api/customers.html#_2-if-customer-is-already-in-the-bagisto-store-with-the-same-email-address) 2\. If customer is already in the Bagisto store with the same email address
Now, hit the above request one more time. Now, we are going to see the following response.
Response
```
{
"message": "The email has already been taken.",
"errors": {
"email": [\
"The email has already been taken."\
]
}
}
```
## [#](https://devdocs.bagisto.com/1.x/api/customers.html#authentication) Authentication
To authenticate any customer at the Bagisto store, the customer needs to have a valid email address and password.
- Headers
| Key | Value |
| ------------ | ---------------- |
| Accept | application/json |
| Content-Type | application/json |
- Request
Now here is your choice, whether you want to use **JWT API guard** or normal **customer guard**.
TIP
If you want to know more about the JWT Authentication, please check here [JWT Authentication](https://devdocs.bagisto.com/1.x/api/getting-started-with-the-api#_1-jwt-authentication).
For JWT API guard, you need to pass the token key in the query string.
`POST /api/customer/login?token=true`
For normal customer guard,
`POST /api/customer/login`
- Params
| Name | Info | Type |
| -------- | --------------------- | ------ |
| email | Email for customer | String |
| password | Password for customer | String |
### [#](https://devdocs.bagisto.com/1.x/api/customers.html#both-examples) Both Examples
#### [#](https://devdocs.bagisto.com/1.x/api/customers.html#_1-let-s-try-the-customer-authentication-with-jwt-api-guard) 1\. Let's try the customer authentication with JWT API guard
- Headers
| Key | Value |
| ------ | ---------------- |
| Accept | application/json |
- Request
`POST http(s)://example.com/api/customer/login?token=true`
- Params
| Key | Value |
| -------- | ---------------- |
| email | john@example.com |
| password | john123 |
Response
Once you send the request, you will get some random token string that will be used to access the API data.
```
{
"token": "eyJ0eXAiOiJKV1QiLCJhbGciOiJIUzI1NiJ9.eyJpc3MiOiJodHRwOlwvXC9sb2NhbGhvc3RcL2RldmVsb3BtZW50XC9iYWdpc3RvLW1hc3RlclwvcHVibGljXC9hcGlcL2N1c3RvbWVyXC9sb2dpbiIsImlhdCI6MTYxMDY5Njk2MSwiZXhwIjoxNjEwNzAwNTYxLCJuYmYiOjE2MTA2OTY5NjEsImp0aSI6IkpuMU9aUWoxd1BVaXlLaHQiLCJzdWIiOjEsInBydiI6IjhmY2EwODhhYmFlMmY5YThmODRhNWYwYmY2YTY1MjQ0OTA1NWJlMDAifQ.6mKgyRgMHxi_W6gf2cgb7Rdcut73L1YEBauYZ8soKSU",
"message": "Logged in successfully.",
"data": {
"id": 1,
"email": "john@example.com",
"first_name": "John",
"last_name": "Doe",
"name": "John Doe",
"gender": null,
"date_of_birth": null,
"phone": null,
"status": 1,
"group": {
"id": 2,
"name": "General",
"created_at": null,
"updated_at": null
},
"created_at": "2020-09-28T05:13:42.000000Z",
"updated_at": "2020-09-28T05:13:42.000000Z"
}
}
```
#### [#](https://devdocs.bagisto.com/1.x/api/customers.html#_2-let-s-try-without-token) 2\. Let's try without token
By removing the token key from request will activate the **customer guard**.
- Headers
| Key | Value |
| ------ | ---------------- |
| Accept | application/json |
- Request
`POST http(s)://example.com/api/customer/login`
- Params
| Key | Value |
| -------- | ---------------- |
| email | john@example.com |
| password | john123 |
Response
Once you send the request, then you will get data without token because now the **customer guard** is active.
```
{
"token": true,
"message": "Logged in successfully.",
"data": {
"id": 1,
"email": "john@example.com",
"first_name": "John",
"last_name": "Doe",
"name": "John Doe",
"gender": null,
"date_of_birth": null,
"phone": null,
"status": 1,
"group": {
"id": 2,
"name": "General",
"created_at": null,
"updated_at": null
},
"created_at": "2020-09-28T05:13:42.000000Z",
"updated_at": "2020-09-28T05:13:42.000000Z"
}
}
```
## [#](https://devdocs.bagisto.com/1.x/api/customers.html#details) Details
You can get the customer's details only for the logged-in customer. To retrieve the customer's information you can use the `customer/get` resource.
- Headers
| Key | Value | Info |
| ------------- | --------------------- | ------------------------------------ |
| Accept | application/json | |
| Authorization | Bearer `token-string` | Use only when you pass `?token=true` |
- Request
`GET /api/customer/get`
### [#](https://devdocs.bagisto.com/1.x/api/customers.html#examples-2) Examples
Let's fetch the customer data,
- Headers
| Key | Value | Info |
| ------------- | --------------------- | ------------------------------------ |
| Accept | application/json | |
| Authorization | Bearer `token-string` | Use only when you pass `?token=true` |
- Request
`GET http(s)://example.com/api/customer/get`
Response
```
{
"data": {
"id": 1,
"email": "john@example.com",
"first_name": "John",
"last_name": "Doe",
"name": "John Doe",
"gender": null,
"date_of_birth": null,
"phone": null,
"status": 1,
"group": {
"id": 2,
"name": "General",
"created_at": null,
"updated_at": null
},
"created_at": "2020-09-28T05:13:42.000000Z",
"updated_at": "2020-09-28T05:13:42.000000Z"
}
}
```
## [#](https://devdocs.bagisto.com/1.x/api/customers.html#details-by-id) Details by id
You can also get the customer information by using `customer_id` as a request payload. To achieve this, you can use the `customers/{id}` API call resource.
- Headers
| Key | Value | Info |
| ------------- | --------------------- | ------------------------------------ |
| Accept | application/json | |
| Authorization | Bearer `token-string` | Use only when you pass `?token=true` |
- Request
`GET /api/customers/{id}`
- Params
| Name | Info | Type |
| ---- | ----------- | ------ |
| id | Customer ID | Number |
WARNING
This request will return the current logged in customer's details.
### [#](https://devdocs.bagisto.com/1.x/api/customers.html#examples-3) Examples
Let's fetch the customer data,
- Headers
| Key | Value | Info |
| ------------- | --------------------- | ------------------------------------ |
| Accept | application/json | |
| Authorization | Bearer `token-string` | Use only when you pass `?token=true` |
- Request
`GET http(s)://example.com/api/customers/1`
Response
```
{
"data": {
"id": 1,
"email": "john@example.com",
"first_name": "John",
"last_name": "Doe",
"name": "John Doe",
"gender": null,
"date_of_birth": null,
"phone": null,
"status": 1,
"group": {
"id": 2,
"name": "General",
"created_at": null,
"updated_at": null
},
"created_at": "2020-09-28T05:13:42.000000Z",
"updated_at": "2020-09-28T05:13:42.000000Z"
}
}
```
## [#](https://devdocs.bagisto.com/1.x/api/customers.html#profile-details) Profile details
To update the current logged in customer's account information, you need to use the `customer/profile` API call resource.
- Headers
| Key | Value | Info |
| ------------- | --------------------- | ------------------------------------ |
| Accept | application/json | |
| Authorization | Bearer `token-string` | Use only when you pass `?token=true` |
- Request
`PUT /api/customer/profile`
- Params
| Name | Info | Type |
| ------------- | ------------- | ------ |
| first_name | First Name | String |
| last_name | Last Name | String |
| gender | Gender | String |
| date_of_birth | Date Of Birth | Date |
| email | E-Mail | String |
| password | Password | String |
### [#](https://devdocs.bagisto.com/1.x/api/customers.html#examples-4) Examples
#### [#](https://devdocs.bagisto.com/1.x/api/customers.html#_1-updating-current-logged-in-user) 1\. Updating current logged in user
- Headers
| Key | Value | Info |
| ------------- | --------------------- | ------------------------------------ |
| Accept | application/json | |
| Authorization | Bearer `token-string` | Use only when you pass `?token=true` |
- Request
`PUT http(s)://example.com/api/customer/profile`
- Params
| Name | Value |
| ---------- | ---------------- |
| first_name | John |
| last_name | Doe |
| name | John Doe |
| email | john@example.com |
Response
```
{
"message": "Your account has been updated successfully.",
"data": {...}
}
```
## [#](https://devdocs.bagisto.com/1.x/api/customers.html#logout) Logout
You can logout the customer from the Bagisto store with the help of `customer/logout` resources. No need to provide any request payload in the API call.
- Headers
| Key | Value | Info |
| ------------- | --------------------- | ------------------------------------ |
| Accept | application/json | |
| Authorization | Bearer `token-string` | Use only when you pass `?token=true` |
- Request
`GET /api/customer/logout`
### [#](https://devdocs.bagisto.com/1.x/api/customers.html#examples-5) Examples
- Request
`GET http(s)://example.com/api/customer/logout`
Response
```
{
"message": "Logged out successfully!"
}
```
## [#](https://devdocs.bagisto.com/1.x/api/customers.html#reset-password) Reset password
You can also use the API to reset the customer's password by providing the valid customer's email address. In this API request, you have to use the `customer/forgot-password` resource with `email` as a request payload. An email will be sent on the provided email address, only if the same email address exists in the Bagisto store.
- Headers
| Key | Value |
| ------ | ---------------- |
| Accept | application/json |
- Request
`POST /api/customer/forgot-password`
- Params
| Name | Info | Type |
| ----- | ----- | ------ |
| email | Email | String |
### [#](https://devdocs.bagisto.com/1.x/api/customers.html#examples-6) Examples
#### [#](https://devdocs.bagisto.com/1.x/api/customers.html#_1-let-s-try-the-customer-forgot-password-request) 1\. Let's try the customer forgot password request
- Headers
| Key | Value |
| ------ | ---------------- |
| Accept | application/json |
- Request
`GET http(s)://example.com/api/customer/forgot-password`
- Params
| Name | Value |
| ----- | ---------------- |
| email | john@example.com |
Response
```
{
"message": "We have e-mailed your password reset link!"
}
```
#### [#](https://devdocs.bagisto.com/1.x/api/customers.html#_2-in-case-you-provide-an-invalid-or-unregistered-email-address-then-no-email-will-be-sent-to-the-provided-email-address) 2\. In case you provide an invalid or unregistered email address, then no email will be sent to the provided email address
- Headers
| Key | Value |
| ------ | ---------------- |
| Accept | application/json |
- Request
`GET http(s)://example.com/api/customer/forgot-password`
- Params
| Name | Value |
| ----- | ----------------- |
| email | peter@example.com |
Response
```
{
"error": "We can't find a user with that e-mail address."
}
```
[Authentication](https://devdocs.bagisto.com/1.x/api/getting-started-with-the-api.html)[Locales](https://devdocs.bagisto.com/1.x/api/locales.html)
## Bagisto Shipment API
Heads up: You are viewing outdated documentation for Bagisto. Please consider upgrading to [v2.3](https://devdocs.bagisto.com/2.3/prologue) for the latest information.
# [#](https://devdocs.bagisto.com/1.x/api/shipments.html#shipments) Shipments
In this section, we will check all the shipments' API.
## [#](https://devdocs.bagisto.com/1.x/api/shipments.html#get-shipments-from-all-orders) Get shipments from all orders
You can get all the shipments of the Bagisto store. To get the shipments of the store, the customer must be logged in to the Bagisto store. You can achieve this job by using the `shipments` API call resource.
- Headers
| Key | Value | Info |
| ------------- | --------------------- | ------------------------------------ |
| Accept | application/json | |
| Authorization | Bearer `token-string` | Use only when you pass `?token=true` |
- Request
`GET /api/shipments(?limit,page,pagination)`
- Params
| Name | Info | Type |
| ---------- | -------------------------------------------- | ------ |
| limit | Maximum number of records in each request | Number |
| page | Records for specific page based on the limit | Number |
| pagination | Will display all the records if set to `0` | Number |
TIP
If you are using pagination and want to know more info about responses then check the [explanation](https://devdocs.bagisto.com/1.x/api/explanation) portion.
### [#](https://devdocs.bagisto.com/1.x/api/shipments.html#examples) Examples
#### [#](https://devdocs.bagisto.com/1.x/api/shipments.html#_1-get-all-shipments-with-pagination) 1\. Get all shipments with pagination
- Headers
| Key | Value | Info |
| ------------- | --------------------- | ------------------------------------ |
| Accept | application/json | |
| Authorization | Bearer `token-string` | Use only when you pass `?token=true` |
- Request
`GET http(s)://example.com/api/shipments?page=1`
TIP
If you didn't use the page (?page=x) filter, then it returns the data of the first page by default.
`GET http(s)://example.com/api/shipments`
Response
```
{
"data": [\
{\
"id": 1,\
"total_qty": 2,\
"total_weight": null,\
"carrier_title": "DHL Shipping",\
"track_number": "1234566",\
"customer": {...},\
"inventory_source": {\
"id": 1,\
"name": "Default",\
"contact_name": "Detroit Warehouse",\
"contact_email": "warehouse@example.com",\
"contact_number": "1234567899",\
"country": "US",\
"state": "MI",\
"city": "Detroit",\
"street": "12th Street",\
"postcode": "48127",\
},\
"items": [{...},{...}]\
}\
],
"links": {...},
"meta": {...}
}
```
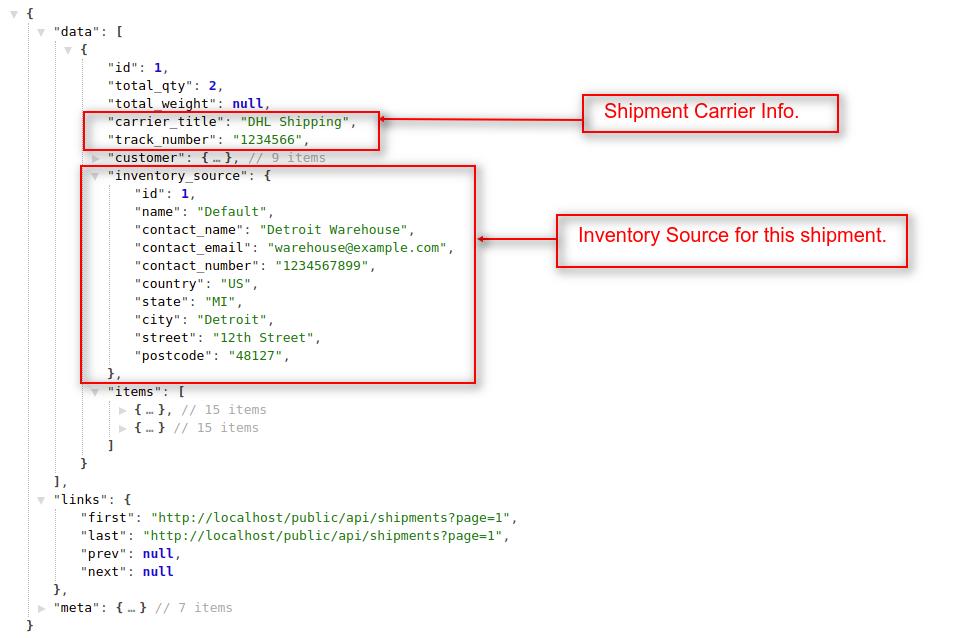
#### [#](https://devdocs.bagisto.com/1.x/api/shipments.html#_2-get-all-shipments-without-pagination) 2\. Get all shipments without pagination
- Headers
| Key | Value | Info |
| ------------- | --------------------- | ------------------------------------ |
| Accept | application/json | |
| Authorization | Bearer `token-string` | Use only when you pass `?token=true` |
- Request
`GET http(s)://example.com/api/shipments?pagination=0`
Response
```
{
"data": [\
{\
"id": 1,\
"total_qty": 2,\
"total_weight": null,\
"carrier_title": "DHL Shipping",\
"track_number": "1234566",\
"customer": {...},\
"inventory_source": {\
"id": 1,\
"name": "Default",\
"contact_name": "Detroit Warehouse",\
"contact_email": "warehouse@example.com",\
"contact_number": "1234567899",\
"country": "US",\
"state": "MI",\
"city": "Detroit",\
"street": "12th Street",\
"postcode": "48127",\
},\
"items": [{...},{...}]\
},\
{...},\
{...},\
{...},\
...\
{...}\
]
}
```
## [#](https://devdocs.bagisto.com/1.x/api/shipments.html#get-shipments-by-order-s-id) Get shipments by order's id
To get the details of a specific order's shipment, you have to pass an `order_id` as a query parameter in API URL. By using this resource and query parameter, you will get only a single shipment detail in API response based on the provided `order_id`.
- Headers
| Key | Value | Info |
| ------------- | --------------------- | ------------------------------------ |
| Accept | application/json | |
| Authorization | Bearer `token-string` | Use only when you pass `?token=true` |
- Request
`GET /api/shipments(?order_id,limit,page,pagination)`
- Params
| Name | Info | Type |
| ---------- | -------------------------------------------- | ------ |
| order_id | Order's ID | Number |
| limit | Maximum number of records in each request | Number |
| page | Records for specific page based on the limit | Number |
| pagination | Will display all the records if set to `0` | Number |
### [#](https://devdocs.bagisto.com/1.x/api/shipments.html#examples-2) Examples
#### [#](https://devdocs.bagisto.com/1.x/api/shipments.html#_1-get-all-shipments-by-order-s-id) 1\. Get all shipments by order's id
- Headers
| Key | Value | Info |
| ------------- | --------------------- | ------------------------------------ |
| Accept | application/json | |
| Authorization | Bearer `token-string` | Use only when you pass `?token=true` |
- Request
`GET http(s)://example.com/api/shipments?order_id=3&pagination=0`
Response
```
{
"data": [\
{\
"id": 1,\
"total_qty": 2,\
"total_weight": null,\
"carrier_code": null,\
"carrier_title": "DHL Shipping",\
"track_number": "1234566",\
"customer": {...},\
"inventory_source": {...},\
"items": [\
{...},\
{...}\
]\
}\
],
}
```
#### [#](https://devdocs.bagisto.com/1.x/api/shipments.html#_2-get-all-shipments-by-order-s-id-for-specific-page) 2\. Get all shipments by order's id for specific page
- Headers
| Key | Value | Info |
| ------------- | --------------------- | ------------------------------------ |
| Accept | application/json | |
| Authorization | Bearer `token-string` | Use only when you pass `?token=true` |
- Request
`GET http(s)://example.com/api/shipments?order_id=3&page=1`
TIP
If you didn't use the page (?page=x) filter, then it returns the data of the first page by default.
`GET http(s)://example.com/api/shipments?order_id=3`
Response
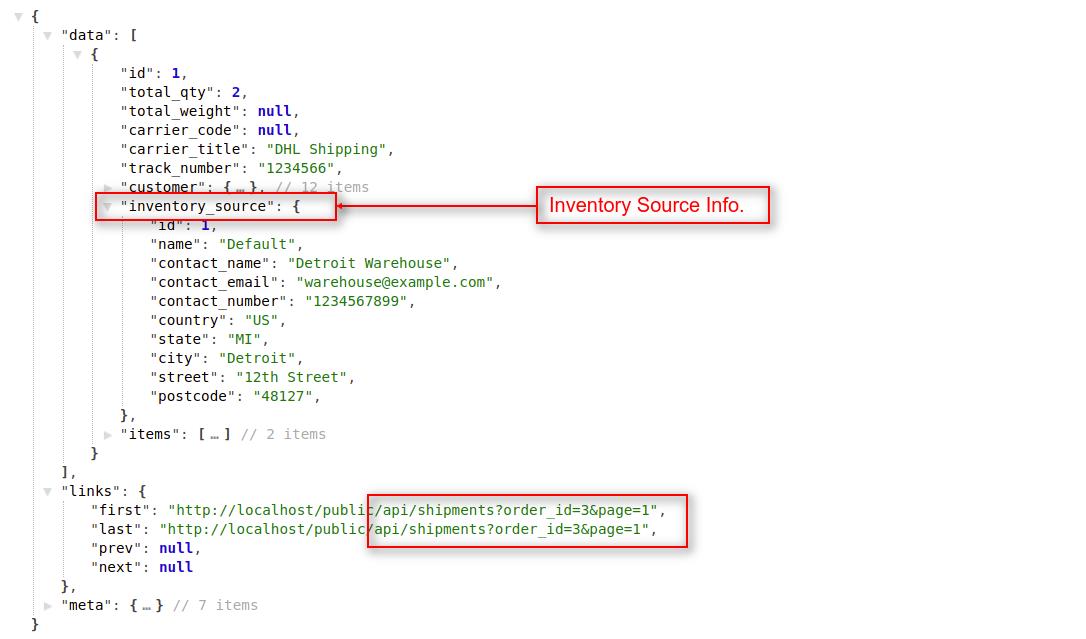
## [#](https://devdocs.bagisto.com/1.x/api/shipments.html#get-shipment-by-id) Get shipment by id
To get the details of a specific shipment, you have to pass a `shipment_id` as a request payload in the API URL.
- Headers
| Key | Value | Info |
| ------------- | --------------------- | ------------------------------------ |
| Accept | application/json | |
| Authorization | Bearer `token-string` | Use only when you pass `?token=true` |
- Request
`GET http(s)://example.com/api/shipments/{id}`
### [#](https://devdocs.bagisto.com/1.x/api/shipments.html#examples-3) Examples
#### [#](https://devdocs.bagisto.com/1.x/api/shipments.html#_1-let-s-fetch-specific-shipment) 1\. Let's fetch specific shipment
- Headers
| Key | Value | Info |
| ------------- | --------------------- | ------------------------------------ |
| Accept | application/json | |
| Authorization | Bearer `token-string` | Use only when you pass `?token=true` |
- Request
`GET http(s)://example.com/api/shipments/1`
Response
```
{
"data": {
"id": 1,
"total_qty": 2,
"total_weight": null,
"carrier_code": null,
"carrier_title": "DHL Shipping",
"track_number": "1234566",
"email_sent": 0,
"customer": {...},
"inventory_source": {...},
"items": [\
{...},\
{...}\
]
}
}
```
[Invoices](https://devdocs.bagisto.com/1.x/api/invoices.html)[Transactions](https://devdocs.bagisto.com/1.x/api/transactions.html)
## Bagisto Upgrade Guide
This is the documentation for the current version (v2.3) of Bagisto. Stay informed and make the most of Bagisto's capabilities.
# [#](https://devdocs.bagisto.com/2.3/prologue/upgrade-guide.html#upgrade-guide) Upgrade Guide
- [Upgrade Steps](https://devdocs.bagisto.com/2.3/prologue/upgrade-guide.html#upgrade-steps)
- [New Changes](https://devdocs.bagisto.com/2.3/prologue/upgrade-guide.html#new-changes)
## [#](https://devdocs.bagisto.com/2.3/prologue/upgrade-guide.html#upgrade-steps) Upgrade Steps
To upgrade your current version to the latest version of Bagisto, follow these steps:
1. Download the latest version of Bagisto from one of the following links:
- [Download From Official Bagisto Site(opens new window)](https://bagisto.com/en/download/)
- [Download From GitHub(opens new window)](https://github.com/bagisto/bagisto)
2. Extract the downloaded Bagisto zip file to the desired deployment location.
3. Open the terminal and navigate to the root folder of the extracted Bagisto folder.
4. Run the following command in the terminal:
```
composer create-project
```
This command will install the necessary dependencies for the latest version of Bagisto.
5. Open the **`.env`** file in your project's root folder. Provide the database credentials of your old project, which you want to upgrade using Bagisto.
6. Run one of the following commands to cache the new changes:
```
php artisan optimize
# -- OR --
php artisan config:cache
```
These commands will cache the configuration files and optimize the project.
7. Now, your project is ready to run the migration command. Execute the following command in the terminal:
```
php artisan migrate
```
WARNING
Be cautious when using the seeder command as it may reset settings and categories. Add default settings manually if necessary.
8. Create a symbolic link to link public assets to the storage folder by running the following command:
```
php artisan storage:link
```
9. Copy the contents of the previous version's folder (e.g., **`old-project/storage/app/public`**) to the corresponding folder in the latest version (e.g., **`new-project/storage/app/public`**).
TIP
If your existing project depends on local storage, has changed paths, or requires previous logs, ensure to include those as well.
10. Once the copying is complete, publish the new files by running the following command:
```
php artisan vendor:publish --all
```
WARNING
Avoid using the **`--force`** flag, as it will reset all your views. Only use it if you understand the consequences.
11. Congratulations! Your project is now upgraded to the latest version of Bagisto. However, keep in mind that if you have made significant customizations, ensure compatibility with the latest version.
## [#](https://devdocs.bagisto.com/2.3/prologue/upgrade-guide.html#new-changes) New Changes
We are excited to introduce the latest stable version of Bagisto, featuring numerous enhancements and improvements. Below are the key changes implemented from the master version to the upcoming release.
For a detailed list of changes, please visit the [Bagisto CHANGELOG.md on GitHub(opens new window)](https://github.com/bagisto/bagisto/blob/2.3/CHANGELOG.md).
To ensure a smooth transition to this new version, we have prepared a comprehensive upgrade guide.
You can find the full upgrade instructions here: [Bagisto UPGRADE.md on GitHub(opens new window)](https://github.com/bagisto/bagisto/blob/2.3/UPGRADE.md).
[Prologue](https://devdocs.bagisto.com/2.3/prologue)[Contribution Guide](https://devdocs.bagisto.com/2.3/prologue/contribution-guide.html)
## Bagisto Contribution Guide
This is the documentation for the current version (v2.3) of Bagisto. Stay informed and make the most of Bagisto's capabilities.
# [#](https://devdocs.bagisto.com/2.3/prologue/contribution-guide.html#contribution-guide) Contribution Guide
- [Bug Reports](https://devdocs.bagisto.com/2.3/prologue/contribution-guide.html#bug-reports)
- [Projects to Contribute](https://devdocs.bagisto.com/2.3/prologue/contribution-guide.html#projects-to-contribute)
- [Feature Requests](https://devdocs.bagisto.com/2.3/prologue/contribution-guide.html#feature-requests)
- [Branch Selection](https://devdocs.bagisto.com/2.3/prologue/contribution-guide.html#branch-selection)
- [Compiled Assets](https://devdocs.bagisto.com/2.3/prologue/contribution-guide.html#compiled-assets)
- [Tailwind Class Reordering](https://devdocs.bagisto.com/2.3/prologue/contribution-guide.html#tailwind-class-reordering)
- [Pint Tests](https://devdocs.bagisto.com/2.3/prologue/contribution-guide.html#pint-tests)
- [Security Vulnerabilities](https://devdocs.bagisto.com/2.3/prologue/contribution-guide.html#security-vulnerabilities)
- [Coding Style](https://devdocs.bagisto.com/2.3/prologue/contribution-guide.html#coding-style)
- [PHPDoc](https://devdocs.bagisto.com/2.3/prologue/contribution-guide.html#phpdoc)
## [#](https://devdocs.bagisto.com/2.3/prologue/contribution-guide.html#bug-reports) Bug Reports
At Bagisto, we highly value active collaboration among our community members to continually enhance our platform's performance and reliability. To facilitate this collaborative effort, we extend a warm invitation to both report bugs and submit pull requests.
Rather than solely reporting bugs, we encourage you to take an active role in resolving issues by submitting pull requests containing fixes or negative test cases that effectively highlight the problem. This approach not only identifies issues but also provides practical solutions for their resolution.
When filing a bug report, we kindly request you to include a clear and descriptive title, along with a detailed description of the encountered problem. Additionally, please provide as much relevant information as possible, including a code sample that can reproduce the bug. Such comprehensive reports significantly expedite the troubleshooting process and enable swift resolution.
It is our collective goal to foster collaboration and find effective solutions to the challenges encountered. By actively participating in bug reporting, you not only engage fellow community members in problem-solving but also contribute significantly to the ongoing enhancement of the Bagisto project.
## [#](https://devdocs.bagisto.com/2.3/prologue/contribution-guide.html#projects-to-contribute) Projects to Contribute
You can contribute to the following projects:
- Bagisto
- Bagisto docs
- Bagisto rest-api
- Bagisto booking-product
- Bagisto laravel-data-faker
- Laravel-aliexpress-dropship
- Laravel-aliexpress-dropship-chrome-extension
- Bagisto-custom-style-extension
## [#](https://devdocs.bagisto.com/2.3/prologue/contribution-guide.html#feature-requests) Feature Requests
We welcome proposals for new features and enhancements to the existing Bagisto app. If you have a new feature in mind, please be prepared to contribute some of the code required to implement it.
## [#](https://devdocs.bagisto.com/2.3/prologue/contribution-guide.html#branch-selection) Branch Selection
Before submitting a pull request, it's important to consider the following points to help you choose the appropriate branch:
- **Bug Fixes**: If you're fixing a bug, make sure to port the fix to the master version.
- **Critical Bug Fixes**: If you're fixing a critical bug, make sure to port the fix to the latest stable version that supports it (currently v2.3).
- **Feature Requests**: If your request involves a feature with potential breaking changes, send it to the master branch, which corresponds to the upcoming release (v2.x).
## [#](https://devdocs.bagisto.com/2.3/prologue/contribution-guide.html#compiled-assets) Compiled Assets
To determine the sorting order for Tailwind CSS classes, consult the official Tailwind CSS documentation for guidelines on class organization. Additionally, consider using the Tailwind Raw Reorder extension for VS Code to streamline the sorting process.
## [#](https://devdocs.bagisto.com/2.3/prologue/contribution-guide.html#tailwind-class-reordering) Tailwind Class Reordering
When making changes to blade files that utilize Tailwind CSS classes, it's essential to maintain consistency and organization. Tailwind CSS classes should be ordered according to a predefined structure to enhance readability and maintain a clean codebase.
To determine how Tailwind CSS classes should be sorted, refer to the official Tailwind CSS documentation for guidelines on class ordering.
[Class Reordering(opens new window)](https://tailwindcss.com/blog/automatic-class-sorting-with-prettier#how-classes-are-sorted)
## [#](https://devdocs.bagisto.com/2.3/prologue/contribution-guide.html#pint-tests) Pint Tests
Pint tests are an essential part of ensuring the quality and reliability of code changes in Bagisto. When making changes to the code, ensure that all Pint tests pass before submitting your pull request.Before submitting your changes, run the Pint tests locally to verify that all test cases pass. It is important to confirm that the modifications do not cause any Pint test failures or regressions.
- To run the Pint tests locally, execute the following command in your terminal:
```
vendor/bin/pint
```
## [#](https://devdocs.bagisto.com/2.3/prologue/contribution-guide.html#security-vulnerabilities) Security Vulnerabilities
If you discover a security vulnerability within Bagisto, please notify us immediately by sending an email to Jitendra Singh at [jitendra@webkul.in](mailto:jitendra@webkul.in). We take security vulnerabilities seriously and will address them promptly.
## [#](https://devdocs.bagisto.com/2.3/prologue/contribution-guide.html#coding-style) Coding Style
Bagisto follows the [PSR-2(opens new window)](https://github.com/php-fig/fig-standards/blob/master/accepted/PSR-2-coding-style-guide.md) coding standard and the [PSR-4(opens new window)](https://github.com/php-fig/fig-standards/blob/master/accepted/PSR-4-autoloader.md) autoloading standard. These standards ensure consistency and readability in the codebase, similar to Laravel.
## [#](https://devdocs.bagisto.com/2.3/prologue/contribution-guide.html#phpdoc) PHPDoc
Below is an example of a valid Bagisto doc block that follows the coding style:
```
/**
* Register a service with CoreServiceProvider.
*
* @param string|array $loader
* @param \Closure|string|null $concrete
* @param bool $shared
*/
protected function registerFacades($loader, $concrete = null, $shared = false): void
{
//
}
```
[Upgrade Guide](https://devdocs.bagisto.com/2.3/prologue/upgrade-guide.html)[Introduction](https://devdocs.bagisto.com/2.3/introduction)